Pages

Showing posts with label Charity. Show all posts

Sunday, October 13, 2019

WIP Charity Top: Jordan Fabrics How to Cut A Rail Fence Quilt

I've never made a rail fence quilt.  September is charity top day at my once a month group, so since I had found this YouTube, Jordan Fabrics How to Cut A Rail Fence Quilt, I decide to find some fabric and make a top.  Several people were also looking thru the fabric, so I think that part could have gone quicker, but it was nice to chat to folks.  I found four fabrics each about 19 inches wide and started cutting 2.5 inch strips.  I followed his tips and cut several fabrics at the same time.  I subcut those into 8.5 inch strips and got to sewing the blocks.  At the end I needed more of the darker blue.  I was going to use some different fabric, but then I discovered that I could piece together enough to make the final strip.

It's unusual for me to follow directions!  I cut the fabric for a top all at the same time, used only a few fabrics, and cut several fabrics at the same time.

It felt like I was working rather quickly, but I'm not sure...  I think it took about five hours for me to get this top pieced (including picking the fabric, ironing, cutting, sewing, chatting).  Unfortunately, I did not pick out backing fabric, so I was not able to get the batting for the quilt.  But I'll get that and work on it the next Saturday group that I can attend. Gosh, that won't be until January.  : (  But at least it's a start of a charity quilt!

Since I have more time, think I'll add some borders to make the quilt a little larger than 40 inch square.


Monday, April 1, 2019

A Finish: Red Charity Quilt

I finished this quilt up today.  It took around 4ish hours to change the top into a quilt.

The group gave me fleece to use for batting and backing, so it was pretty easy to finish up.  I put the right sides together, then sewed around the outside leaving a space for me to turn the quilt right side out.

At first I was going to keep the right angle corners, but then I decided to curve them out.

I used a saucer to determine the curve, first marked with a pencil, sewed, then cut.


After turning it right side out again I pressed with my fingers to get all the edges oriented so the seam was at the side, rather than with the backing or front showing on the other side.  I put extra pins where the opening was to help keep that in place.

I did a variation of an orange peel design.  This is how I started in the center.


Then it was just a matter of going out one square and finishing the design and stitching around the outside of the piece.

I didn't intend to have the center be off to the side, but I kept going hoping it would look okay in the end.  There was one spot where I deviated from the plan and put an extra loop.  The last two lines I could feel something wasn't right with the thread or tension but when I looked it was okay.  It was only after I pulled it completely off that I saw the two spots with the thread build up.

Added April 18 2019:  Took about 30 minutes to remove the thread buildup, hide the threads and resew the quilting. Looks a lot better now!


It was quick to finish, but I think I prefer working with a binding, then it is easier to go off onto the batting when quilting.  But I'm not sure.  So looking at my notes from the first post on this I guess it took around 8 hours of hands on time with this quilt.  Is that what it would have taken you?

Added April 18, 2019 30 minutes to correct the thread build up issue on the back.

First post on this project here:
https://quiltquest.blogspot.com/2019/03/wip-red-charity-quilt-top-done.html

I used the Singer that Audrey got me from Freecycle and a walking foot for the quilting.

If I do this pattern again I will put two rows around the outside so the points are not lost...

Thursday, March 14, 2019

WIP: Red Charity Quilt - top done!

Took between three and four hours to sew this top up.  I did the sewing in two sessions....

Squares are six inches, I started with two blocks each with 36 squares.  I used the same fabric in the diagonal of the blocks, and arranged the blocks so the same fabric would not line up along any of the six inch seams. (I will bind using the same fabric as the diagonals.)


Then I cut each block along the diagonal, and then sewed on the edge of the diagonal cuts about 1/8 of an inch (to help avoid stretching).

Then I placed the resulting four pieces so the triangles were on the outside of a square. 

And I sewed the pieces together!  Magically I was able to nest all the seams. Only the final connecting seam had to be repressed so it was all in the same direction and flat.

The top is now 46 inches square.  A great size for a charity quilt.  It should be easy for me to quilt and bind.  Now I need to decide how to do the quilting!

But first I need to get back to the gifts for the upcoming baby shower!

I think this link will be a good place to start dreaming:

I see she is giving some workshops in CA soon - maybe a road trip is in order?


WIPs in Progress: String Log Cabins, Red Charity, and Baby Gifts and Just Get It Done Winner!

Well, I have been busy.  But nothing is complete, yet...

I made more of the strings that will surround the UANDUQAL wonky log cabin with strings quilt.  Was all set to finalize the placement of the blocks, and then received an invitation to a baby shower of a friend's daughter second baby.  I wasn't able to attend the first shower a few years ago when I came down with the shingles (diagnosed when I went to the doctor to receive the shingles shot!).  I never finished that quilt and instead gave her a little gift meant to be a place saver until I finished the quilt.  I reread my notes and see that I used the wrong colors in the blocks I was putting together (but having trouble cutting the final square correctly so the seams would line up).

Here are the blocks I have completed for the wonky log cabin with strings. The log cabins  are placed on top of each  other since my design wall wouldn't hold them all.  Project UANDUQAL.

Here is the link to the post about the original baby quilt.  Notice in the words I say she requested (black, grey and if I had to use another color maybe some purple).   I'm not sure how I converted that to black white, and navy blue.  https://quiltquest.blogspot.com/2017/03/wip-baby-quilt-based-on-allpeoplequilts.html  But since I couldn't get the seams to line up I will save these strips and partially completed blocks for another project, another time.  The Wonky Log Cabin with Strings would almost be the correct colors, but the green and the blue knock it off in the running for the now three year old...

I want to have a quilt for both children for the baby shower on March 23rd.

I'm now thinking of finishing the purple, and black Cultural Fusion Windmill for the first child.
https://quiltquest.blogspot.com/2016/03/omg-march-2016-quilting-cultural-fusion.html
To finish it I just need to square it up and apply the binding.  Would be nice to make a pillow cover too.  I was going to send this to my Swedish friend, but since she doesn't know that was my plan I can make another one for her...  I see in my blog notes I saw a problem with the way I did the quilting as the outer lines will be covered by the binding.  Oh dear.

Then for the new baby (a girl) I may either combine my Liberated Floating Yellow Triangle Quilt:
https://quiltquest.blogspot.com/2016/07/a-variety-of-liberated-floating-yellow.html  This would be pretty easy to put together, but I'm unsure if the mom would like all the yellow and white...  Easy but since I'd have to continue inventing the directions it would be time consuming...

Perhaps better yet, use my newly won fabric from Karen at Just Get It Done Quilts (Blog) that I forgot to write about) and make either a square on point quilt or the Moda So Simple pattern.


The beautiful fabric that I won in a random drawing from Karen Brown is amazing!  30 fat quarters!  In her note she said she hoped I would use it in my next project...


I only need 12 fat quarters for the So Simple pattern though so I'm unsure which to use....  I didn't ask The new mother this time what colors she would like as there is a baby registry where I can see what colors she is liking now...  The fabric Karen sent me match all the colors I think!
Not able to come to any decisions on anything,  I have distracted myself with starting a square on point charity quilt...  Testing this will let me know whether it would be a good pattern to make for the baby girl.

Here are the directions I am doing for this quilt.

Cut squares (my long ruler is 6 x 24 so I cut 6 inch squares).  In doing some rough math since I wanted the quilt to finish at around 42 inches square with out any additional border fabric, I needed 72 squares.

I decided to arrange my squares so when finished there would be an outer border of all the same fabric.  So I needed 12 squares of one fabric, and then 60 squares of a combination of fabric.


Originally I was going to divide my fabrics into darks and lights, but then I added some middle shades and ones that were different as they had large designs.  I just added them in but by by coding them as light or dark the six inch seams never joined with the same fabric.  Once the two squares are together then I will cut each on the diagonal and sew together to get my top.

To work on where the squares would end up I put the pieces of fabric on my bed top:
I decided to try not to stress about it and just be happy if it ended up that two of the same fabric would not have a long seam next to another...

Here is what I have after my first sewing session...


So I have been busy, but nothing is completed.

Do make sure to check out Just Get it Done Quilts! 

Thursday, February 8, 2018

Just Checking: Was it the fleece, batting or fmqing design?

After finishing the Put a Little Love in Your Heart Project, I was curious to check if the quilting puffiness dimension was a product of the FMQing or the fleece or the batting.  

I pulled out a charity top made with a different quilt pattern and finished it with the same walking foot quilting design and batting.  Not as puffy, but still a great design...


So it was the fleece that make the Put a Little Love in Your Heart Quilt puffy (and I liked the puffiness for that quilt). But with or with out the puffiness I like this variation of the orange peel quilting design!

This quilt had the binding sewn on the front as I thought I was going to try hand stitching it on the back.  But instead I found some thread that almost matches the rust border and sewed the binding on.  These were 2 inch bias cut strips.  Sewn on the front and then the back with 1/4 inch seam.


Friday, February 24, 2017

WIP: QFK Square Quilt Part 2

When I last wrote, I had finished quilting the major parts of the quilt.

I went back and added a wavy line of quilting so the light green inner square had stitching on both sides.


And I added the outer borders to the piece!  This makes it so it's the correct size for Quilts for Kids.

I just placed the border, and stitched it down.  If you remember I was having a ballooning effect so the borders were removed, so when I replaced the borders I did not go by the edge of the quilt, but rather went where the border strip went when it was placed, this meant that I lost a little of the quilt, but not much.  And now the quilt is flat!

I added a line of stitching so on the back it looks like there is a square in the corners of the piece.

As soon as I put the piece on the table to bury the threads, my friend jumped on the quilt to keep me company.
(She is getting almost too comfortable in the sewing room!)

I do not usually pin, but pinning every three inches helped me keep the border so it covered the quilt seam.  (I didn't pin the second seam and after adding the third border saw that there were a few places where the fabric was not joined correctly.  So I removed the stitches and did it correctly.)  The pinning also helped keep the fabric in position under the batting.


I added a line of stitching just in the batting and backing so there is a corner square. Here you see one corner undone.

I added the stitching so it did not show on the front.  I think the corner on the back will disguise that the extra lines of thread were added when the final border was added.  Will make it more symmetrical.

Here is the front.  The extra stitching doesn't show.   
In this case I knew I had borders to add, but I think this technique could be used to enlarge a quilt when there is extra batting showing at the sides.

Now the piece is ready for the binding.

I named this post Part 2, but there have been many starts with this project.  I'm glad to be closer to finishing it up!

Wednesday, February 22, 2017

WIP: Quilts for Kids Square Quilt

I've blogged about this project before, for such a little project it has gone thru several changes in it's creation.  First it looked sort of like the Nazi symbol, then was redone to be this square.  But it had so many ripples that it was taken apart again and partly sewn back together.  I left the final border off and will add that after the quilting is done...

I did Angie's wavy lines on the larger center square, then went back to cross over them.

Then on the outer triangles I made a design with different types of waves to fill that area in.

I'm really liking the way the wavy lines poof up, and sort of go with the design of the piece too.

In class tomorrow I'm going to ask someone to show me the proper way to tie the threads off.  I've been using the Clover cheater needle that Leah Day recommends, and added a knot after rewatching her video, but the teacher at the class I attend showed a way to pull up a loop so the two threads end at the same place so that would save a lot of time from what I've been doing.


As soon as I finished the initial lines I put it down for a photo and Buffy appeared from thin air and sat right in the middle of the quilt, so I had to take her picture!

Yesterday I took her to Petsmart and they trimmed her nails, brushed her teeth, and cleaned her ears.  Her teeth were so bright afterwards!  I wish they would show me how to brush her teeth but actually they hid her away from me while they did that and the ears.  I'll have to learn from videos posted on the web.  I think it's better to have someone else trim her nails though, it was always stressful when I groomed our cat's nails.  They had a good set up for doing the nails in the front part of the grooming area, and did give me a coupon when I asked if they had any, so I got 15% off the food!  But I'd rather have a set up where I can at least see Buffy all the time whenever she is being groomed.

Buffy is at the far table.
I gave her a bath when we got back, her conditioner makes her hair so soft!

I'm going to look into videos for training dogs too.  She sometimes will run to grab a ball, but doesn't know what to do with it really after that.  It would be fun for her and for me if she would bring the ball to me so I could toss it again for her to retrieve.


Sunday, February 19, 2017

Finish #3 Charity Quilt - Frogs and Wavy Lines with Cool Binding

I finished the quilting on the last charity quilt that I put the bindings on before quilting.  I followed what Angie does for charity quilts and finished with utilitarian wavy lines.  First I put waves in the rust sashings, then I added a rectangle around the outer blocks, and then added a line in the two middle blocks.  This is a nice way to finish the charity quilt.

I really like the faux piping with the little black and white lines and will be looking for more fabric so I can add that to other projects!


Here you can see the cool binding finish!

And here Buffy jumped on the quilt when I brought it downstairs to tie off and bury the threads.  She is such a good helper!
I've been using charity quilts to practice and learn, and I sure have a lot more to master, but I really like Angie's tip to stick with utilitarian stitching at least sometimes so I can finish and move on!.


Saturday, February 18, 2017

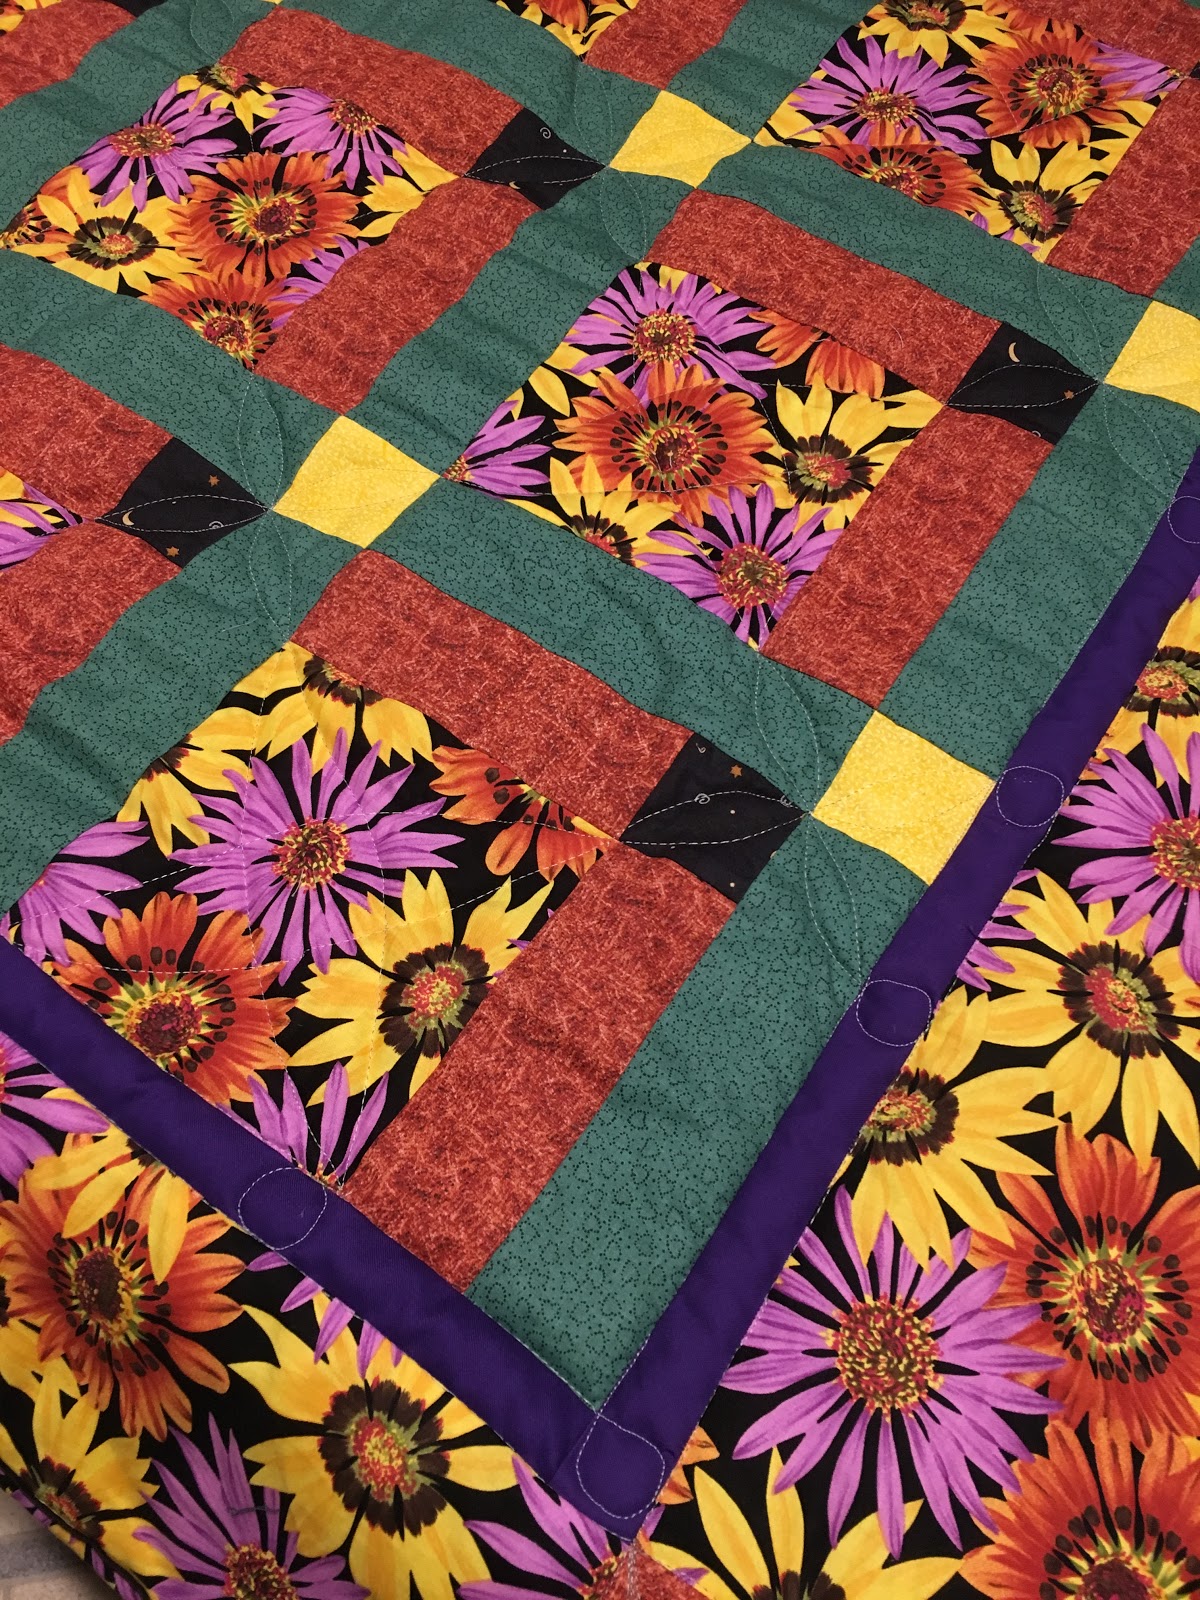
Finish #2 2017 - Charity Quilt

Boy, it's really difficult to show the FMQing on this project!  

It's a variation of an orange peel design.  I started by making the loops on the diagonal starting with the little yellow squares, then the little black ones, then continued to the larger flower blocks - then back again.  Then in the other direction it was green, green and larger flower block and back again.  It made a pretty design on the top.


I went along the inner purple border and went into the border when I hit the tip of quilting described and then made a little circle. I also made a circle in the corners of the purple border.  

On the outside of the purple border I went along and only popped out at the corners.  In the green I made one loop that sort of looks like the design in the inside.  On the rust I made three loops.  I'm not sure why I did this but I did.
 

You can see the faux flange on the binding.  A lady in the group is a long arm quilter she makes a flat faux flange so she can quilt as usual on her long arm by cutting a strip 1 inch, sewing it on at 1/2 inch seam then continuing on with what ever she is putting on (in her case where she was showing me she was adding the faux flange between two borders that were close in the same color).  Anyway that is a way to get the flange effect and be able to have quilted on a long arm!


This was turned into the quilting group for that lady to donate...

I also turned in the 9 patch quilt as you go project!