This month the
Play With Me QAL board game is HEX, so of course the game board is made of hexies.
In the pattern, several methods of making them are explained, but since I'm using denim from old pants, it seemed the traditional English paper piecing would be impossible.
I decided I needed to resize the pattern so the game board wo
uld be more symmetrical, that means I made the hexies so they were smaller. I didn't know enough the beginning to realize it would then make the pieces even more difficult to manage!
I found a lot of help online to get the hex board done with the machine:
Machine Sewn Hexagons - start with perfectly cut shapes.
http://tallgrassprairiestudio.blogspot.com/2012/02/sewing-hexagons-by-machine-without.html
The problem for me was starting with the perfectly cut shapes, but I took her advice and modified to suit the denim...
Start with perfectly cut shapes and draw the seam lines on each piece.
https://katyquilts.net/2013/04/21/machine-piecing-hexagons-tutorial/
http://www.fromthebluechair.com/2012/11/how-to-piece-hexagons-part-2.html
She discusses the placement of the grain of the fabric here:
http://www.fromthebluechair.com/2012/11/how-to-piece-hexagons-part-1.html
Hmm, I thought. Drawing the seams might be just what I need to do! Then it would be easy to start each seam a stitch short so there would be less chance of needed to remove stitches later.
This one suggests sewing the hexagon on facing then turning that inside out and pressing where you want it on the backing:
http://reannalilydesigns.com/2013/01/hexagons-made-easy/
http://www.sewmamasew.com/2014/05/modern-geometric-pillows/
My pieces were too small to even try this!
Making the hexagon look by sewing half hexagons:
http://sewmanyways.blogspot.com/2010/08/machine-sewing-hexagonshalf-hexies-that.html
http://www.polkadotchair.com/2013/10/large-hexagon-quilt-tutorial.html/
http://modernhandcraft.com/2014/10/hexagon-snuggle-quilt/
I thought the extra seams would be too apparent in the end product this time.
Paper Piecing (but sewing straight seams on paper) without folding and ironing:
Derksen, Cori, and Myra Harder. Traditional Quilts to Paper Piece: 14 Small Projects. Woodinville, WA: Martingale, 2003. Print.
I bought a used copy of these from Rodney's in Cambridge last month. Really a neat idea, but I decided to save the technique for different fabric.
Another way would be to sew them directly to the backing - but this method still required folding the fabric over paper first - Very cute and different look when done!
http://modernhandcraft.com/2016/07/quilt-it-modern-hexie-pillows/
http://modernhandcraft.com/2013/11/hexagon-mini-quilt-tutorial/
I was sure some of my denim would be too thick for folding over the paper.
This way you just cut the fabric and sewed on the backing:
http://modernhandcraft.com/2015/01/hexie-pincushion-a-tutorial/
I didn't see this until I had already finished several rows using my primitive draw the outline of the hexit method.
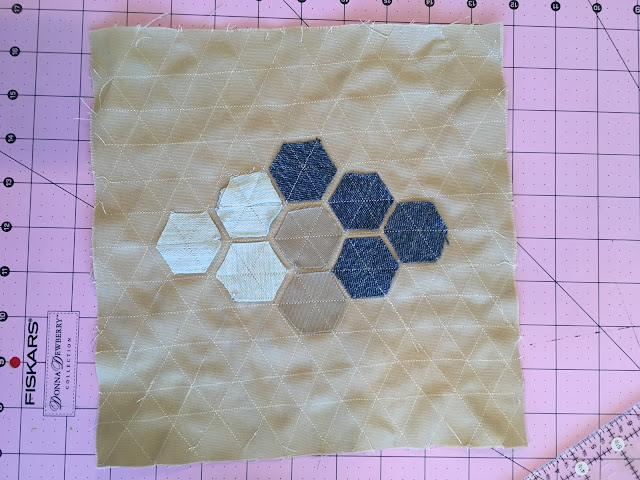
I was afraid I wouldn't get things lined up exactly enough... but the photos on the modernhandcraft.com site were so appealing. I decided I needed to at least test the method.
So I did. I tested the method with a smaller number of hexies and was really pleased with the result. This is something I will try again! (If I hadn't already done so much work on the project I would have switched to this method for the gameboard.)
 |
| I eyeballed all of this. Think how terrific it would be if I premarked the lines! |
Here is a link to a different, easier way perhaps to stitch the hexies down - way different look.
http://lilluna.com/jean-hexagon-pillow/
(Got the link from
http://gnomeangel.com/link-love-illness-slow-stitching/ )
So after this research, here is what I did. (after reading websites and articles about how to play the game)
I printed one that would fit on a regular sheet of paper, drew the line for the game board, and challenged my husband to a game! (Somewhere I read that during WWII people would play paper versions of this game provided by their government or army while waiting for the 'all clear' in underground shelters. I didn't save that link, but it was interesting in a sad way to think about.)
So now I had the game to preserve on the pillow!
The pillow front will be around 18 - 20 inches so the size of the design could be larger than the piece where we played the game. I enlarged and printed two times. I then cut and taped the two pieces so I had a life sized pattern. I transferred the pieces showing the game to be preserved on this pattern.
I decided on my fabrics, made a template to trace the design using the top of a plastic container. I tried tracing with a pencil and pen, but they distorted the fabric too much, so I decided to take advantage of the fabric being so thick and just use a Sharpie.
 |
| Paper pattern, paper game, individual hexies and hexies sewn together in rows (back sides). |
I randomly made outlines on the back of different denim. Then arranged one row to match the colors in my game board. Sewed the straight seam for that row. It didn't look like this was going to work out, but I thought I'd continue until I came up with another way to do it.
I sewed one hexie at a time to the next row for a while. It was really difficult to keep track of what was to be sewn together! So I thought to join the hexies in order for the rest of the row and then join them together. This made it much more manageable!
(Actually I tried using my sashiko needle and thread to join some pieces when I was at a sewing group without a machine. But a smaller needle and or thread would have been better, so I removed what I could and sewed together again with the machine.)
So for the rest of the project I would do that. Sew the eight hexagon pieces together so they were order, then I would start at a place where there were different colors to be joined and sew. Then I'd return to the other side of the colors and continue sewing the row.
 |
| Rows sewn together on the flat sides, paper pattern, and right side of sewn rows. |
To help ensure the matching of the intersections and to help me keep track of which seam I was sewing, I placed two pins at the start and end of each seam. (I put them in by looking at the drawn lines on each side.)
 |
| Backside showing next seam to be sewn. Pins matched on both sides of the drawn lines placed to show me where to sew. |
I would place the piece under the machine and lower the needle, then would remove the first pin before starting to sew.
 |
| About to put the needle down and remove the pin. |
At first this was very difficult for me to do, and not fun at all. I'm not sure if it ever would be fun, but it was very do-able and I am pleased at how it looks at this point. This would not work for a quilt as it would be too bumpy, but for a pillow in the game board series will be very nice.
 |
| Front side of the piece without borders. |
But now I need to work on the borders for the game board! At first I didn't think the borders would be important, but for the game it's important to show the players the sides of the board they have to start and end.
First I was going to just trace the pattern on a strip of fabric and sew each seam as I had done before...
But I lost my confidence, so went back to making individual hexagons and sewing things together.
!! If I do this again I will simply add the ends when doing each row!!
 |
| Nine hexies in each black row. The coloring didn't make it clear that the corners could belong to either player. |
The last two rows were easy to add. I was starting to think ahead for how I was going to add the rest of the pillow front to the game board. But something wasn't right. There were more hexies in each of those rows.
There was several hexies removed and replaced, and removed and replaced, but finally I settled on making two hexies that were half of each color and then placing them in the larger angles of the piece. (So all the border sides have 8 1/2 cells of a color.)
First I put a border around the game board. Then I cut two rectangles - and then cut them on the diagonal and sewed those on the piece. I made a template to help me with the size of the front of the pillow, pinned that down and then cut the piece.
I am behind with making several of my game boards into pillows, but that is still the plan.
I have admired hexie quilts for a long time. I know I didn't do this in the correct way. It seemed more important to make it using the denim for this project. I don't think I ever would have put this on my bucket list, and even if I do not make another one (with regular cotton and larger pieces) I have a new found appreciation and amazement at the work done by others.
You can see how the others in the
quilt a long have done their hexie game boards. You can still join the quilt a long for the final months of the adventure.