Saturday, February 25, 2017

Finish #4 QFK Charity: Square Green Quilt

Binding on, this quilt is finished!

I'm very happy with the charity quilt.  I like the free form wavy line quilting, the way the added border looks on the front and the back, the way the corners have the extra line of stitching so it makes a square on the back, the way the binding went on so easily too.

Maybe I'm getting the hang of this!

4th finish for 2017!


Thank you again Angie @ http://quiltingreadersgarden.blogspot.com/ 
Really like the wavy lines for charity quilts!


Friday, February 24, 2017

WIP: QFK Square Quilt Part 2

When I last wrote, I had finished quilting the major parts of the quilt.

I went back and added a wavy line of quilting so the light green inner square had stitching on both sides.


And I added the outer borders to the piece!  This makes it so it's the correct size for Quilts for Kids.

I just placed the border, and stitched it down.  If you remember I was having a ballooning effect so the borders were removed, so when I replaced the borders I did not go by the edge of the quilt, but rather went where the border strip went when it was placed, this meant that I lost a little of the quilt, but not much.  And now the quilt is flat!

I added a line of stitching so on the back it looks like there is a square in the corners of the piece.

As soon as I put the piece on the table to bury the threads, my friend jumped on the quilt to keep me company.
(She is getting almost too comfortable in the sewing room!)

I do not usually pin, but pinning every three inches helped me keep the border so it covered the quilt seam.  (I didn't pin the second seam and after adding the third border saw that there were a few places where the fabric was not joined correctly.  So I removed the stitches and did it correctly.)  The pinning also helped keep the fabric in position under the batting.


I added a line of stitching just in the batting and backing so there is a corner square. Here you see one corner undone.

I added the stitching so it did not show on the front.  I think the corner on the back will disguise that the extra lines of thread were added when the final border was added.  Will make it more symmetrical.

Here is the front.  The extra stitching doesn't show.   
In this case I knew I had borders to add, but I think this technique could be used to enlarge a quilt when there is extra batting showing at the sides.

Now the piece is ready for the binding.

I named this post Part 2, but there have been many starts with this project.  I'm glad to be closer to finishing it up!

Wednesday, February 22, 2017

WIP: Quilts for Kids Square Quilt

I've blogged about this project before, for such a little project it has gone thru several changes in it's creation.  First it looked sort of like the Nazi symbol, then was redone to be this square.  But it had so many ripples that it was taken apart again and partly sewn back together.  I left the final border off and will add that after the quilting is done...

I did Angie's wavy lines on the larger center square, then went back to cross over them.

Then on the outer triangles I made a design with different types of waves to fill that area in.

I'm really liking the way the wavy lines poof up, and sort of go with the design of the piece too.

In class tomorrow I'm going to ask someone to show me the proper way to tie the threads off.  I've been using the Clover cheater needle that Leah Day recommends, and added a knot after rewatching her video, but the teacher at the class I attend showed a way to pull up a loop so the two threads end at the same place so that would save a lot of time from what I've been doing.


As soon as I finished the initial lines I put it down for a photo and Buffy appeared from thin air and sat right in the middle of the quilt, so I had to take her picture!

Yesterday I took her to Petsmart and they trimmed her nails, brushed her teeth, and cleaned her ears.  Her teeth were so bright afterwards!  I wish they would show me how to brush her teeth but actually they hid her away from me while they did that and the ears.  I'll have to learn from videos posted on the web.  I think it's better to have someone else trim her nails though, it was always stressful when I groomed our cat's nails.  They had a good set up for doing the nails in the front part of the grooming area, and did give me a coupon when I asked if they had any, so I got 15% off the food!  But I'd rather have a set up where I can at least see Buffy all the time whenever she is being groomed.

Buffy is at the far table.
I gave her a bath when we got back, her conditioner makes her hair so soft!

I'm going to look into videos for training dogs too.  She sometimes will run to grab a ball, but doesn't know what to do with it really after that.  It would be fun for her and for me if she would bring the ball to me so I could toss it again for her to retrieve.


RSC17: February - Aqua

Pulled out my aqua fabric.  I have some nice yards and half yards waiting for another project, but I did have some aqua scraps from either previous projects, or people had gifted me with them....

So I sewed some together for the Rainbow Scrap Challenge!


I'm not exactly sure what I'm going to do with these, but will decide on something at the end of the challenge.

The other folks in the challenge have some beautiful projects they are working on - hope you will click to go see them!


Sunday, February 19, 2017

Finish #3 Charity Quilt - Frogs and Wavy Lines with Cool Binding

I finished the quilting on the last charity quilt that I put the bindings on before quilting.  I followed what Angie does for charity quilts and finished with utilitarian wavy lines.  First I put waves in the rust sashings, then I added a rectangle around the outer blocks, and then added a line in the two middle blocks.  This is a nice way to finish the charity quilt.

I really like the faux piping with the little black and white lines and will be looking for more fabric so I can add that to other projects!


Here you can see the cool binding finish!

And here Buffy jumped on the quilt when I brought it downstairs to tie off and bury the threads.  She is such a good helper!
I've been using charity quilts to practice and learn, and I sure have a lot more to master, but I really like Angie's tip to stick with utilitarian stitching at least sometimes so I can finish and move on!.


Saturday, February 18, 2017

Surprise: A Quilting Reader's Garden Fat Quarter

I returned from my monthly quilting group session and checked my email and found I had been picked to get a fat quarter from A Quilting Reader's Garden.

How fun is that?  I think yellow or white would be a good color to insert in a project...

Thank you Angie!

-----------

At quilt group I actually brought in a sewing machine that I hadn't used in a long time, and for another surprise it works perfectly!  I guess I stopped using it when I got the new 1/4 inch foot for the new Brother that I have at home.

So I had brought a bunch of assorted charms that I had either won in drawings, cut myself with rotary or with a Studio Go.  So I got organized and started sewing them up into 4 patches.  One of the ladies showed me how to get the center of the patches so a mini-4 patch appears on the back, but I wasn't successful with getting that to work for me for all the patches.  She said it would help reduce the number of thicknesses of the fabric when I was quilting the project.

And I got distracted so I wasn't consistent with how I put together the blocks.  Oh well.

I put them on the living room floor to take a photo and Buffy returned from her walk and I forgot what I was doing so you don't see them all in this photo...  But you can see her tail is wagging!


Except for two of the 4 patches, they each have the same fabric in the lower right of the block.

: )


Finish #2 2017 - Charity Quilt

Boy, it's really difficult to show the FMQing on this project!  

It's a variation of an orange peel design.  I started by making the loops on the diagonal starting with the little yellow squares, then the little black ones, then continued to the larger flower blocks - then back again.  Then in the other direction it was green, green and larger flower block and back again.  It made a pretty design on the top.


I went along the inner purple border and went into the border when I hit the tip of quilting described and then made a little circle. I also made a circle in the corners of the purple border.  

On the outside of the purple border I went along and only popped out at the corners.  In the green I made one loop that sort of looks like the design in the inside.  On the rust I made three loops.  I'm not sure why I did this but I did.
 

You can see the faux flange on the binding.  A lady in the group is a long arm quilter she makes a flat faux flange so she can quilt as usual on her long arm by cutting a strip 1 inch, sewing it on at 1/2 inch seam then continuing on with what ever she is putting on (in her case where she was showing me she was adding the faux flange between two borders that were close in the same color).  Anyway that is a way to get the flange effect and be able to have quilted on a long arm!


This was turned into the quilting group for that lady to donate...

I also turned in the 9 patch quilt as you go project!

Wednesday, February 15, 2017

Grapefruit

I'm been making more grapefruit marmalade.

Packed some up and sent to friends and relatives back east along with a package of Alternative Bagels.  (I'm lucky I can pick these up at a sort of local store.)

I keep charts of how much fruit I put in the pressure cooker, how long it cooks.  Reminders to get the next set of supplies in order.  Weigh and put in sugar, and little package of the recovered grapefruit seeds.  Have ended up cooking at low saute for 30 minutes, then about 10 minutes of medium saute and then end up with 10 minutes of high.  The original recipe was for 2 pounds of fruit and only 7 minutes of high saute, I've ended up with 5 pounds of fruit and the additional cooking mentioned above.  Each time something seems to change.

I taste the mixture after the 30 minutes and need to add sugar.  Sometimes.

I always need to stir at high, sometimes and medium, and sometimes even at low saute.

The color of the marmalade is now usually golden, but when we have tasted the darker versions seems the taste is the same. ???  Have made 18 batches of marmalade!

My addition of cutting old wash cloths in thirds so I can wrap each bottle as it goes in the water has really helped with preventing the jars from hitting each other, and make it easier to insert, and remover from the water.  They make easy the final cleaning of the lip of the jar too.

------------

There are still more fruit to process!  I have a 5 gallon bucket in the frig and there are more fruit on the tree not ready to pick.

------------

Was so concentrating on marmalade that I forgot that one could just juice it.  So today I used the citrus juicer my mom left me to make morning juice, then I removed the rest of the fruit and some of the white and cut 1/4 inch strips.

Have been boiling that.  The recipe I found suggested boiling and changing the water three times.  Then to add sugar and boil - then to lay out the strips and let it all dry.  I think sprinkling some sugar on the top.  Then we will have sugared grapefruit skins.  If needed I'll dip in the dark chocolate for different taste!

After one boiling...

Watched a film on Netflix: Jiro Dreams of Sushi. http://www.imdb.com/title/tt1772925/  Looks like at least part of it is posted on the web.  Our son was watching me make the marmalade and said I was like Jiro - always thinking of new ways to process things and to make them better.  I guess it's the same with quilting - always testing and thinking of new ways to piece, baste, bind and quilt!

After second boiling.
After third boiling, I weighed the peels.  Added five cups of water and four cups of sugar and simmered for 90 minutes.


Then I removed from the syrup and rolled in sugar before putting on drying rack.  This is my first time using the dehydrator machine.  We also cut some grapefruit rounds and put them on and have one tray of grapefruit bites (no peel, or sugar, just fruit).  Just tasted the candied peels - delicious and warm.  Wonder how they will be after a full night of dry heat?  It feels so frugal to use all of the fruit!


Wednesday, February 8, 2017

Finish #1 2017 - Third Binding Done - on previously quilted charity project

I'm sort of on a roll.  We'll see how long this lasts!

I finally finished up a charity quilt that I had put together with charity fabric.  I quilted each block as I finished it, and then joined with strips. I think I got the QAYG strip directions from Leah Day's site.

I did find a good video Leah Day posted for Applying Binding by Machine:
https://leahday.com/pages/how-to-bind-a-quilt-by-machine


I like the way the FMQing shows on the plain fabrics.

I applied the binding first to the back, then did the stitching on the front.  I really worked at lining the binding up so there is pretty even line of stitching that shows on the back side.  If you look closely, you can see where I patched a bit of the joining strip so the batting would not peek thru.  I hadn't noticed the batting until doing the binding...

I'm posting this photo to show that the two fabrics are facing each other and the tails are to the right!  It's difficult to see since I unhelpfully had a solid fabric at the end of the scrap binding that I made for the project....
-----

I participated in another political event yesterday.  I'm not sure what to call it really.  We met outside the offices of Senator Feinstein and Senator Harris.  We are all figuring out how to do this.

I liked the way this lady had her signs set up so she didn't have to hold them up for the two hours.  Really can only read the front side from a car, but the back was important to consider too.


People were adding notes to their signs that they were not paid protestors.
This dog had a tag on that said he was not paid too!
I don't think everything should be protested, but I am concerned when I hear plain lies being represented as facts or when people are being recommended for positions who either do not have experience, or appear to have such self-interests for profit or gain instead of looking at the needs of people who are not like them.

It was about a mile between the two offices, a beautiful walk thru downtown San Diego.  I took a few photos showing old and new buildings.  I bet some one is going to knock the older things down to make room for more shiny new buildings.  Since I don't own them I don't have a say, but I do like older buildings...


Sunday, February 5, 2017

Second Binding Done!

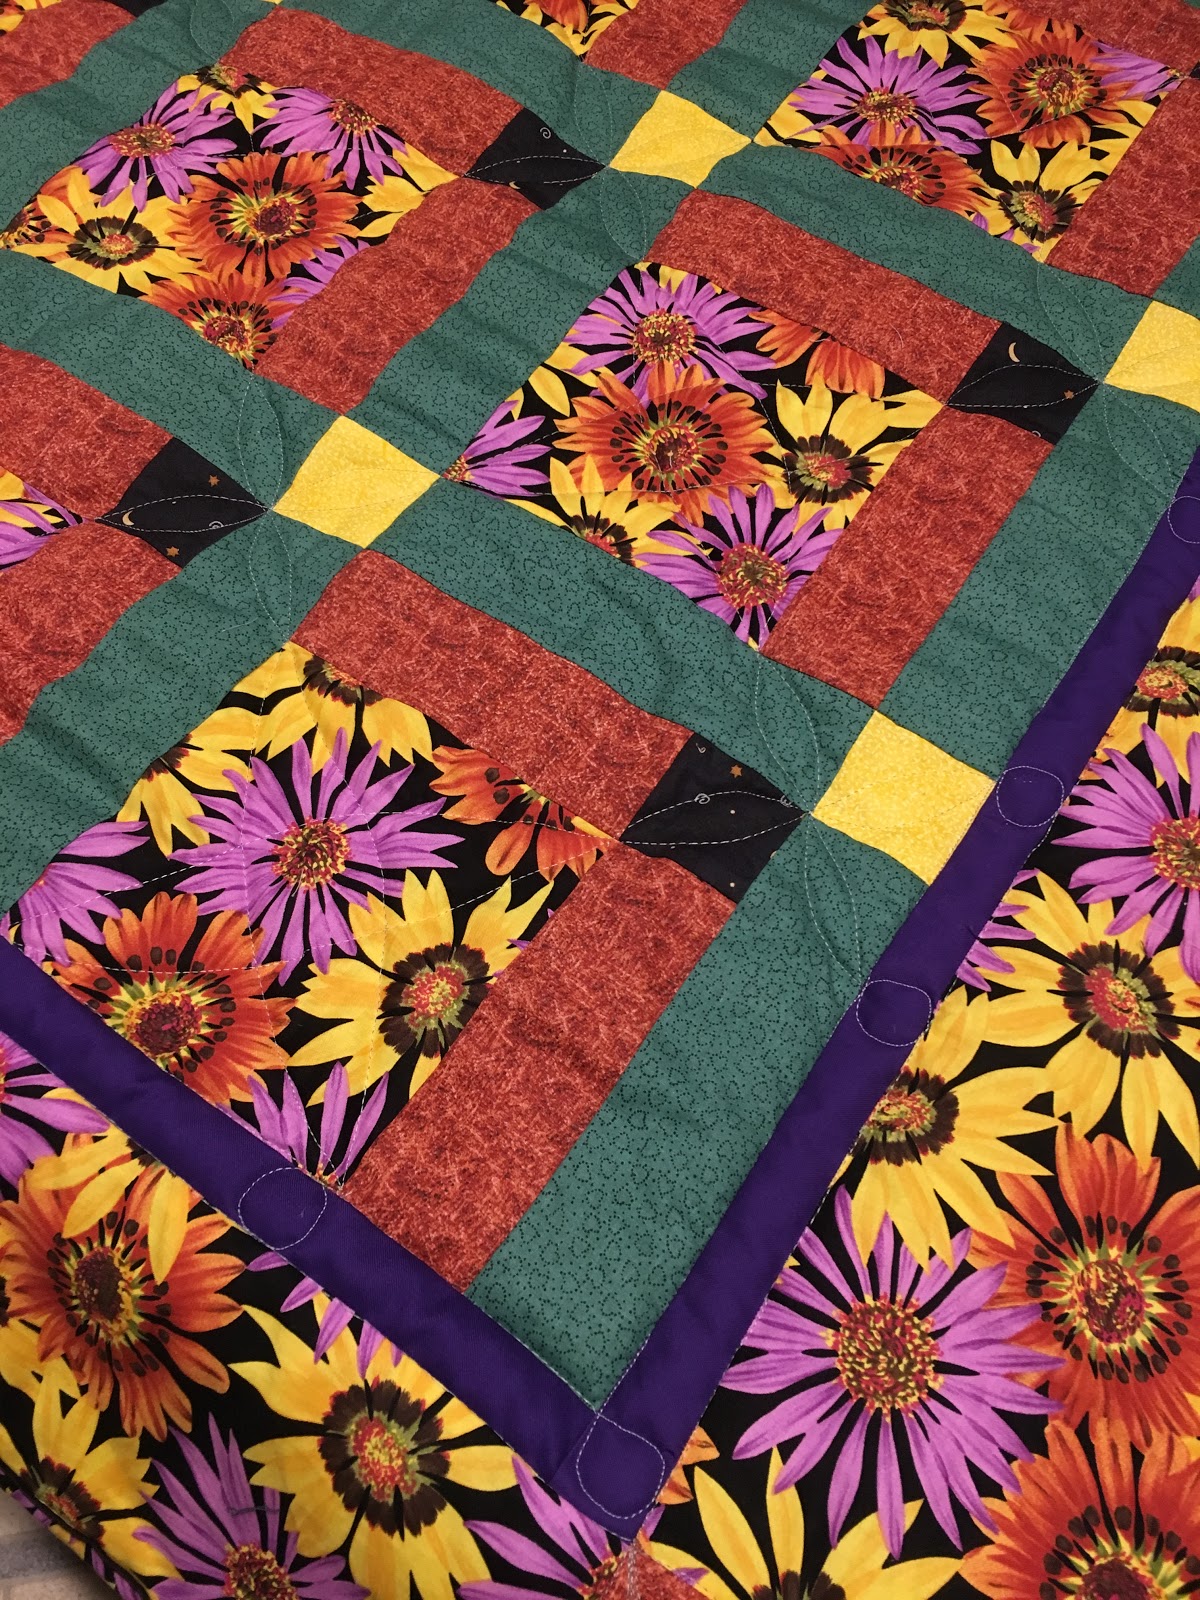
I picked the larger of the spray basted quilts to work on today!

Originally I was going to do curves in the binding.  Gentle curves with equal measurements on the top and bottom...  But then when trying to figure where they would start and end I noticed the design of the quilt was asymmetrical, something that had appealed to me when I picked the pattern.  But something that I had to think about toward the end when I was adding the final borders.  I decided then to have the borders be equal on all sides, and that is what I decided about the binding too.

So I practiced another magic binding finish!

Changes and tips I used again:

 Stitched the edges of the quilt together before trimming.

Trimmed so the back and batting were approx .25 inch wider than the top.  (I then trimmed the backing so it was closer to the top position, but realized after that I should have kept the fabric and instead concentrated on placing the edge of the binding so it was on the stay stitching line. Photos below.)

Did the trick of pressing the ends to help me keep track of which side to put where on the plain black fabric. (no photo)

Pinned and then sewed each joining set all at one time.

Cut the flange 2 inches (instead of 1.75) so more of it would show.

Cut the main color still 1.5 inch and used fabric recovered after trimming the backing and batting so it was a tad sticky. I did not press the seams open for the fabric joins of each strip as I wasn't sure what would happen to the iron or fabric.
 Sewed and pressed the combined pieces oriented it so I could see the flange.  I did press the seam open for the two fabric strips and I pressed the color on top of the black color to get rid of the sticky side being exposed.  Worked well.

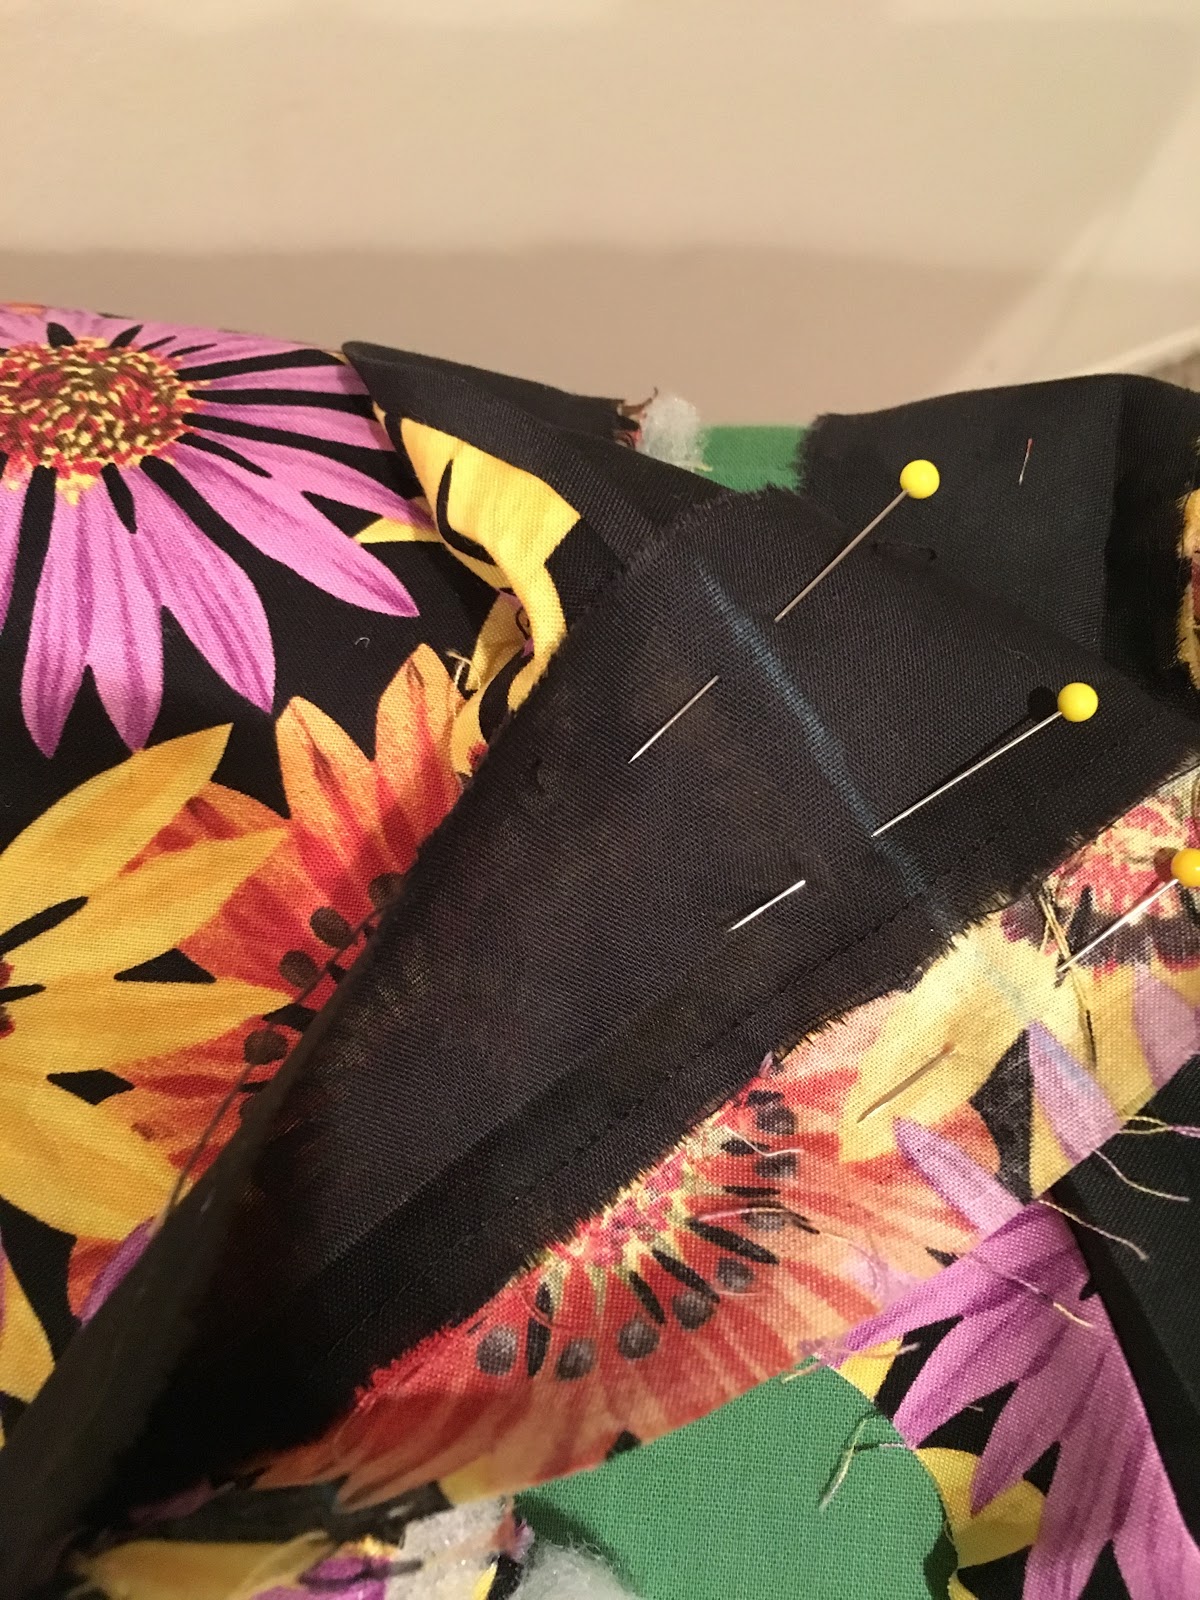
 Here I show sewing the binding on.  It would have been easier if I had not cut the backing back - the batting kept getting caught on the presser foot.

 I lined up the edge of the binding with the stay stitching line.

I used the tip of pinching the end at the corner then bringing the result up to meet the sewing line. And I used the stack of fabric (I didn't have emery board handy) so the pressure foot at the corners was level with the fold when I was sewing that to the back.

 When I got to the end, I folded the binding back after having it meet.

 Then I pressed the fold, and used a pencil to mark the intersection line.

 I referred to the photos from last night to help me orient the fabric and so got it right the first time!

 The final binding stitching didn't take very long. I prepared each corner with Wonder Clips and oriented it so I could just continue sewing with little effort.


More of the flange shows, which in this case with plain fabric, I like.  I'm still getting an extra line of stitching that shows on the back, but the binding is done and this charity quilt is now ready for free motion quilting!

As I was working on the binding I started thinking ahead to the buckets of grapefruit waiting to be turned into marmalade.  My son and I keep charts of what we do (amounts of fruit, water, sugar; cooking times and temperature).  Seems we are always tweaking something, just like I was tweaking the making and application of this binding.