Pages

Showing posts with label Progress. Show all posts

Tuesday, March 7, 2017

WIP: Baby Quilt Based on allpeoplequilt's Purple Play

The daughter of one of our friends just had a baby.  I had promised a baby quilt two months ago.  I found fabrics in my stash that matched the colors the new mom requested (black, grey and if I had to use another color maybe some purple).  I found this quilt on the allpeoplequilt site that really caught my eye.  So I cut the strips but things happened that distracted me from the project, so I'm just now getting into production mode.  (I'm figuring the white will lighten the quilt and not count as a distracting color.)

I made a block and was pleased with the results, although it was awkward to sew each seam as I had to sew each one with the pressing going toward the sewing machine.

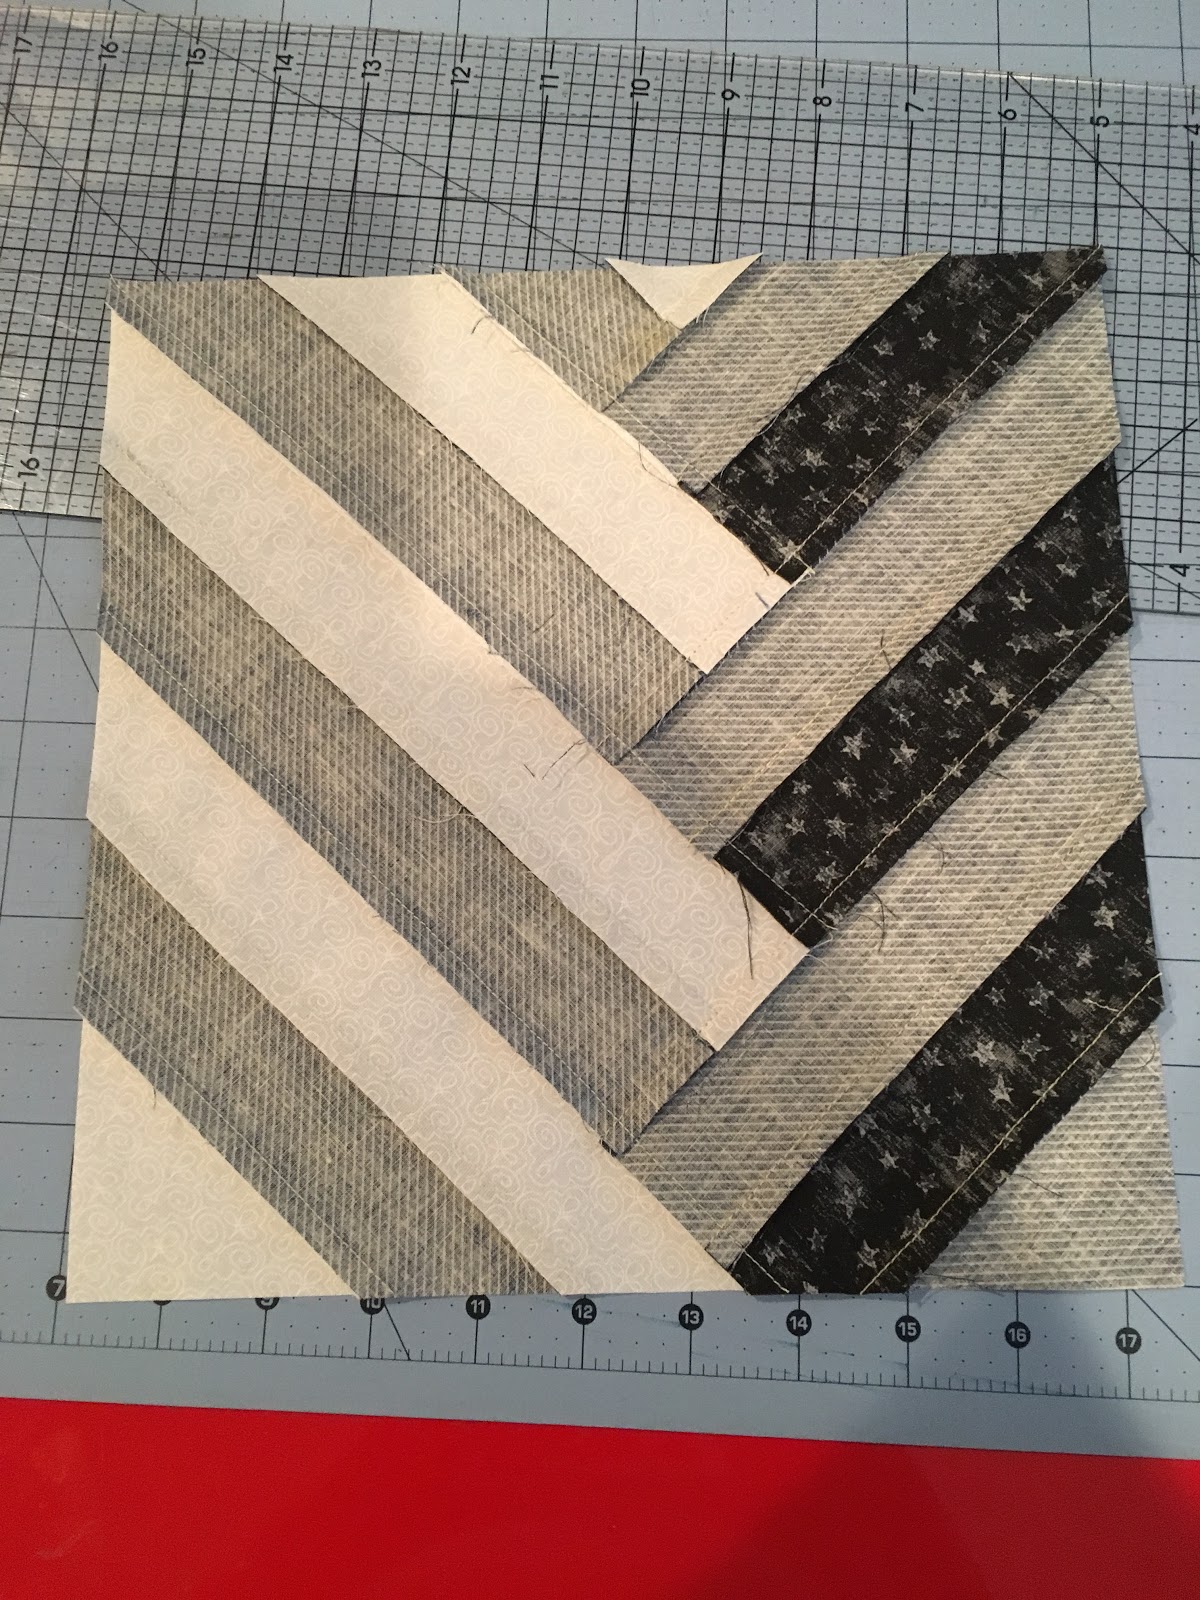


The back came out beautifully though, but I thought if I just changed the way the fabric was pressed then my issue with the seam direction and sewing would be fixed.  You see I wanted to start the fabric with the even ends of pieces aligned and that the seams would be sliding away from the machine as the fabric went under the needle, so that is why I had the problem.

Anyway, the next block I pressed the fabric the opposite way from the directions.  It was easy to start with the fabric aligned - BUT when it came to pressing, to keep things consistent, I had to press so the the seams were crossed back over themselves. It was either that or have the seams pressed in different directions...

But now I see that the little design has the ducks also marching in different strange directions - so before finishing the block, I stopped and now will be unsewing so I can sew the block again.

And I will go back to folIowing the directions. 

I really had thought about the block and the sewing and the pressing, but still messed up!

I reminds me of when I was a Girl Scout working on my cooking badge.  My folks left the house while I made my fancy hamburger and chocolate cake with mocha frosting dinner for them.... It was the first time I was alone in the kitchen - and the whole concept of cooking at all was foreign to my experience.

The directions for the mocha frosting said to put a tablespoon of coffee in the frosting.  I thought a tablespoon of coffee wouldn't add that much flavor so they must not have been referring to brewed coffee. I grabbed the instant coffee and looked back at the cookbook - it was old.  I figured they didn't have instant coffee then so I grabbed the regular coffee grounds.  And made the frosting with the crunchy coffee grounds in every bite! 

(Things were so different then.  I think my mom only had two cookbooks - Good Housekeeping Cookbook and the one I was using I think was called the Lighthouse Cookbook. That book really went to the basics of how to butcher animals and how to cook them!  Now of course I could google mocha frosting and get many different recipes to compare and adapt. And even before that I have two cookbooks that are just about making cakes on my shelves now - so many cookbooks in this house now.)

Anyway, when my folks came back they ate the food. I remember my Dad's big smile when he had the cake. Such a nice guy.

My Godsister who is 10 years older than me (and became a home economics teacher) used to like to make mud pies.  I remember she told me how she offered one to my sweet father - and he started to take a bite!  She remembers telling him how it was all pretend and he wasn't supposed to really eat the pies.  He was a nice guy.  

My mom signed my report so I was able to get my cooking badge and that was crossed off for Girl Scouts.  It wasn't until relatively recently though that I really started cooking and enjoying it, so the badge was not the right way to go for that life skill!


Friday, February 24, 2017

WIP: QFK Square Quilt Part 2

When I last wrote, I had finished quilting the major parts of the quilt.

I went back and added a wavy line of quilting so the light green inner square had stitching on both sides.


And I added the outer borders to the piece!  This makes it so it's the correct size for Quilts for Kids.

I just placed the border, and stitched it down.  If you remember I was having a ballooning effect so the borders were removed, so when I replaced the borders I did not go by the edge of the quilt, but rather went where the border strip went when it was placed, this meant that I lost a little of the quilt, but not much.  And now the quilt is flat!

I added a line of stitching so on the back it looks like there is a square in the corners of the piece.

As soon as I put the piece on the table to bury the threads, my friend jumped on the quilt to keep me company.
(She is getting almost too comfortable in the sewing room!)

I do not usually pin, but pinning every three inches helped me keep the border so it covered the quilt seam.  (I didn't pin the second seam and after adding the third border saw that there were a few places where the fabric was not joined correctly.  So I removed the stitches and did it correctly.)  The pinning also helped keep the fabric in position under the batting.


I added a line of stitching just in the batting and backing so there is a corner square. Here you see one corner undone.

I added the stitching so it did not show on the front.  I think the corner on the back will disguise that the extra lines of thread were added when the final border was added.  Will make it more symmetrical.

Here is the front.  The extra stitching doesn't show.   
In this case I knew I had borders to add, but I think this technique could be used to enlarge a quilt when there is extra batting showing at the sides.

Now the piece is ready for the binding.

I named this post Part 2, but there have been many starts with this project.  I'm glad to be closer to finishing it up!

Wednesday, February 22, 2017

WIP: Quilts for Kids Square Quilt

I've blogged about this project before, for such a little project it has gone thru several changes in it's creation.  First it looked sort of like the Nazi symbol, then was redone to be this square.  But it had so many ripples that it was taken apart again and partly sewn back together.  I left the final border off and will add that after the quilting is done...

I did Angie's wavy lines on the larger center square, then went back to cross over them.

Then on the outer triangles I made a design with different types of waves to fill that area in.

I'm really liking the way the wavy lines poof up, and sort of go with the design of the piece too.

In class tomorrow I'm going to ask someone to show me the proper way to tie the threads off.  I've been using the Clover cheater needle that Leah Day recommends, and added a knot after rewatching her video, but the teacher at the class I attend showed a way to pull up a loop so the two threads end at the same place so that would save a lot of time from what I've been doing.


As soon as I finished the initial lines I put it down for a photo and Buffy appeared from thin air and sat right in the middle of the quilt, so I had to take her picture!

Yesterday I took her to Petsmart and they trimmed her nails, brushed her teeth, and cleaned her ears.  Her teeth were so bright afterwards!  I wish they would show me how to brush her teeth but actually they hid her away from me while they did that and the ears.  I'll have to learn from videos posted on the web.  I think it's better to have someone else trim her nails though, it was always stressful when I groomed our cat's nails.  They had a good set up for doing the nails in the front part of the grooming area, and did give me a coupon when I asked if they had any, so I got 15% off the food!  But I'd rather have a set up where I can at least see Buffy all the time whenever she is being groomed.

Buffy is at the far table.
I gave her a bath when we got back, her conditioner makes her hair so soft!

I'm going to look into videos for training dogs too.  She sometimes will run to grab a ball, but doesn't know what to do with it really after that.  It would be fun for her and for me if she would bring the ball to me so I could toss it again for her to retrieve.


Tuesday, January 26, 2016

Tumbler: After Additional Hour or so the quilting is done! My Jan OMG Done!

Something was wrong with the bobbin, it allowed me to stitch a few inches then the thread broke.  I decided to remove all that stitching then went walking to clear my head.  What was the solution?  I was going to change the needle as that does seem to be a solution to stitching problems, but took the bobbin out and discovered the thread was sticking out oddly.  So I tried to wind these thread onto a new bobbin.  It worked for about a quarter bobbin's worth.  I decided to give it a try.  I'm estimating that took about 30 minutes....  But the stitching was even and nice on my test bits so I put the needle in and finished that line!
http://redletterquilts.blogspot.com/2016/01/omg-its-finished-party-january-2015.html

In another 30 minutes I had finished the remaining three lines.  So done with this stage and done with what I wanted to do this month on this project for my January One Monthly Goal

I doubt that I would have finished this quilting so quickly without the call of this challenge, the opportunity to share and meet new folks, and the possibility of winning the beautiful red valentine fabric. So thank you so much Heidi for organizing OMG!  

After 19 hours for the quilting.  4.5 bobbins. January OMG Done!
  
Next steps: 
binding and label!

And thanks again to Candace for helping me figure out how to do the quilting design and encouraging me to just go for it!
I need to practice my binding skills so will save this part of the project to complete after I have made a few mug rugs or something!  I can bring this with me to my once a month sewing group next time it meets, I'm sure someone can guide me there so I have a nice binding to this project.

As a reminder, I started sewing this quilt in 2011, and it's been basted since 2013...
To see the posts about this quilt:
http://quiltquest.blogspot.com/search/label/tumbler

----------------

Now I have a few days before the beginning of a new month so I'm going to use my quilting time to work on the Polaroid Blocks that my Stash Bee/Hive 8 friend Katrin will be compiling to make a quilt for her friend's little daughter, Hanno, who will be going thru chemotherapy now.  If you have time, won't you join in?  If you only have time to find fabrics for the photo part of the block you could send to me and I would put into the frames for Katrin!  

----------------


Thanks for coming by!


Sunday, January 24, 2016

Tumbler Progress: About 3.5 hours (in two sessions) and almost done!

I'm not sure why today's first sewing session went so quickly...

Session One

I started at 4.:49pm and at 6:28pm I had sewn the second lines for one side starting in the center, and even did one line on the other side of the quilt!  So that's 10 angle lines done so far today.  I'm still on the same bobbin so no time was wasted in that regard.

So that's 1 hour 39 minutes if I'm doing my math correctly.  And an average of around 10 minutes for each angle line!  The sewing flowed during this session...

After around 16 hours of quilting.  This is the side that is the most done.  You can click to see the enlarged version.


Session Two (no photos)

I sewed again from 10:47pm to 12:44am.  This time I only did 8 lines.  Near the top of the 9th line at 12:29am I ran out of bobbin.  It took about 7 minutes to get the new bobbin in place and to hide the ends of the threads from where the bobbin ran out.  I started again and then about 8 minutes later the thread got caught and I ended up cutting it to release the material.  I decided it might be too late to continue.

I think I have 4 more lines to go then done with this stage of the project.  There are a few spots where I need to pick out thread that was crossed over and became part of the quilting on the back. For this second sewing (which was the other side of the quilt) there was more pleating that I could not stop from happening.  I tried sewing very slowly, sometimes that seemed to prevent the pleating but there were other times when slow sewing did not help in that regard.  Next project I will use that special top and bottom feeding foot that Katrin reminded me about.

As I travel thru the blocks instead of seeing the colors and fabric, now I'm noticing where I wasn't as careful as I should have been with the stitching even with the FMQing.  I hope the wash will fluff the fabric up so the puckers blend in...

So pretend there is a photo here to show the progress after 18 hours of quilting.  At this stage I've used around 4.5 spools of bobbin.


Tumbler Progress: Almost three hours more 14 lines a new bobbin started


Continuing with my details on this project...

This time I just clicked to see what time it was when I finished a line.  I was able to finish the other side of the quilt with the mainly single lines of angles.  So I just now need to add the second lines of angles to the top and I'll be done.

Today was different than the other days as I did all the sewing in one session.  Our son's little dog kept me company. I thought I had taken photos her on the quilt, but nothing was on the camera when I offloaded the quilt photos.  She came in the room and sat on the chair I had on the side, then all of a sudden she was in my lap and climbed up to sit on the quilt!  I got her to move to a pair of jeans that I put on the table for a while.  Then she was back in my lap, but finally she moved back to the chair and curled up to sleep next to me while I worked.

I started at 1:06 and finished at 4:00.  During that time I sewed 14 lines of angles going down the side of the quilt, a single straight line at the end of that side, ran out of bobbin, so filled two bobbins, hid the mid-line bobbin thread, trimmed the thread for the new lines completed.  Whew!

After 14.5 hours of quilting.  There are a few places with the double lines in the angles too.

Of course now I realize my detail shots 
don't show the double angles....

Can really see lots of progress now!  I'm on bobbin 5.5.
I went to Road to California yesterday with some ladies I sew with during the once a month Saturday sewing group.  We pretty much stayed together while we went up and down the many rows of the vendor area.  So many things to see, it really became a blur! (One of the ladies had been there since Sunday taking classes everyday.  She was staying on until this Sunday.  It's her second year doing this, she says she learned so much that it's a wonderful week.)  I was just there to see the vendor area - and also got to see some of the show quilts.  As I went to the vendors I was on the look out for Creative Grids Rulers – $20 Triangle Squared and $18 Perfect Rectangle ones. that were called for in the Facets Quilt Along that I'm planning on working on.  I found some pretty much the same sized ones by Tri-Recs - I got the set for just $5.  That was a deal.  I also got a bunch of long zippers for all the future pillows I may be making - each for just fifty cents!  Another deal.  I gave that man my email to put my name on his email list.  He says he has no sales tax and free shipping deals every once in a while so I thought that would be a good list to be on.

Road to California Expenses
  • $15 Admission to Vendor Area
  • $5 Tri-Recs Tool
  • $12  24 zippers
  • I had two meals while we were there, and I'm going to take the lady who drove out to lunch later as a thank you. (She didn't want gas money or for me to pay for her meal or admission.)

http://quiltingmod.blogspot.com/2015/12/lessons-learned-linky-1.html
Anyway to get back to my tumbler quilting, the lady taking all the classes mentioned that some sewing machines with a needle up or down option also slightly lift the pressure foot when it stops in needle down to make it easier to readjust fabric.  The machine I'm using doesn't have this feature, but I realized I had not always been lifting the pressure foot to change the angle when going down the lines, and that, I think, contributed to my puckering in the stitching.  Those initial lines of stitching are not even close to being a quarter of an inch.  I don't know why I didn't see that before.  Anyway, it seems to make a big difference even now if I do not lift the foot when I turn the fabric.  So that is something else I have learned.

When changing the angle of a stitching line, be sure to lift the foot!

Previous things I learned or relearned recently are:
  • wind bobbins ahead of time
  • do any straight stitching before doing angles
  • shorten the stitch length at the beginning and end of a line of stitches
  • bring phone battery to conference so you can take photos! (I did but am sure that other people have posted better ones)
  • bring writing pad and pen or pencil to write down booth numbers that have items you might want to purchase or follow up on!
  • if the table you put up next to the sewing machine isn't the same height, and the quilt keeps getting caught in between, put something under the lower table so they are the same height.  (I put a pair of old jeans that will become a board game block underneath today and it made it so much nicer to not have to fight the quilt being caught.)
  • put something underneath or in front of the foot peddle to stop it from traveling as you sew.
To see previous posts about my tumbler project search for tumbler in the label and sort by date!


Thursday, January 21, 2016

Tumbler Progress: additional 3.5 hours adds 15 lines of quilting

Detail of half of the quilt showing
the alternating columns with stitching.
When I was nursing our son, I kept such detailed records of how long and from which side he nursed.  I made charts of the time and condition of diapers when they were changed.  None of that meant anything to anyone. The doctor never asked me for the information, but still I kept lists and charts.  Someday I will probably find those notes and wonder what to do with them...

So now I'm doing the same thing with this tumbler quilt.  Keeping way to many notes that don't really mean anything. But now I will type them in this blog.  It might be interesting to someone wondering how long it takes someone to quilt a tumbler in this design.

First, I'm using a regular pressure foot. It has about a quarter inch on either side of the needle that I am using to guide the stitching.  If I do this design again I will do all the straight lines first, then go back and do the angle lines.  I'll decide after the piece is washed if I use the regular pressure foot again.  There are still a few pieces where there is a pucker in the sewing.  Very small.  I am more sure these will be sort of hidden once it's washed.

I am sewing starting in the center of the quilt and then moving out, always starting at the same top of the quilt.  I'm sewing along the inside of a column of pieces, then skipping a column and doing the same thing on the following column.  Later I will go back so there is a line of stitching on either side of all the seams.

What I did today, I think I will need to do three more times to finish the quilting on the project.  So I have roughly 11 hours of quilting to go!
After 11.5 hours or quilting.  I think I'll have to repeat what I did today three times to have all the lines quilted.


Today I worked about an additional 3.5 hours on the project and finished about 15 lines of mostly angle lines on the quilting.  I have about 45 lines of quilting to go!  (That is how I figure I have around 11 hours of quilting to go until the quilting part of the project is done. (then it'll be the binding and label!))

Here are the detailed notes:
Got started and bobbin ran out, finished the line but didn't record how long it took to sew that first angle line nor to hide the threads and reset the machine up with the new bobbin.
First 2 recorded lines (near center) took 32 minutes - 16 minutes for each angle line.
Next 3 lines took 35 minutes - almost 12 minutes for each angle line.
Final 8 angle lines of the day (toward outside) took 81 minutes - around 8 minutes for each one.
The outside straight line took only 5  minutes to sew.
I'm now on the third full complete bobbin, have added 15 lines of mostly angle lined quilting and have spent roughly additional 3.5 hours.
Will start the next session by winding the bobbin that is now empty so it is ready when I need it.


Wednesday, January 20, 2016

Tumbler Progress: 168 more minutes of sewing plus around an hour more results in 26.5 lines of quilting

You can tell from my blog entries that I have been doing other sewing instead of working on my tumbler quilt! (Pillows, Game boards, Scraps!)

But today I got back to the tumbler for just under three hours of quilting time.  In that amount of time I finished all the second straight lines for the quilt, trimmed the thread and brought the piece downstairs for a photo!
After about 8 hours of quilting and working with the fabric, still using the third bobbin.
So it took me about six minutes to do each of the straight lines that go across the quilt.  How do I sort of know this?  I set  my phone on the stop watch app and clicked when I finished a line and then started the timer again when the needle was in the down position and in place to start another line for stitching! (So I wasn't counting the time to reorient the fabric to get it ready for the next line of stitching at the sewing machine.)  I'm estimating that took about 2 minutes each time so that's additional hour on the quilt.


I learned that I should have done all the horizontal lines at the same time.  The first day of tumbler quilting I had started with trying to do some of the angular lines, but when I crossed those lines with the straight stitching, almost every time, there was a bubble in fabric that I had to work to try to flatten.
Plus about 2 minutes per line or another hour for
turning and setting up to sew again.  That's
about 8 hours on the quilting so far.

When I did the orange peel quilt it felt natural to rotate the quilt after each line was completed to add a different color to the quilt from a different direction, but this did not work with the tumbler quilt.  

I'm thinking it would have been better to do all the horizontal, straight stitching in the tumbler first.  I'm hoping this will get the fabric so it is very firmly oriented where it's supposed to be in the quilt!

I did what I have done so far by starting in the middle then skipping a few seams and sewing again, then I went back to fill things in so there was one line for each seam. After that I went back and filled in the second lines.  I'm hoping when the piece is finished and washed that the bubble of fabric at these intersections will be more or less unnoticeable.

Gosh, my fingers are crossed that when I do the rest of the angular lines that I will not continue to have the bubbling fabric problem!  If I do, I will change the design of the stitching and will do straight lines coming down thru the middle of the tumbler shapes.  Candace at Saltwater Quilts did this for some of her tumbler quilts.  She posted a photo and wrote: I stitched a fourth of an inch above and below each horizontal seam and through the middle of each of the tumblers. This version of her stitching looks terrific, but I had wanted to do the version she did after this with the lines following all the seams so that is what I am trying for in the tumbler. We'll see what happens with my quilt after the next session of sewing!

I thought I had basted my tumbler project quite snugly and completely.  I taped the backing, the batting and the top down on this huge basting table at the adult education class. Then I used all my pins, but them in all the alternating blocks on the inside and in each of the blocks on the perimeter of the project.  But guess it wasn't tight or often enough to prevent bubbling... or maybe it got loose being basted for almost three years before I started the quilting!

I'm pleased with how the quilt looks so far.

Monday, January 11, 2016

Tumbler Progress: 1.5 Bobbins

Yesterday I straightened up the sewing room,  reset up my machine for FMQing, found the thread, half filled a bobbin, changed the needle, put the quilt under the needle and started putting the quilting stitches in the tumbler.

I started by doing one straight line, then turning the piece and going in the other direction with the angles - took 2.5 hours for all that!

Filled the bobbin and left things set up for today.

Today I was able to just start sewing! I think I did one straight and one pass with angles, then decided to only do the straight passes for alternating rows before considering doing more angles.  There were a few places where the fabric puckered, I just kept going.  Hopefully these puckers will not be noticeable once the quilt is washed.   Other than that, things went well.  I decided to go back and put a line at every seam before considering the angles again.

I did remember this second day to change the stitch length so it was shorter at the beginning and end of each line, so I'll be able to trim and not have to hide the ends as I did with the pajama bag!

It like going thru a sea of color and memories.  I'm enjoy seeing the fabrics again as they pass the needle.  I makes me happy to come across the fabric and decide, now that's my favorite.  Only to change my mind with another set of colors appear.


I don't remember why my then future DIL was with me, but I do remember she was with me when I got three different orange fabrics and she helped pick them out. Probably for the Block Lotto year.  And I'm glad when the fabric I used for pants for my son appear and remind me of those times.

I traded tumblers with an older lady in class so there are some really different for me fabrics, like flowers and these little bird houses. I've never noticed fabric like that when I have been to the store.  I can imagine it framing a window or on an apron when she was a young bride.  Fun.

I remembered when I got to a corner that the batting I used had a corner cut out so I had to cut a piece from another side and place it in the quilt sandwich, so there was batting in that corner.  It's secured pretty well I think.  I'll do some extra stitching there, perhaps with a label, before I give the quilt away. I should finish the quilt for my husband before I do that...

This batting a rather flat, it's warm and natural cotton I believe.  With the pins there is a lot of weight to this project so it seems wonderful.  I hope once it's quilted the weight will be nice for our friend.  It's a lot easier to remove the pins than it was to put them in!

Going to stop now after about 4 hours since I sewed thru a bobbin's worth of thread. This time I filled two bobbins so it will be a quicker change out the next time I quilt this. I'm not tired but do have some other work to do before my husband returns from work!

After 1.5 bobbins of quilting, and about 4 hours of quilting.


Monday, November 23, 2015

Monthly Quilting Saturday and Fakesgiving - our testing of new recipes

First,  had a wonderful time at the monthly quilting session.  I put the label on my hour glass quilt and turned it in, then I basted two charity quilts for a different charity, Quilts for Kids.  I did one of them so there will be no binding as it's turned inside out and the other one I will probably do one of my wide bindings after quilting it.  Unfortunately neither of these are very pretty quilts but they will be warm for someone and I plan to practice more of my FMQ, including feathers in the corner of at least one of them!
Two projects ready to quilt. Going to use gold
thread on the front one - click to see the color!

Since then, I'm all about recipes and shopping list, so didn't do anything in the sewing room, and Shasta, I haven't done any decluttering or cleaning beyond straightening up the downstairs.  
My circle would be out of bubbles as our clothes washer has decided to not work - the lights are just happily flashing at me.  Of course I discovered this after putting in kitchen towels and putting in some bleach directly on the towels.  I had to pull out the towels and put them in a container full of water so they wouldn't be destroyed by the bleach.

Kaja has made my day and written to tell me about the linky she has on the last Tuesday of each month where people share their projects. Link up your recent improvisational quilt, top, block, plans, or ideas. Sounds like great challenge to share this way.  I added a button to my side bar on the blog!


Fakesgiving

On Monday before Thanksgiving three kids that went to high school with my son are coming over with two new-to-them recipes and we will all taste to help determine if they will bring to their Thanksgiving dinner with family.  They are bringing bread pudding and 'pink stuff' something one of them remembers from her childhood - involves cool whip and cranberries.  Sounds very interesting.  I'm not sure if the cranberries will be cooked or raw, whole or ground up.

Last year we did the cooking together the same night as the test tasting, but it took a long time so this time we are doing the prep work before.  (I guess we should have done this in October so we would have more time for fall back plans - and so we wouldn't have to eat the same thing so many days of the same week!)


So tomorrow my DH and I are making:

  1. General Tso’s Cauliflower - http://www.purewow.com/recipes/General-Tsos-Cauliflower
  2. Slow Cooker Sunday: Honey Garlic Chicken- http://www.slenderkitchen.com/recipe/slow-cooker-sunday-honey-garlic-chicken
  3. Salad -Broccoli, red onion, cashews dressing 1 c mayo, ¼ c sugar, 2-3 T red vinegar
  4. Pumpkin Dinner Rolls - http://www.cookingclassy.com/2015/11/pumpkin-dinner-rolls/  I'm only going to completely bake one for each of us to taste, but will par-bake the rest per this website: http://redstaryeast.com/yeast-baking-lessons/postpone-baking/
  5. Grapefruit Cornmeal Cake - http://www.thebittenword.com/thebittenword/2015/11/grapefruit-cornmeal-cake.html   http://www.foodandwine.com/recipes/grapefruit-cornmeal-cake  DH is going to half the recipe for the testing - if we like will make a full recipe for Thursday.
  6. Pumpkin Ice Cream - Might make double recipe of pumpkin ice cream - https://shar.es/1c3QoN
Everything except the Honey Garlic Chicken might make it to our Thanksgiving dinner.  We we decide after we taste!

Or maybe my circle would be a happy face, feeling very good about the quilting, the ladies in the sewing group, that I have a sewing room, that I have online friends, and that we are going to have our recipe testing session tomorrow!


Added Dec 7 2015:  Photo of the flowers DS brought - the white flowers were buds when he gave to us!