Found this drawing today:
http://www.stashbooksblog.com/2011/12/introducing-modern-quilting-designs%E2%80%94with-a-giveaway/
Deadline is December 26, 2011.
Looks like a really interesting book - fingers crossed on this one!
Wednesday, December 21, 2011
Friday, December 16, 2011
Expenses
Mailed my block lotto block to Oklahoma - about 70 cents.
Picked up about two yards of pink cotton at thrift shop - $1.70.
Total = $2.40
Picked up about two yards of pink cotton at thrift shop - $1.70.
Total = $2.40
Tumbler Edges

Tomorrow I will wear my fitbit so I can see how many steps I take to finish the next pair of rows. I have the ironing board set up in the dining room area - as that is where I have my pieces laid out. It takes so long to do, I will not have this done in time to use the basting table at the class - but know how much extra pressing I'll have to do if I fold it up so will keep it on the bed if I have to use the dining room table before I can get to the basting table.
A came by to see if he could recognize any fabric he had gotten me, but since we didn't exchange gifts last year I didn't get the fabric.... I pointed out the fabric I had made him shorts or pants with when he was little....
Now that I see how easy it is to get the straight edge, I think I will experiment with some of my remaining tumblers. It might be interesting to add a narrow strip and surround it by the half pieces. I'm not sure. I want to finish this up before I have to move it all, and put in boxes.
The fabric in the bottom left corner - I bought today at a thrift shop. Got about two yards for $1.70!
Thursday, December 15, 2011
Tumbler Progress

I decided to end the rows with a color - so then will cut some beige pieces in half and put on the ends to make them straight. Originally I had ended both sides with a beige piece, but when I figured out how to make the straight edges, I didn't like the idea of having so much beige (especially since I may decide to add borders to make the quilt larger).
I didn't want the colors to be in rows so made it so there are some splots of color. I'm not sure if anyone can 'see' what I was thinking, but I'm going with it now...
I want to work on my speed in making projects during the next year. My family has been using sleeping bags instead of quilts for ever - 2012 will be the year they get quilts!
Wednesday, December 14, 2011
http://stephanieodea.com/
She has some terrific posts - a recipes for slow cooker!
Now has a give away.... Closes Friday morning (12/16)
http://stephanieodea.com/2011/12/2011-last-minute-gift-ideas-and-give-aways-18-items/
Now has a give away.... Closes Friday morning (12/16)
http://stephanieodea.com/2011/12/2011-last-minute-gift-ideas-and-give-aways-18-items/
Thursday, December 8, 2011
90*4 Tumblers - only enough for a baby quilt....

I didn't (and still don't) have a lot of works in progress so I took fabric to adult education class and spent two long days cutting up different fabric using the 3 inch tumbler die for the GO. It was really tiring, but I thought would at least add value to what I was sending on. I also cut 5 inch charms in not as many fabrics.... I traded with a lady in the class to double the number of fabrics.
I sent along more than an equal number of plain beige tumblers so there would be enough I thought for a nice lap quilt.
I've been sewing them together as a leader and ender project, it's been very nice. Since I can't find my fabric to finish the LibRR I decided to go ahead and put sections together. Now I realize I do not have enough tumblers for my lap quilt - also I shouldn't have sewn them all together in fours as that limits the order in which I sew them together. And I know I need to send my World Wide Swap partner some more tumblers so she can make something useful! It occurred to me tonight to check the GO site and see how many pieces are needed for different quilts - I only found the baby sized quilt - and it requires 180 tumblers - it's 12 rows of 14 shapes - then cut 12 additional shapes in half for the edges - surround all with a 2.5 inch strip and bind after quilting. The finished baby quilt is 38 x 40 inches.
The pattern is here:
http://www.materialgirlsquilt.com/media/uploads/2011/01/19/files/GO-Tumbler-Baby.pdf
I haven't been attending that adult education class, will write the teacher to see if the GO is still available for people to use.....
I'm so surprised to see how wrong I was about estimating the number of pieces needed for a quilt. Before packaging the pieces to mail I had laid them out on the dining room table and kept cutting and trading with people to get more fabric - I really thought there would almost be enough for a twin size quilt before borders, etc..... Oh well.
Tuesday, December 6, 2011
Go Baby Give Away - Lisnaweary Quilts
Found this give away while on Sew Cal Gal's site (looking to see if she had more information for the FMQ monthly activity she is hosting next year....
AccuQuilt GO! Baby and 3 dies. Deadline: December 11thhttp://lisnaweary-quilts.blogspot.com/2011/11/go-baby-giveaway.html
I got to use a GO a few times at the adult ed class I sometimes attend - fabulous to get the cutting done so quickly. I especially like the way the corners were cut off (I was doing tumbler blocks) so it's easy to sew them together!
Sunday, December 4, 2011
LibRR - Section Six
Finished up round one, two and three with Leah's pattern for Tree Bark.
http://freemotionquilting.blogspot.com/2009/09/day-20-tree-bark.html


http://freemotionquilting.blogspot.com/2009/09/day-20-tree-bark.html

LIBRR-Section Five


Friday, December 2, 2011
LibRR- Section Four
I started doing a different pattern but didn't like it so ripped it out. I like these small curves....


 |
| I broke a few needles doing this - I was moving the fabric too quickly trying to rush. Did it in two sittings - part last night and part this afternoon. Only two more sections - then on to rectangles and curves and finishing it up! |
Thursday, December 1, 2011
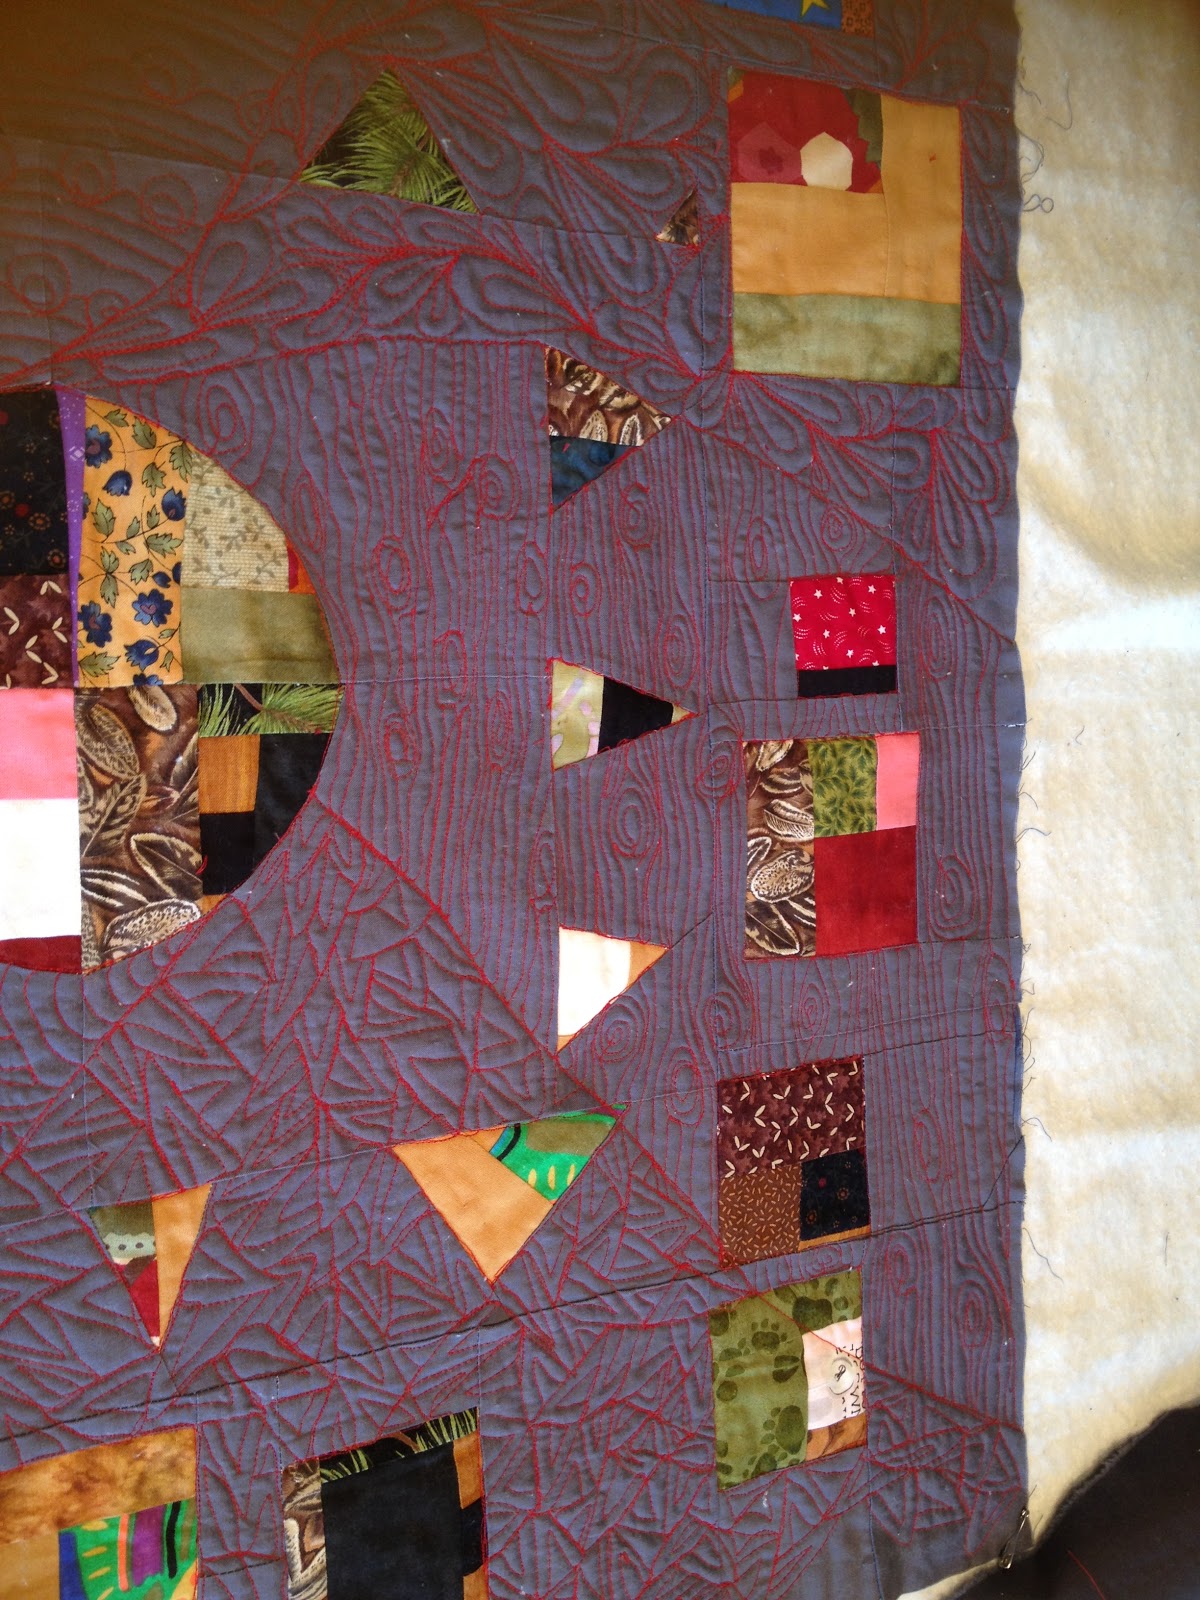
LibRR - Section Three
 |
| This pattern is called hardwood floors (as I recall). From Leah Day's site. |
 |
| This view of the back shows part of the other completed sections too! |
Wednesday, November 30, 2011
LibRR - Quilting Section Two
 |
| Second Section - Front |
 |
| Second Section - Back |
I'm not sure how closely to quilt to the edges - I will be adding sections using QAYG modified method as explained by Sarah in the Liberated Round Robin....
I think I will go back and add more little paisleys to more sharply outline the patched pieces....
LibRR - Starting to Quilt!
 |
| I really like the way the design of the quilting adds to the quilt - wonder if I should try using different color thread for the different sections? |
I decided to start by dividing the piece in to liberated sections - then I will quilt a pattern in each section - leaving the parts with piecing alone so they stand out. Next quilt I'm going to play with adding some additional suffing to these areas!
I'm doing the center section, then will add the rectangles and curves, etc. Sarah's method to complete my Liberated Round Robin.
I'm realizing after starting that Sarah did not do her quilting as densely as I am doing it so I thought to leave some of the part next to the seam to be added empty to make it easier I hope to tie the sections together. My next border is to have rectangles and I was looking forward to doing some words - but they will look so backward on the back of the project so now I'm not sure what to do. I have plenty to stitched to continue to work on while I ponder this....
I uploaded the images at original size but am disappointed that when you click on the image only the smaller version appears - so now have reset the size so it fits in the theme for the site. I guess it was Word Press that lets you make it so when clicked the image appears in the original size.
 |
| I really like the way the stitches really stand out on this darker grey - without pesky patches to distract the eye..... |
Saturday, November 26, 2011
Liberated Round Robin - Basting of Steps 1 - 3
I basted what I had pieced for steps 1 to 3 of the liberated round robin ----
Not sure how I am going to do the quilting.....
 I am also thinking of what words I would like to have in the next rows. I'm going to try to make those rows fit the batting that is already there.....
Not sure how I am going to do the quilting.....

Thursday, November 17, 2011

Monday, October 31, 2011
BlockLotto - October
I was so busy with my organization's conference that I missed October's challenge.
October Directions:
http://blocklotto.blogspot.com/2011/10/you-chose-colorway-now-choose-block.html
Examples:
http://blocklotto.blogspot.com/search/label/Oct%202011%20photos
October Directions:
http://blocklotto.blogspot.com/2011/10/you-chose-colorway-now-choose-block.html
Examples:
http://blocklotto.blogspot.com/search/label/Oct%202011%20photos
Saturday, October 22, 2011
New to Me Site: Bloggers BOM Quilt Along
http://cvquiltworks.blogspot.com/2011/09/bloggers-bom-quilt-along.html
I am just putting this here so I remember to go back and look in more detail.
The block for this month is very pretty - paper pieced - sort of looks like the start of a NY Beauty kind of block. She calls it gaggle of geese.
http://cvquiltworks.blogspot.com/2011/10/gaggle-of-geese.html
It's a store - she invites or invited selected bloggers - perhaps other stores - to post a block each month.
Thursday, September 29, 2011
BlockLotto -September 2011 - Curved Rails

Directions are here:
http://blocklotto.blogspot.com/2011/09/curved-rails-in-batiks-for-september.html
Example photos are here:
http://blocklotto.blogspot.com/search/label/sep%202011%20photos
Wednesday, September 28, 2011
Friday, September 16, 2011
Expenses
Last Tuesday, mailed extra fabric to block lotto winner - the original block I sent got lost in the mail.
Less than a dollar.
Less than a dollar.
Sunday, September 11, 2011
FMQ - River Path and WSF Section Completed
http://freemotionquilting.blogspot.com/2010/01/day-121-river-path.html
 Before:
The video is pretty clear - it shows how to start and then how to fill in on one side. Looking fotward to doing this design.
 After:
I thought this was going to be a really easy pattern to do - but I lost track of how many times the thread broke or even worse the needle skipped and then picked up again. I understand now why she had the curve arranged so the foundation line goes almost up to the edge - then the remaining stitches are just in the small area - it's hard to try and make several large curves - easier to do in the sections. The end result is nice looking - I need more practice to really like doing these large curves though.
================================================
I have now finished another basted section of the Wonky Shoo Fly quilt!
 Now I will be finding the rest of the blocks and sewing them together so I can baste them together so I can practice more free motion quilting....
 But first I'm going to switch over to working on my Liberated Round Robin project. I want to sandwich what I have done now and quilt it - then use the QAYG border method for adding my yet to be sewn rectangle and curved borders.

The video is pretty clear - it shows how to start and then how to fill in on one side. Looking fotward to doing this design.
 After:
I thought this was going to be a really easy pattern to do - but I lost track of how many times the thread broke or even worse the needle skipped and then picked up again. I understand now why she had the curve arranged so the foundation line goes almost up to the edge - then the remaining stitches are just in the small area - it's hard to try and make several large curves - easier to do in the sections. The end result is nice looking - I need more practice to really like doing these large curves though.
================================================
I have now finished another basted section of the Wonky Shoo Fly quilt!

 But first I'm going to switch over to working on my Liberated Round Robin project. I want to sandwich what I have done now and quilt it - then use the QAYG border method for adding my yet to be sewn rectangle and curved borders.
FMQ - Trippy Triangles
http://freemotionquilting.blogspot.com/2010/01/day-119-trippy-triangles.html
 Before:
 I'm going to need to relook at this video - I'm having trouble understanding how the next row is done! I wish she had shown the transition - but oh well, I'll figure out a way for me to do it - tomorrow or the next day. I have to finish up some paperwork before I can sew anymore for a while...
The design looks very complicated to me....
After:
I like it! I had to think while I was doing the design - but it was very forgiving and I think looks terrific! I don't think I broke the thread at all - but I think I had to put in a new bobbin. I wasn't sure my triangles were straight enough - but they look great. I'm very happy with the block.
Saturday, September 10, 2011
FMQ - Rainforest Leaf
http://freemotionquilting.blogspot.com/2010/01/day-112-rainforest-leaf.html
 Before:
 At first I thought this would be really easy, but after seeing the video I'm thinking lots of curves to break thread and needle. She shows how she has to reposition the fabric while doing the side of the leaf, but I'm not really sure why she did that. Well, I'll give it a try!
After:
The design was easy to sew. easier than the earlier leaf pattern too.
I think the thread broke just two times - could that one of those times it was a needle break too. I can't remember...
Friday, September 9, 2011
FMQ - Mesh Curtain
http://freemotionquilting.blogspot.com/2010/01/day-115-mesh-curtain.html
 Before:
 The design is pretty easy - just curvy line down, then curvy line up crossing in the center - repeat - then go back and add two more lines. I sort of think the last two lines make it look too jumbled - but what do I know? I wonder how hard it will be to actually get those crossing lines in the center of each space....
After:
Very easy. I did somehow manage to break a needle while doing this - but even so it was an easy pattern to do. Maybe I broke the needle with the previous pattern - big leaf. I really can't remember now.
FMQ - Modern Art
http://freemotionquilting.blogspot.com/2009/12/day-110-modern-art.html
 Before:
This design appeals to me - and I liked doing the designs it was based on earlier in the project so I'm anticipating enjoying this one. In the video she shows how to get to the second side of the design on the block so that is very helpful.

After:
It wouldn't have taken any time at all to do this block - except - of course I ran out of bobbin so had to rewind my spools again. That always takes time. I like the way the pattern looks - can't imagine doing this on a piece that is much larger than what I am working on now....
FMQ - Overlapping Arches
http://freemotionquilting.blogspot.com/2009/12/105-overlapping-arches.html
 Before:
The simple design seems doable - the complex one does too. She mentions marking it when doing the more complex pattern, but doesn't show an example. And the video does not show how to start and end new rows of the design in the block. I think if you just wrote down directions to yourself you could do the more complex pattern. Wide short arch - go back to center and do tall skinny arch - go back to center and do a tall wide arch - something like that. I'm not even sure marking really would help for this design as there is so much traveling back. I'll have to draw this out to figure out the traveling required. I'm thinking this is not really a beginner design as traveling is required.... We'll see...
 After:
Getting to the second row wasn't as difficult as I thought it would be. I just did the simple arch version - in the end it reminds me of the Cat design from the very first - I didn't like that one. Don't really like this one either - will need to try again with a more complicated plan so it looks fancier.

The simple design seems doable - the complex one does too. She mentions marking it when doing the more complex pattern, but doesn't show an example. And the video does not show how to start and end new rows of the design in the block. I think if you just wrote down directions to yourself you could do the more complex pattern. Wide short arch - go back to center and do tall skinny arch - go back to center and do a tall wide arch - something like that. I'm not even sure marking really would help for this design as there is so much traveling back. I'll have to draw this out to figure out the traveling required. I'm thinking this is not really a beginner design as traveling is required.... We'll see...
 After:
 Getting to the second row wasn't as difficult as I thought it would be. I just did the simple arch version - in the end it reminds me of the Cat design from the very first - I didn't like that one. Don't really like this one either - will need to try again with a more complicated plan so it looks fancier.
Thursday, September 8, 2011
FMQ - Bright Star
http://freemotionquilting.blogspot.com/2009/12/103-bright-star.html

 Before: Hard to believe this one is coded as beginner level there is alot of moving of the fabric to sew the design. It will be easier than Hot Coil as it's straight lines.... She gives the advice to slow down when you approach an area that will have a lot of thread build up, as the slower you stitch the less thread is left. So that sounds like a good tip.
After: This was a pretty easy design. I messed up a few times in the center and when I was going backwards to do a line I ended up in the wrong area. It looks pretty nice though. Would be nice as Leah suggested to use in a holiday quilt. As I was doing it, I was wishing I had pencils to mark the lines - so that might be something I end up buying....
Wednesday, September 7, 2011
FMQ Heat Coil
http://freemotionquilting.blogspot.com/2009/12/101-heat-coil.html
 Before:
 I remember reading about this design when Leah first posted it - a cute idea.
After:
Boy, I broke the thread about five times, and even broke a needle. This was hard to do with my larger blocks than I thought I would be! It is a good learning design though.

 I remember reading about this design when Leah first posted it - a cute idea.
After:
Boy, I broke the thread about five times, and even broke a needle. This was hard to do with my larger blocks than I thought I would be! It is a good learning design though.
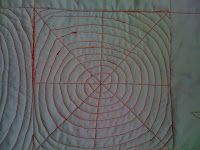
FMQ Super Spiral
http://freemotionquilting.blogspot.com/2009/11/day-98-super-spiral.html
 Before Sewing:
The video seems clear - there is alot of fabric moving to get the design done - but I will try to do without moving the fabric.
After:
Was rather easy to do. My middle points are all joined up - but it looks nice. Toward the end I did some stitching from the other direction so I think it looks even.

Tuesday, September 6, 2011
Expenses
Mailed the BlockLotto August Block (Violet) and some extra fabric to Newberry Florida.
.84 postage.
.84 postage.
Monday, September 5, 2011
FMQ - Wobbly Cosmos
http://freemotionquilting.blogspot.com/2009/11/day-97-wobbly-cosmos.html
Before:
The video is clear - the design is a natural after the jagged cosmos. It is a pattern that requires the sewer to reposition the fabric... 1:10 pm
After:
1:30 pm Went pretty quickly. Broke the thread only once so that helped with the speed. It's a nice design.
I realize I've been including the taking photo time when I've been putting the times in so it really isn't taking me as long.... 1:45 pm
I've completed another section.
I have one more that is basted and ready to prepare for FMQ....
 |
| Wobbly Cosmos - Front |
The video is clear - the design is a natural after the jagged cosmos. It is a pattern that requires the sewer to reposition the fabric... 1:10 pm
After:
1:30 pm Went pretty quickly. Broke the thread only once so that helped with the speed. It's a nice design.
 |
| Wobbly Cosmos - Back |
I've completed another section.
 |
| Section Front |
 |
| Section Back - with the artistic red strip! |
FMQ - Jagged Cosmos
http://freemotionquilting.blogspot.com/2009/11/day-95-jagged-cosmos.html
Before:
The video does show that the fabric needs to be moved as you get to different parts of the design.... At the corners you have to sort of fill the pattern in - then remember to add the points again as you continue on with the design. It would be difficult to do with a big sandwich - but I have a pretty small one so will give this a try!
11:57 am
During:
Broke the thread a few times, ran out of bobbin, replaced with a not full bobbin, ran out of bobbin, reloaded two bobbins. While I was doing the pattern I thought how I was not doing what Leah had shown.
After:
12:45pm
Now that I see it, it looks pretty good. This was a good design to practice making angles and repositioning the fabric. To avoid the straight lines I added an angle before I thought I was going to have to reposition the fabric. This will be one I try again later.
Before:
 |
| Jagged Cosmos - Front |
11:57 am
During:
 |
| Jagged Cosmos - Back |
After:
12:45pm
Now that I see it, it looks pretty good. This was a good design to practice making angles and repositioning the fabric. To avoid the straight lines I added an angle before I thought I was going to have to reposition the fabric. This will be one I try again later.
FMQ - Leaf Veins
http://freemotionquilting.blogspot.com/2009/11/day-92-leaf-veins.html
Before:
The design looks really nice on her sample block. The video is sort of clear - she does not show how to get to the other side - I suspect she she had to turn the fabric once already it will be necessary to do that again.....
After:
This is a beginner design. I did break the thread two times - but I was going too fast. The trick I think is to think about the leaf standing up so the angles are going up too - wider at those ends so it gets shaped correctly.
 |
| Leaf - front |
The design looks really nice on her sample block. The video is sort of clear - she does not show how to get to the other side - I suspect she she had to turn the fabric once already it will be necessary to do that again.....
 |
| Leaf - Back |
This is a beginner design. I did break the thread two times - but I was going too fast. The trick I think is to think about the leaf standing up so the angles are going up too - wider at those ends so it gets shaped correctly.
Sunday, September 4, 2011
FMQ - Oil Slick
http://freemotionquilting.blogspot.com/2009/11/day-89-oil-slick.html
Before:
I watched the video - design involves creating squiggly loops and filling them in - then tracing back over those areas and starting another loop. There are notes to use thin thread - but I only have what I have. I know the traveling part will look okay on the front, but on the back it will look real ugly.
I do not think this is a beginner pattern at all. So we'll see how I do! (My first thought was to just skip it but I think I will try later on....)
I wrote to Leah earlier about how she codes the beginner patterns and she said something about how she needed to have beginner designs or people would think it was too hard - but I think she has enough patterns now that she could go thru and redo her coding - it would save other beginners frustration. I think the curvy patterns are harder - the ones where you have to move the direction of the fabric are harder - the ones where you have to travel back are harder too. Any design with these three characteristics are not beginner ones they are at least beginner intermediate!
I drew the pattern on a piece of paper to test it out and decided to give it a go.
But then I remembered I had finished the last section of the Wonky Shoo Fly, so I had to spend time getting a new section ready for FMQ. That always takes a while - and since my walking foot isn't working right I first tried with the darning foot - then just the regular 1/4" foot - that worked better to outline the blocks that have a wonky shoo fly....
After:
It wasn't as hard as I thought it would be. I broke the thread two times while doing this block - but it wasn't as scary as I feared. It doesn't really look like an oil slick - but it's what the block was telling me to do....
I think it wasn't hard as I wasn't really doing the pattern as she intended. My result looks more like some sort of modern Danish drawing of people bending and sitting on different things. Looks okay though - I'm moving on to the next beginner design!
Before:
 |
| Front - Oil Slick |
I do not think this is a beginner pattern at all. So we'll see how I do! (My first thought was to just skip it but I think I will try later on....)
I wrote to Leah earlier about how she codes the beginner patterns and she said something about how she needed to have beginner designs or people would think it was too hard - but I think she has enough patterns now that she could go thru and redo her coding - it would save other beginners frustration. I think the curvy patterns are harder - the ones where you have to move the direction of the fabric are harder - the ones where you have to travel back are harder too. Any design with these three characteristics are not beginner ones they are at least beginner intermediate!
I drew the pattern on a piece of paper to test it out and decided to give it a go.
 |
| Oil Slick - Back |
After:
It wasn't as hard as I thought it would be. I broke the thread two times while doing this block - but it wasn't as scary as I feared. It doesn't really look like an oil slick - but it's what the block was telling me to do....
I think it wasn't hard as I wasn't really doing the pattern as she intended. My result looks more like some sort of modern Danish drawing of people bending and sitting on different things. Looks okay though - I'm moving on to the next beginner design!
Monday, August 29, 2011
FMQ - Stomach Lining
http://freemotionquilting.blogspot.com/2009/11/day-88-stomach-lining.html
 Before:
Watched the video and saw that she did not change the orientation of the fabric while she sewed this center out design. It's been a while since I did FMQ - we'll see how many needles I break while doing my block!
12:08 AM
After:
The design sewing went a lot better than I thought it would. I broke the thread one time - but did not break a needle! Hurray! Turns out I didn't have the start in the center of the block so I sort of did u-turns to fill in the space. I don't think it looks like a stomach lining, it doesn't look like Leah's model. But it is a pretty nice design. This is my first center out design to FMQ. 12:35 AM

I have now finished another section of the Wonky Shoo Fly Quilt.


Subscribe to:
Posts (Atom)