Pages

Friday, April 6, 2018

Leah Day's Explore Walking Foot Quilting: Pinstrips

Another Leah Day Walking Foot Design: Pinstrips!

I used the guide for the lines that were 1 inch apart, and don't tell my husband as he got me the 1/4 inch masking tape, I used the walking foot itself for the 1/4 inch spacing.

Took about 34 minutes including swapping out a bobbin for one that was already filled.

Looks pretty nice.

I think it would really look better used for  outlining another design.  Like Leah has in her Mega star workshop.

The batting for my block is Quilters Dream Cotton, Select, Natural.


Now I'm off to the grocery store.  Louise was nice enough to send me the crockpot recipes she uses.  I'll have to find and set my crockpot up for the weekend, but still will get the supplies today!

Leah Day's Explore Walking Foot: Desert Sands - the redo

I had to redo my sample of Leah Day's Desert Sands as the first one was stained by the HDX spray adhesive that I used to baste the block...

So here is the redo.  The angles in my piece made it a little weird, but if this is a block I use in the final quilt, it will be used!

The batting for this piece is Quilter's Dream Select Natural.


My first line.

To know when to stop and turn I used pieces of tape then inserted a pin.
I removed the tape and only kept the pin to show me where to stop and turn.


Took 30 minutes to sew this half, and 52 minutes to sew the entire block.


Tuesday, April 3, 2018

Leah Day's Explore Walking Foot: Bright Star with Lines

I finished up my extra block for the Marvelous Mosaic Quilt.  My husband had stopped by the SDSU campus Blick's store yesterday and got me the 1/4 and 1/2 inch tape I had requested, but in rewatching Leah's video I heard that I could be using the walking foot itself as a guide for those lines.  So for this practice block I did that.  I also used the guide bar for the one place where the lines are 1 1/2 inches apart, and I eyeballed the second line from the center.  It all looks good to me... Not perfect, not just good enough, but good.  I'm pleased.


My original plan was to make this block a miniature of the quilt, but my design was off center so I stuck with adding the lines to the corners of the fabric.

------
Not Quilting

Goodwill came and picked up the secretary my Mom had given me.

After he returned from helping to move it to the front entryway, my son asked how I felt about giving it away, such a nice boy.  I think he would have moved it right back if I had expressed any second thoughts!

I told him I was just making myself remember how I enjoyed it when I was a kid.  So much fun to put things in the cubby holes and to close up the front to hide the desk too.  I would have had to drill a hole in the back to use it as a desk now (as that is how I would get the electricity to the computer.)  It was really made for another time, another life.

I had let him set up a desk in it too when he was little, too little it turned out.  He accidentally nicked the front with a stapler when he was getting down from the chair and I was afraid it or he would get too banged up,  so that was just a short experiment.  : ( He has no real memories of using the desk.

But I feel okay about letting the secretary go.  I remember that my mom said she was going to offer it for a garage sale and how I said 'oh no you can't do that'.  So she sighed and didn't put it up for sale then.  As soon as I had a place of my own she moved the furniture so I would have it.  In my condo, I had it in the living room so it was the first thing people would see when entering the front door.  I used the top as a book shelf for my paper back books.  I remember thinking if I sold all of the books for 25 cents each I would have enough to get a Paul Revere bowl.  So I sort of did that.

Recently I placed that Paul Revere bowl on our current display/book shelf. It was all tarnished, but I hired a lady to help me with cleaning and she surprised me and shined it all up!


Those plastic grapes are part of the deal when my Mom purchased their living room and dining room set from Biggar J H Furniture in Pasadena (now closed I just checked).  I remember her telling people when they come over and were admiring the new furniture how she bought everything in the display at the store, including the knick-knacks and pictures for the wall!  We still use some of those furniture pieces in our den and living room.  

The larger picture is our son taken a year or two after he graduated from high school. He looks like a movie star I think. 

The smaller one is when he was five years old wearing the dinosaur shorts I made him with a friend at the end of fun trip somewhere - July 7, 1993.  So sweet.  I heard that little girl got married well after her wedding.  We weren't on the list to attend the wedding which I can understand, but it my feelings were hurt that her mom didn't even email me an announcement after the event.  Oh well.

Okay, so here is the secretary.

It was always hard to figure out where to put it.  It had been in our living room, dining room, den, and ended up in the hallway when my husband moved it to get it out of the way when we were rearranging things after having the house painted.

The glass doors got stuck shut with that move, so the top has been empty for a while.  Before that I had special photos of our son and art work and pieces he made on display. I had used a Marti Gras necklace (that I got on the trip with my husband when he was going to propose to me but chickened out) to keep the doors closed but not shut as I knew it was extra hard to open those doors.

When I was a kid, I remember coming home from school and being so surprised that my mom had moved it to different places and rooms in our house then too.  I guess she had a hard time finding the perfect place for it too.  It was something she purchased.  She told me the door windows had 13 sections, one for each of the original colonies.

I still can't figure out how she moved it by herself.  And I can't figure out how my husband was able to move it up and down the stairs by himself either.  I was taking care last night that our little dog wasn't underfoot when he and my DS did the final move of the secretary so I don't really know how that was done either!

This morning when it was waiting in the front entry for Goodwill to pick up, I took some final photos.
Angeles Furn, Mfg. Co., LA Calif, 874


Most recently, I kept wrapping paper, ribbons, and tape in some of the drawers.  Office supplies or large art projects mainly in the others.


 I realized I didn't have a photo of the desk part of the piece. Since it was placed so close to the wall while it was waiting for Goodwill I couldn't open it up completely.  But here is the inside.

For years in the the two vertical pull out places I kept some three days passes to Disneyland (that still had one day left that I thought we would use someday - but didn't).  And it was where I put the medals my father won at the 1928 and 1929 Junior Olympics, our passports, those yellow immunization cards, and our car pink slips.  I had a little stash of greeting cards in one of the slots so it was easy to pull one out when it was needed.  When I was younger I had sealing wax and seals in the drawers, and for a while I had ink and fillable pens behind the little door.  My Mom, or maybe it was my Godmother, gave me a special desk pad that protected the bottom of the desk.

My Dad's medals.


Two Christmases ago, when our son expressed an interest in learning how to play a violin,  I gave him my Dad's violin.  DS was going to get a practice instrument, but I thought he might as well use the one my father and I had both used!  There was a local place that fixed it up for him.  They put new strings on it, perhaps a new bridge, polished it up and I got him a new bow.  Neither my Dad nor I had played it at all for many years. I don't even know if our son remembered I had the violin when he mentioned wanting to play one.

My Dad played little snippets of songs off and on through out my childhood.

I remember my Dad got the case redone for me when I took lessons in junior high (or maybe it was a entirely new case).  I tried, but was never very good at the violin. Always in one of the last three chairs in the orchestra.  I made a good friend of the girl who was always first or second chair (at the front), so it was fun to have that experience. Her last name was Bonaparte.  (I was so surprised later when I learned that was also a famous last name.)


 Her family would have me over for dinner sometimes.  They always knew what they were having for dinner as their mom had a schedule for the meals.  Something like: Friday- tacos, Saturday - spaghetti, Sunday - ham or roast beef, Monday - meatloaf, Tuesday - hamburgers, Wednesday - mac and cheese, Thursday - chili.  It was a great idea I thought. I really liked the tacos.

My mom didn't do that.  As I recall, we mainly had different salads or went out as my dad was away doing construction work.  My favorite meal for a long time was hamburger patties with peas and Kraft mac and cheese.  My mom made great french dip sandwiches too. She made a lot of good food actually.  But that isn't the focus of this memory.

When I got married I proposed having meals on a schedule to my husband, but he didn't think it was a good idea.  Until our son was in high school we mainly ate out so it ended up not being an issue.  It would be good if I could come up with a new schedule of meals and as long as I didn't announce it or better yet had more than 9 dishes to rotate it would be great with him.  He'd just be glad I think to have me make meals.  Let's see.  My schedule would be something like: Lemon Chicken, Curry Chicken, Stuffed Salmon, (Fall/Winter) Costco Meatloaf/Potatoes, Pollo Asado, Scrambled Eggs, Grilled Chicken.  It's difficult to come up with 9 dishes to rotate!  Think I will work on this idea though.  Better late than never.  I wonder what you have for dinner!! 😀

When our son started at Waldorf they had an unwritten schedule for the kids to wear different colors every day.  It wasn't in rainbow order.  I can't remember now, but at the time it made it very nice when it came to dressing him for school.  I liked the idea of having limited clothes to deal with.  He always looked nice.  Made it easy.  I wanted to do that for myself too when he was at Waldorf, but I didn't have as many colors.

For many things, it's better to have fewer choices, fewer decisions.  Then there would be more time for important things!

My folks
Well, I'd better get back to today and get dinner planned and bookkeeping started!


Monday, April 2, 2018

Leah Day's Bright Star Procedure Refined

Leah Day's Bright Star Design is really impressive.


Her procedure uses tape for the marking of the lines.  After determining where the center is, she starts each spoke in the center and goes out to the end.  So for each spoke there are two threads ends that need to be tied off and hidden.  She says the center spot will build up after a while so she suggests starting a few stitches beyond or ahead of the center so there will be different starting points.  Here is an image of her idea of putting several pieces of tape down, then removing them after a spoke is completed.


I made an example block and was really pleased with how it looked.
Post: https://quiltquest.blogspot.com/2018/02/leah-days-explore-walking-foot-quilting_4.html

But now that I have finished my second try in my quilt, I knew I had to rethink how I did the design. I just did not like the way the center looks, especially on the back. 

I'm happy to report that my new way works - at least in a single block.  I will need to put in a quilt to see if the additional twisting of fabric is doable in a larger piece, but I do believe if I go slowly things will look nice.

So here are my three examples.  You can see the thread in the center example looks a lot cleaner than the other two (or at least I can in person).  I believe you will be able to click to further enlarge the photos.  On the right you can see where I started the stitching beyond the front as I thought it would match with the other spoke and be hidden.  I did this several times, but in the one instance it didn't match.  (I probably didn't understand what I was supposed to be doing.) Because I was hiding the threads after each spoke was completed, I think this would be really difficult for me to fix.
Double click image to see detail.


Here is what the backs of those blocks look like:  
This is more difficult to see as my backs have so many fabrics, but still I think it's clear that the center example looks the cleanest.
Double click image to see detail.

Here is what I did differently.

I used tape to mark from the outside to the center point.  Then I picked another outside point and used another piece of tape to mark going from that point to the center, being careful to arrange the tape so it would not need to be lifted until the two spokes were sewn.  

So to get two spokes sewn with one pass of the machine was easy.  I started at the outside, brought the bobbin thread up, and sewed to the center.  Kept the needle down, lifted the walking foot and turned the quilt so it was oriented correctly.  Then I just sewed to the end of the second spoke.

After a few times I marked a little dot on the tape pieces to show where the starting and ending point would be and that helped since my sample block does not have piecing seams to use as starting/ending points.

I saved time by only tying off and hiding the threads after a 4 or 5 angled lines (8 or 9 spokes) were completely sewn.

There was perhaps more stopping and starting as I had to tape/mark again after completing the two spokes, but I halved the number of thread breaks so there were fewer threads to tie off and bury.

It seems to me this is going to work!

The back and the front of the block will be very neat looking in the center.


Like I said, this procedure works for an individual block.  I'll be testing tomorrow on my real quilt to see how it goes with having to move an entire quilt around while stitching the design.

Well, now I have a few more quilt block sandwiches prepared so I can continue with the Leah Day's Marvelous Mosaic Quilt

It's the first of the month so I know what the new color will be for the Rainbow Scrap Challenge (gold and yellow). I found a fun way of using my rainbow scrap challenge strip blocks - from Sweden no less!  http://kviltstina.com/2015/05/tutorial-for-january-scandibee-quilt-or-sort-of/  I'll have to start making neutral strip blocks too.

It's the first Monday of the month so I have the new April pattern from Alida for the Starry Bright Sky QAL

I'm pleased with the progress I have made on my sewing projects.  Even considering posting a One Monthly Goal at Elm Street Quilts.  What to commit to?  I'm thinking...

Having friends over here for dinner tonight, already did some weeding this morning, and read 30 minutes too.

: )


Leah Day's Explore Walking Foot Quilting: My "Rainbow Log Cabin" Part 3

The adventure slowly continues - I have changed my estimate to this taking at least 20 sewing sessions to finish the quilting...

Part 3:
54 minutes:  finished the rest of the spokes for the first super star.

You can double click to see the centers more closely.


Hmm.  I'm not happy with the way the design looks in the center.  I went back to my original Bright Star practice and see that it also doesn't look great in the center...

But I'm pleased I have one of the four blue spaces quilted!

Wednesday, March 28, 2018

Leah Day's Explore Walking Foot Quilting: My "Rainbow Log Cabin" Part 2

Part 2 of the quilting adventure:

(I had estimated ten sewing sessions to finish the quilting on this top, but based on today it will take much longer...)

Today:

28 min - Applied painters tape to outline the outer center square and then sewed the square.


110 min - Applied painters tape to show initial line for all four blue areas.  New bobbin.  Applied tape to determine center of blue area.  Sewed two lines end to end.  Sewed third line but had to remove it as it was not going thru the center.  Marked half spokes and sewed 8 of them.


Tuesday, March 27, 2018

Leah Day's Explore Walking Foot Quilting: My "Rainbow Log Cabin"

Part One of the Quilting Adventure:

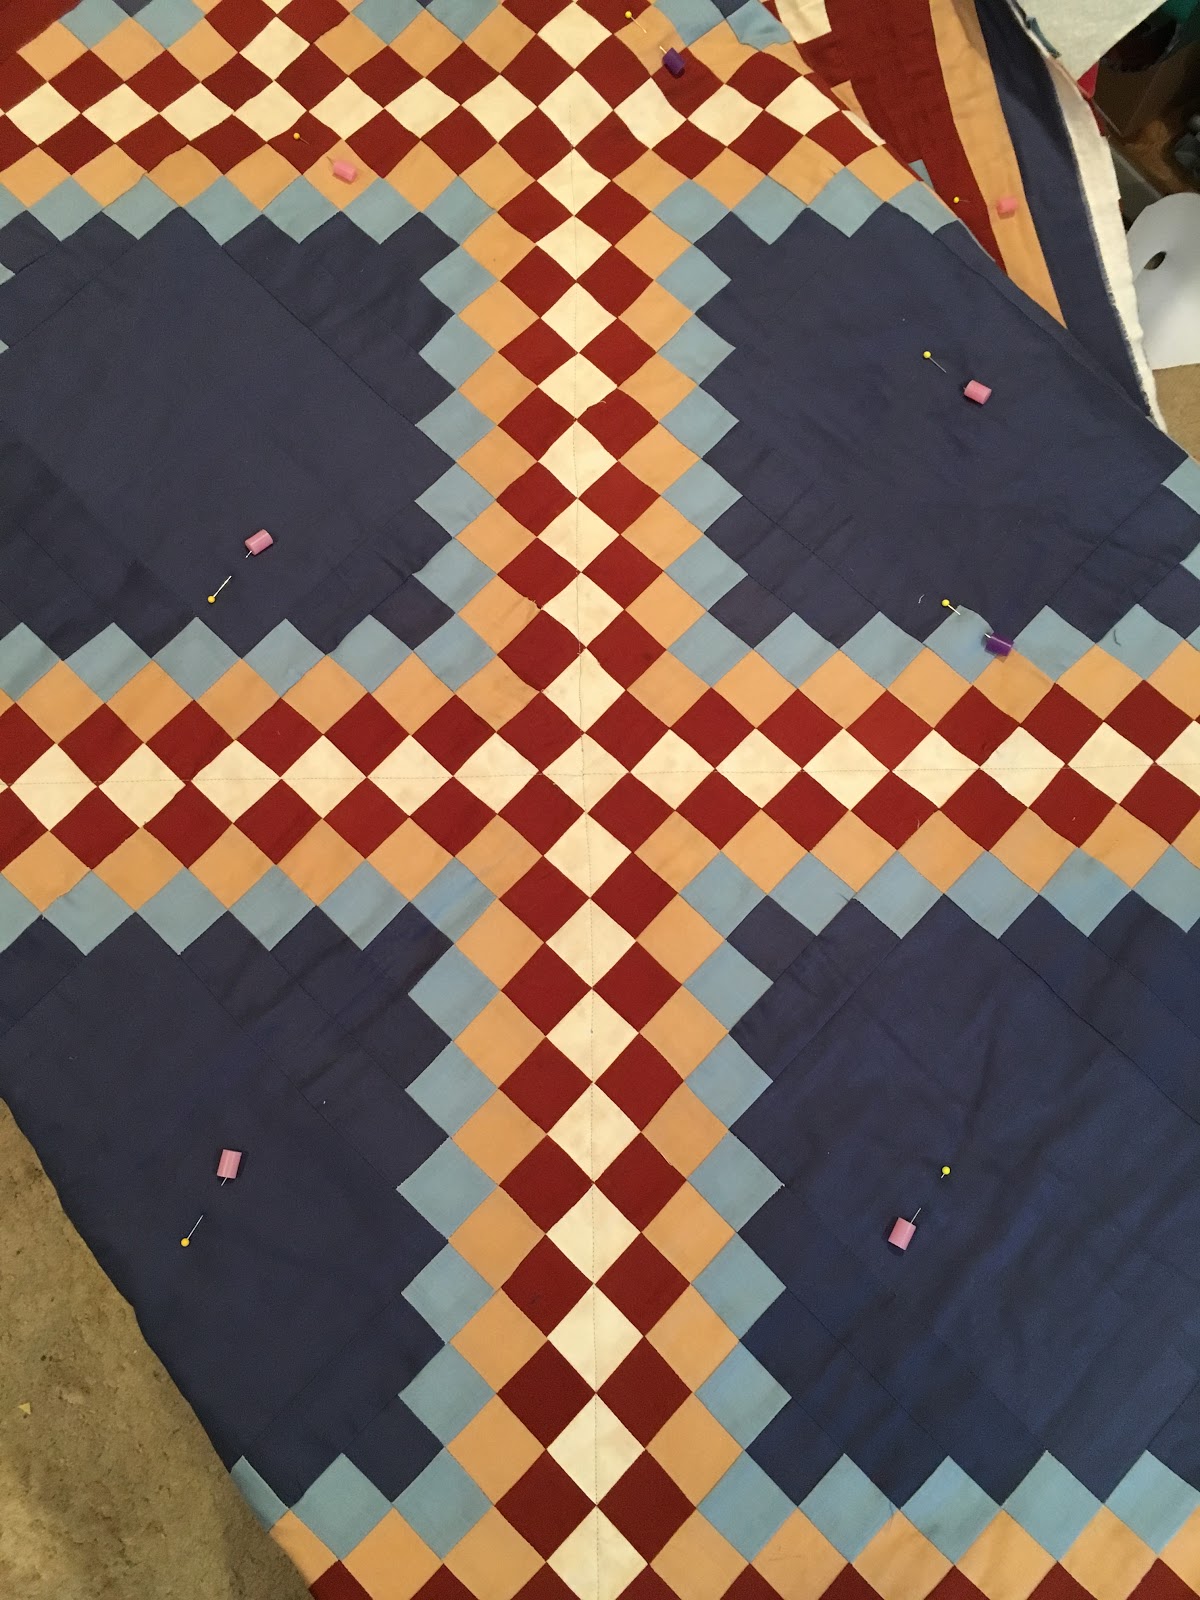
In Leah Day's Explore Walking Foot Quilting, she has folks begin with making a very pretty rainbow log cabin.  I have so many unquilted tops that I just couldn't make another one.  So I decided to use my quadruple Irish Chain for the first project in her class.  I think this was the second or third quilt top I finished.  I know it was the first I made without a pattern.  I had liked the Irish chains I had seen, but wanted more colors.  So I figured out how to make this one:

I can't really remember how I made it, but know it involved make strip sets and subcutting, then putting things together.  (I forgot to take a photo of the flip side of the full quilt, but even looking at the back it is difficult for both a quilting friend and for me to to figure out how I sewed the pieces together. We couldn't find the block lines.)  I remember when I was sewing it how I was shocked at how large the dark blue parts became, and how much more of the beige and rust were becoming the face of the quilt.  I didn't draw and color things out to scale, I just figured where the pieces would go to make the design.  In my mind this was going to be a blue quilt with rust, beige and lighter beige accents.  When I saw what it had become, I started adding more of the little light blue/dark blue center bits, instead of making more of the large dark blue areas.  I extended the ends into the first border because it made the design float and was, I thought, rather cool looking.  I added the extra blues in the corners to also try to have more blue.  Immediately on finishing the last border I remember thinking how I should have made that border wider as it would become very small once I put on the rust binding.  Fun problems.

In those days machine quilting was new.  No one around here was showing how to machine quilt things.  I didn't want to hand the project off to someone else to finish up.  So this project sat in a box for around 26 years.  Was that the right decision?  I'm not sure. Well, probably not.  It would have been nice for my son and husband - and for me -  to be in a house with quilts...  But I really wanted to do the entire quilt myself.  So now with Leah Day's help, I will be able to do that.  I have been practicing on charity quilts, and gift quilts. I will continue to do that, but now I'm starting to work on a quilt that will be used in this house!

I pulled it out now to repair a piece that had wax on it, and to use as my first practice quilt for Leah Day's Explore Walking Foot Quilting project.  I was planning to do the quilting she prescribed on that quilt on this quilt...  But now I may change things up.  I'm still thinking.

Her quilt is made so the log cabin blocks are arranged so the final quilt appears from a distance to be one large block.  Here is her quilt with the quilting.  She has just two quilting designs on this 80 x 80 inch quilt.  In the center there is what she calls a giant bright star, surrounded by several concentric squares, and then in the corners she has a variation of the bright star (each corner has a quarter of the bright star that begins in the corner and goes back to the concentric square).  It's completely doable with the book and the videos on her site.


I'm thinking that I perhaps should have a bright star in each of the four larger blue parts, surround each with a concentric square and then put a few concentric squares around all those and then continue as Leah has shown. Instead of changing thread colors, I'm planning to use my grey for the top and bobbin of the entire 60 inch square quilt.

So right now I have just sewn the initial X in the center. I used painters tape to do the marking.


And ta dah - here are the first two lines of quilting on the quilt!


(I spray basted this project, so that is why there are not many pins.)

I created this backing made of left over bits and fabric when it was not 'a thing' to do - also then it seemed solids were not a thing.  But I sure like them. When I was sewing the quilt I liked the back of the quilt more than the front.  Now I can appreciate both sides.

Sharing via Em's Scrapbag: Moving it Forward

Sunday, March 25, 2018

Google Art Palette

https://artsexperiments.withgoogle.com/artpalette/

At first it seemed sort of the opposite of what we quilters would use. But then I could see it could be useful.

You find a photo or upload one and then see results of different art pieces made with that palette of colors.

So I uploaded a photo of my sample Walking Foot blocks, see the colors they pulled out of it at the top of the screen (useful) and then see the images they selected below.


Leah Day's Explore Walking Foot Quilting: Desert Sand

Leah's new design is called Desert Sand.  She has words and video on her website @ https://leahday.com/pages/how-to-quilt-desert-sand-walking-foot-quilting-tutorial

Took a couple of looks at the video, and the book to plan out my initial quilting line.  Although mine looks different than Leah's, I'm really pleased with it.

It took me longer as I misplaced the fabric I had cut to make the backing so I had to get out other fabric and make up a few blocks.  In the process I straightened up my sewing room a bit so that was good I guess.

I used some new-to-me basting spray to put together these sandwiches, and didn't notice until I was about half done with the stitching that the places where I double sprayed have a different color.  You can see in the photo below...


Doesn't show on the back as far as I can see...


I had prepared two sandwiches at the same time, so I removed the fabric from the unquilted one and put it in the wash with some towels. (thinking the heat and/or soap might melt it away)

But the stain did not go away.  I used 409 to remove the over spray from the counter so I sprayed the fabric and was able to get most of the glue off the back fabric with a  toothbrush, and washed again but there is still some color.  With work I could remove all the glue.

409 won't help the desert sand sample I finished up unfortunately.  That glue will always be in the quilted sandwich. : (

HDX Multi-Purpose Spray Adhesive - Purchased at Home Depot

This is the spray I used for the basting.  A friend uses it and recommended it.  (It's less expensive than the stuff one buys at quilting or fabric store.)  But probably she sprayed the batting instead of the fabric too so there is no problem then.  Also she sprays outside on a piece of plywood that she doesn't care about over spraying, so guess she doesn't double up on the spray.  And she perhaps has only used with dark fabric.  So I still think there is a chance of using this for quilt basting.  

Added: I blogged about my friend's spray basting when she helped in 2016 - in rereading that see that she usually used an unknown to me 3M product.  She sprayed on the backing, applied the batting, then sprayed the batting and applied the top - and the top she was helping me with was all dark fabric.

But I will use Dritz or 505 Quilting Spray Adhesive again for real quilt tops.  I'm glad this was just a block that was wrecked. 

** I just searched for "Quilting Spray Adhesive" and see there are several other brands to try too...