Pages

Saturday, January 6, 2018

RSC18 - Light & Medium Blues

I have finally finished something in 2018 that counts as quilting!!!

For several years, Angela has been hosting the Rainbow Scrap Challenge.  I am back to taking the challenge, my way.   I'm going to continue to make one block a month...

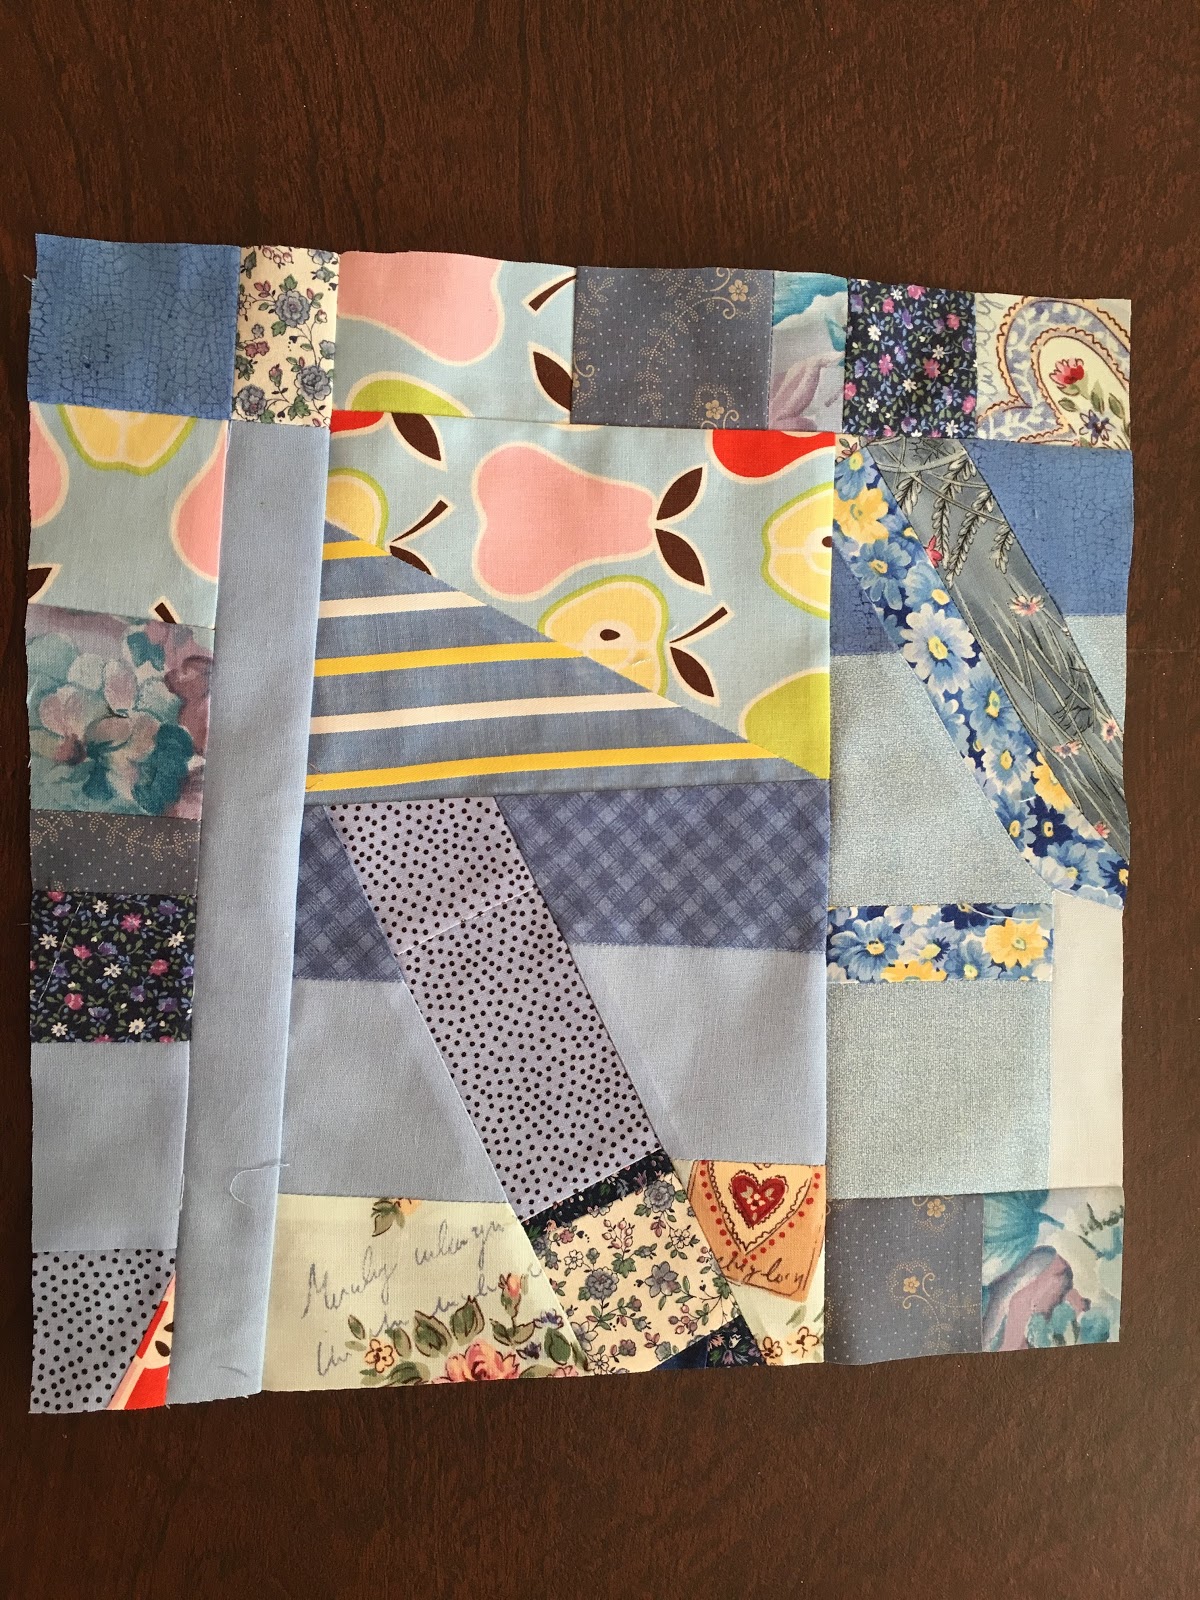
So I got out my box of scraps! and was pleased to see the light blues on the top, that made it easy...


And my 14 inch ruler - picked out the light and medium blue scraps, and made this one block:


I'm a slow sewer and worker, but perhaps this year will get more things done.  These scrap color blocks will be combined with the blocks I did in 2016 and make a nice comfy quilt. Here are the posts from 2016, the last time I did these kinds of blocks...

=========

I'm linking up to Rainbow Scrap Challenge.

Received: Beautiful Patterns from Quiltscapes

https://quiltquest.blogspot.com/2017/12/busy-busy-and-quiltscapes-pattern-winner.html

Last month I won these beautiful patterns from Quiltscapes.  The directions are very clear, I was especially interested in the Techno-Tag Quilt as I had planned on making one for my Godsister's son and DIL - they use one of these tags on their wedding invitation.  But Deonn told me the tagging wasn't being supported anymore - so she sent along an extra pattern and the material and pattern to make a cute bird ornament.  

These will be lovely to read in more detail, and to make too!

Thank you so much Deonn!


Wednesday, January 3, 2018

Jan 3 2018: Progress

Well, not really a lot in the quilting department - yet!

Let me go back....  For Christmas this year instead of gifts, I gave each of us ten index cards, and the task of thinking of places and thing we'd like to do together this year - and then to do it!  Too many times we have said we were going to do something and it hasn't happened.  Hopefully these little thirty cards will push us along to having some new experiences together!  Of course, they can't all be long weekends, but a new park or part of town for a walk or coffee would be good too. (I'm going to display the cards on the frig to mark our progress.)

My husband came up with the first idea that we did already! We went to Borrego Springs for the New Year's weekend. DH's idea was to take night sky photos and doing some ham radio exploring too. Stayed in a house so our little Buffy could come along too and have different windows to look out. We didn't think ahead though as there was a full moon so the stars were not very clear after all, radio interference at the house we rented, Still we made the best of it and enjoyed the time to read, relax, cook and chat. Had one meal a day at a cafe, and logged into HQ Trivia for New Years - funny how that turned out.  Did any quilters log on for the event?

Our next adventure away may be a weekend in Idyllwild.

Very low key, but a great way to start the year.  We returned late last night, but while we were there I read QProject 1A - 2018 Leah's post and watched her video about the first part of the machine quilting project that I'll be working on this year, and I read the email from Alida about the  QProject 3 - 2018 Starry Bright Sky QAL.

I washed almost all my fabric before going to a wonderful workshop in Berkeley last fall that I haven't blogged about yet - but my fabric is ready to starch and press and cut.  I just have do commit to the colors to use for the projects. 

QProject 4 - 2018

I'm reminded of a fun blog hop that I have signed to to participate in next month, though so will let you know about this!  I haven't decided on my project to post yet, but it will be fun to think about and do.  Fun for me, and will be fun for the followers too!


http://www.justletmequilt.com/2017/12/put-little-love-in-your-quilt-blog-hop_20.html

The rules are simple, and came today in the mail from Carol, the organizer:

The blog hop is a month away...plenty of time to finish a project, right! I can't wait to see what your heart project is! Besides the rule about having a heart somewhere on your project, the other rules for the blog hop are pretty simple:

1. Show up on your assigned day. I like to schedule my post for the night before around 11 p.m. MST. That way if I'm still awake I can make sure it posted, plus it lets early risers and other time zones see your blog post in the morning.

2. Post the list of the other bloggers on your blog post.

3. Visit the other blogs and leave a nice comment.

4. Have a giveaway or don't have a giveaway. It's entirely up to you.

5. Have fun with it! I'm keeping things simple so it hopefully won't stress you or me out.

========

QMaybe Project 6 - 2018

And I got word on the new block lotto January block for 2018 - this looks like a lot of fun to make too!  You can see the blocks already submitted on this screen:  http://www.blocklotto.com/  Just scroll down to see the photos that will show up next to the "Recent Work The latest blocks posted" heading. They remind me a bit of work by Piet Mondrian.

Going to have to start cutting and sewing if I want to do everything I want to do!

=======
NQProject 7 - 2018

But while on our little adventure I decided to add reading between 30 and 60 minutes everyday...
Starting tomorrow I will record the time and pages read just to keep me accountable to myself...

Dec 31 - Jan 1 | The Keeper of Lost Causes | Page 1 - 385 | Didn't track time.  Great first book in the Danish Detective 'Department Q" Series.

Jan 1 - Jan 3 | How Georgia Became O'Keefe | Page 1- 130 | Didn't track time.

========
NQMaybe Project 8 - 2018

My son and I had our weekly lunch out together today.  We may work on learning Spanish together.  He already knows more than I do, but needs a language to finish his masters degree.  He has been studying Chinese, but now that he is just trying to finish the degree up it might make more sense to pick an easier language to master.  I was working on Swedish and German myself, but will abandon those for Spanish if it means someone to practice learning with!

========
NQProject 9 - 2018

The other non-quilting goal is to cook more often at home and to plan several meals out at a time.  Well tonight that's not happening, and might not happen for awhile as I would like to use the food we have in the frig or cupboard already.  So tonight it will be chicken, vegetables, salad and sweets from Christmas or the New Years trip!

========
NQProject 10 - 2018
Walk and exercise more! I used to do more walking, oddly that was before little Buffy joined the household.  When I walk with her it is like walking with a toddler, with lots of stops and side trips.  It's frustrating actually to want to walk but to be stopped by my partner.  And she knows when I leave without her, I can see her looking at me thru the front window.  Well.  This year I need to get back to at least 9500 steps a day so for some days when I'm inside and she is needing company I have found this site to encourage me along:
Jessica Smith TV - Jan 1 2018

I also paid for the Gentle Yoga class from Sixty and Me, but haven't done more than the first session.  I was disappointed that they started with standing exercises when the photos show exercises done on the floor.  : ( Perhaps by continuing to do them I will like it...  I do need to work on balance, but I was expecting this program to be different and work more on flexibility.  Oh well.

=============

My phone is backing up 10,000 photos - I'll share some from the weekend once that is done!  Hmm I thought the back up would be done by now - but now it says it has started to go thru all my photos again to look to see what to back up!  What a bother!

: )


Saturday, December 23, 2017

Looking Back on 2017 and Forward to 2018

So this has been a strange year.  Personally that is.  I would rather just look ahead hoping that things will get settled soon.

For quilting I didn't do a lot, for blogging I didn't do a lot.  I don't have a lot of things to point to..  Oh well.

2018 Planning Party
After reading Shasta's post, I was reminded that it is nice to make plans for the year ahead.

I'm jumping on the plan for the year bandwagon. If you have a plan, and document progress then it counts! And it is fun to be eligible for new fun the prizes via Yvonne AKA JetGirl's Planning party!

So this year I will work on Leah Day's Walking Foot Class and finish the older Building Blocks project too.  Anything else is frosting on the quilting cake. (I am pretty sure I will at least start the Starry Bright Sky QAL. It looks very pretty and I'm interested in the textured blocks side event too!)

I would like to finish at least three of my older projects and have some quilts that stay in the house instead of going out the door for charity or gifts.  Perhaps the tumbler quilt, the purple and black quilt, and the denim quilt.

I want to continue going thru items in the house so I know what we have, what we need, what we can give away, etc.  A little every month.

I want to have people over on a more regular basis through out the year, not just the winter holidays and birthdays!

I want to get better than what I am now!

and I want to blog to document my journey.


Monday, December 18, 2017

Project 1-2018: Leah Day's Explore Walking Foot Quilting and 2-2018: Leah Day Building Blocks Quilt

I got the eVersion of Leah Day's Explore Walking Foot Quilting book and have been having fun reading bits and pieces.

I hope I can keep up - knew that we are to start with making her rainbow log cabin - 80 inches square - then quilt it all within the first two months. I should have started making the blocks months ago but didn't get the pattern until the book arrived...  Have to have the quilt top done quickly though as during week 4 we will already be stitching in the ditch!  For some reason she then has us switch to a more manageable quilt as you go quilt. Maybe using a walking foot will make the quilting easier so 80 inches will be okay to start with? I don't know.

I don't like mystery quilts so haven't even tried the Leah Day project from the last two years, I'm glad to already have the book and written notes, but will not do anything before seeing the weekly videos! I will need the hand holding and support from that.

I spent today working on what may be the back of my Leah Day Explore Walking Foot Marvelous Mosaic Quilt. The front is where the action will be, and that will be done on solid fabrics so the quilting work will show up clearly!  This is a scrap quilt I was just making with fabric as I came across it (charms I won in a give away, fabric from my mom or Godmother, etc.), or finished up a charity quilt and had fabric to add to the quilt.  Each block is made up of two 4-patches. In an attempt to control the wild look a bit,  each 4-patch I have used always the same fabric that reads as grey.  With a few pinwheels thrown in as I had them... This is a quilt as you go project so the out side of each block will lose an inch so the fabric, that will perhaps make the back more interesting.

Well, I hope I can keep up with Leah's 2018 project timeline.  Now that it's closer it seems impossible, but I will at least give it the college try. I have four more blocks to make and then to decide on the front fabric and make the sandwiches.

I haven't finished her Building Block quilt yet, but it's nicely organized with each block fabric in a zip lock bag with the design to quilt included too so it will be easy to finish.  Okay that will be my second 2018 project to work on!

2018-1 Explore Walking Foot Online Lessons with Leah Day and associated three projects: a-Rainbow Log Cabin, b-Marvelous Mosaic Quilt, c-Prism Path Baby Quilt (Weekly Monday updates from Leah.)

2018-2 Finish the Building Blocks with Leah Day quilt! (On my own.)

Friday, December 15, 2017

Busy, busy - and a Quiltscapes pattern winner!

It will take some time to get a little caught up with the blog, I have been doing so many things.  Some quilt related - some not.  But I've decided to get back into posting so I can look back and remember how I'm spending my days...!

Last week though I discovered the Virtual Cookie Swap blog hop and spent so much time looking at all the recipes and the quilts on the blogs.  So much fun.  Many of the sites had giveaways too so that was even more motivating to read and dream...

I received an email:

So much fun! I just sent her the list of the three patterns that I selected... I picked one that had different sizes figured out, one that was a full bed quilt size (suggested fabric - denim!) and one that results in a quilt that can be scanned.  I know I will learn from reading the patterns, and even more when I start cutting and sewing!

Deonn shared her recipe for Christmas Spritz cookies - somewhere I have one of those presses and will make them.  http://www.quiltscapesqs.com/2017/12/virtual-cookie-exchange.html She notes though that if I can't find the press to still make the recipe:  either roll out and use cookie cutter or roll in balls and flatten with the bottom of a glass then bake and enjoy!  Sounds delicious.  I remember making these with my mom and the Brownie troop in our kitchen. 

Cookies:

I already made 3/4 ingredient cookies from the cookie swap - these were delicious!
From: http://selinaquilts.blogspot.com/2017/12/virtual-cookie-exchange-2018.html She has a link to all the blogs in the blog hop in her post.


I signed up to be part of the heart blog hop: 

If you'd like to join in, just send Carol an email with your first name, email, blog name and blog URL. Here is a link with her information and more inspiration:


Monday, August 7, 2017

WIP: Cultural Fusion Inspired Sunflower/Star

The project in my class this time is to make a center star design then to surround it with different sized blocks - most of them have been hand or machine appliqued - depicting our 'favorite things'. The other people all jumped in on this.  The design walls are full of cats, fish, flowers, dragon flies, pigs, food, iconic buildings, camping trips and more.  I, however, was drawing a blank.  What were my favorite things?  So for several weeks all I did was observe and learn.

But then I remembered my intent to make all the blocks in the Cultural Fusion book by Sujata Shah! They qualify to me as favorite things. I will probably not be able to put them in the one quilt, but I am making progress finally these week. It has been fun for me to pull out her book and remember the terrific time I had meeting Sujata while a student in two of her workshops.  But I'm also trying to stay focused to have a project to show the teacher and class.  

I warmed up by first grabbing some blue fabrics and cutting squares.  I admired them for a while, then finally made some half square triangles.


My original idea was to have the same sized blocks throughout the project, but I really wanted my yellow star/sunflower to stand out so I moved to larger squares of fabric.  After debating my choices of fabrics, I finally decided on darker oranges and golds for the center, and then mostly brighter yellows for the petals of the flower.


I decided to use Sujata's method for adding some 'leaves' in the corners:

Now I need to pick the size of the blocks...  Hmm, I'm sort of liking having the extra space between the blocks... Well, I'll think about that, but in the mean time will be squaring the blocks up sized by the smallest block.


Friday, June 30, 2017

Expanding the Labyrinth Block Design at The Spruce: Fantastic Stash Quilts

Found this book that extends my idea for the woven frames so much it becomes the entire quilt top!  Her book has a controlled color scrap idea, and uncontrolled too.  Sounds very nice! Without seeing it I recommend at least looking into it - please see the video and link to the book too below!

http://www.ctpub.com/blog/peek-inside-fantastic-stash-quilts-in-this-video/  Video

http://www.ctpub.com/fantastic-stash-quilts/


Referring back to my WIP:
http://quiltquest.blogspot.com/2017/05/another-try-at-binding-inner-corners.html

I haven't done any more sewing on this project, instead I have scanned several of my notebooks from my reading masters degree.  Now I can discard them and have more empty space!

I have also scanned more papers from my mom, some recent so I put post-it notes on them to remind me they are scanned and it'll be okay to shred and discard in a few years.

Sunday, June 25, 2017

While Not Sewing I Found These Sites

Licorice All Sorts
http://quiltingismorefunthanhousework.blogspot.com/2017/06/oh-scrap-licorice-allsorts.htmlCute interpretation of Crazy Mom Quilts Summer QAL
http://crazymomquilts.blogspot.com/2017/06/june-quilt-qal-week-1.html
Machine Binding Post
http://crazymomquilts.blogspot.com/2011/11/one-way-to-machine-bind-quilt.html
Fabric Basket
https://aaseevana.wordpress.com/2017/02/25/fabric-basket/ 
Denim and T-Shirt Quilt
https://aaseevana.wordpress.com/2015/08/19/picnic-quilt-big-finish/
What Happens When One Passes Away (but has a lot of quilting materials)
http://luannsloosethreads.blogspot.com/2016/09/pillow-class-and-sale.html
Nine Patches are the Detail in the Quilt
http://margaret-margiestitcher.blogspot.com/2017/01/urban-neighbourhood-quilt.html 
 Instead of sewing blocks she is sewing in columns - long seams!
http://exuberantcolor.blogspot.com/2017/06/sewing-long-seams.html
GRILLED VEGGIE SKEWERS WITH CHIMICHURRI SAUCE
https://minimalistbaker.com/grilled-veggie-skewers-chimichurri-sauce/ 
Spring Sampler - Piecing and FMQing - My favorite site now for FMQing fun!
http://theinboxjaunt.com/2017/05/09/the-spring-sampler-qal-piecing-the-quilt-top/
I scanned 10 years of tax returns with supporting documentation.  So many different consulting jobs. It was interesting to see again.  After dinner I'll shred.  The recycle bin is full already so now there are boxes of shredded papers lined up in the hallway...  Two of the unfinished rooms are pretty much empty as I moved their contents to the house for processing.  My original plan was to go thru a few books, scan, donate, discard, return, clean up and then continue - but then decided to bring things into the house.

We went to see Ham Radio Field day set up in Poway, impressive!  Next time we should go on Saturday and perhaps later in the day when it's not so hot.


Saturday, May 6, 2017

Another Try at Binding: Inner Corners

Almost done with my interpretation of a class project quilt, and time to think about how I want the edge of the project to be bound.  Instead of regular 90-degree corners, this time I want to do a binding that has at least a few inner corners!

The sites I found to help are:

Added 5-12-17:  Shasta sent me link to a tutorial she prepared on binding too:
Added here as a resource to refer to:

https://hubpages.com/art/How-To-Bind-When-Quilting   Thanks!

http://thecraftyquilter.com/2013/06/how-to-bind-an-inverted-corner/

  • Make a small cut into the corner.
  • When you near the inverted corner, draw two lines on batting to show where the needle should be down when you pivot.
  • Stitch to the back then wrap to the front (she only machine finishes). Her inner corners do not have miter, but look nice.  She uses thread to match the fabric.


https://ankastreasures.wordpress.com/2009/06/01/how-to-bind-inside-corners-plus-a-give-away-to-practice-your-skills/


http://flyingparrotquilts.com/2015/01/16/binding-inside-corners-and-joining-curved-binding-tutorial/

  • Example shown is a scalloped finish.  I think once I do then the detailed photos will really help me with making the mitered inner corners - and finishing up the binding on a curve. Sews on front then flips to the back.


http://www.sisterscommonthread.com/how-to-bind-an-inside-corner.htm

  • Adds hint of stay stitching at the inner corner, then doing the cut and sewing binding on. Sew on the back, flip to the front.


https://m.youtube.com/watch?v=4VGNcDoI-R8 - From http://quiltwithmarcibaker.com

  • Sew on front, wrap to the back.  Stay stitch and cut. GREAT demo. Shows how to adjust the fabric at the inner corner. Using a sample piece and pins.  Her website has other helpful videos.  Can't tell if she is updating things for her $10/month subscription service, or if she has recently moved. Can't find the handout referred in the video, so it must be behind the subscription. There doesn't seem to be an index of what the titles are in the subscription or how her whole system works.  : ( Might be able to buy or check out her books where she has written out the information. Not my Grandmother's Log Cabin might be one of the books she mentions that has the directions.
  • https://www.youtube.com/watch?v=Vci9-li3aYU&t=20s Bindings for different angles, shows non-examples and examples. WELL DONE! From http://quiltwithmarcibaker.com
  • https://www.youtube.com/watch?v=lwPe_84GBfY Shows how to add facing to the back of really irregular edged pieces (her example grandmothers garden).  First stay stitch a little closer to the raw edges than the facing will be applied.  Then line up the facing and pin to the top of each point. Sew with contrasting to the back colored thread.  Trim keeping 1/4 inch of the front but remove the batting and back.  Flip over and adjust the fabric, then hand stitch closed. WELL DONE! From http://quiltwithmarcibaker.com

https://www.youtube.com/watch?v=Be9dzI_X41w

  • Stay stitch with basting stitch a little closer to raw edge than where the binding will be sewn on. Sew on front, flip to back to finish by hand. 
  • Instead of pulling to straighten at the pivot point she pivots then pulls the fabric back to make it straight again when you sew. 
  • Clip a V in the the quilt and binding after it's sewn on so excess fabric is removed and the piece will lay flatter. 
  • She uses a large scissor to do this clipping and isn't particular about the order that she folds the corners.


MY ATTEMPT

I cut an old FMQing practice piece to be the shape in the Marci Baker demo.    My binding strips are 3.5 inches.


I marked the quilt to show the pivot point, but for a beginner like me will also mark on the binding when I get near the inner corner.  When folded the binding strip is 1.75 inches.  I will sew half an inch so the binding should end up being half an inch on both the front and the back.

The first actual quilt that I am going to have the inner corners in the binding will have the half inch binding or maybe even wider binding as the color will be part of the design.


Decided I might as well get extra practice with the regular 90-degree corners too so I started at the corner of the practice piece.  It's only been a short while since I did my set of binding practices, but I still had to go back to remind myself how to do things!  I'm glad I have the entries on the blog to remind myself.  I went back to the post and adding the time in the video where the part was that I really wanted to refer to...  

But just in case those videos go away...


Here are my notes to help my future self with regular 90-degree and less corners in bindings.

First 90-degree corner.  I set up so I could see where to place the fabric so I would be joining things 1/2 inch from the raw side. Started sewing the end, and turned to the point when I got near the corner.

Pinched the fabric at the end and brought it up so the fold was even with the side of the corner just sewn.  (Next time remember, it is easier to pinch when the point at the outside is actually a little above or short of the corner of the unseen quilt.) This makes a 45 degree fold on the inside.

Then sewed again with needle the same distance (half inch) away from the raw edges. Used stack of fabric to help the pressure foot stay even.

At this point I stopped to double check that I had done it correctly.  Looks right on the side where I am sewing...

And when I wrap to the other side it looked correct there too!

So now I could see where the inner corner was going to be so I marked the binding.  Double check to be sure the intersection is in the correct place!

I continued sewing the binding on the practice piece until the binding strip ended.  With the pivot points marked and the cut to help the piece be pulled straight it was pretty easy sewing.

Here is the side I sewed onto. (I think for a real project one first sews to the front and then wraps to the back for the hand finish!)

Here is the other side. I did not do the stay stitching that was recommended by several bloggers.  And notice the notch on the left is a little too close for comfort to the stitching...

Enlarged view of notches.  Next time will do the stay stitching! And use smaller scissors. And look for sharper scissors too!

I was excited to see how things were looking.  I could pin the 90-degree corners to check them, but I need to cut the inner corners so they will be flat when the binding is folded for the miter there.
Cut a V shape out of inner corner, to allow the fabric to lie flat.
This photo shows the notch after more angle was removed.
I was trying for a 90-degree notch. This was difficult to do in the 1/2 inch space I had, hard to believe it can be done in 1/4 inch!


Flip it over.  Fold down left then right then hand stitch from center to the seam to create the miter. This will then match the order of the 90-degree corners (so maybe it's right and then left depending on orientation of the piece.)

Here is my hand stitching - need to work on how to do this!  I felt like a little kid when I was sewing the sample binding. My stitches are too loose or long and show too much.


On the back side pull the folded fabric to the left. Then pull down the right side of the binding and then the left side of the binding.  After fiddling, you'll see a nice miter. Pin to hold in place while hand stitching.
For this practice piece, I did hand stitching to for two 90-degree corners and one of the inner corners. Then I did the rest with the machine.

In this photo the hand work is on the left.  Clicking should enlarge the photo.
On the right is the side finished by machine.


In this view the hand work is on the right.  On the left side done with machine, you might notice no miter, the buckling, and the ugly bobbin thread showing so clearly too.  The lady who only does with machine stitching does not cut a notch so that might help with having the fabric be flat for her.


Just in case you missed it, in this photo the machine stitching is on the left.

Okay, so now I can finally appreciate hand finishing a binding.  Even with my primitive stitching it's very nice to not see the bobbin stitching on the back.

But I need to learn how to do the stitching so it doesn't show as much before I do on real projects. I need to learn a consistent way to knot the thread at the beginning and end too!  This exercise though makes me think I can go ahead with my plan for having inner corners on the project I'm working on.

I'm working on my project for the weekly class I take.  (I only did one of the teacher's blocks as I didn't plan correctly and didn't have all the fabric I thought I had but I didn't feel like starting over and doing it all.)  The students who thought ahead are ending up with a lovely quilt.

I'm aiming now to make a small lap size quilt featuring the one teacher block in the center.

I thought I had mastered regular 90-degree binding, so didn't want to just add regular strips to make the project larger.  I practiced half seam construction and added six inches to the width and height.

I decided to add sort of woven frame to the piece, and then one more piece and the binding.  I could of course make a regular square quilt as I have been doing, but scallops or angles in borders is on my list of things to learn, so decided to add inner corners in with this project.

I found the interwoven frame idea in the Labyrinth block design at The Spruce.  Her directions for around a 3-inch center block and my class project block was 18-inches (plus 6) so I had to do some figuring to get her labyrinth frame to fit!

The Labyrinth block is similar to the quilting motif I did in the Leah Day project in 2012 that I really liked.  Leah's design has more background showing and I may prefer that look.  However, I think the Labyrinth block design was easier for me to adapt for finishing this class project.


Leah Day Motif
The Spruce Labyrinth Block


You can see in the Labyrinth it's just a matter of doing the math so the center of the outer orange points are even with the center of the dot in the inner block.

My inner block was 24 inches due to the additional frame I added to the teacher's block.  So it was pretty easy to do the math - I used 6 inches finished as my starting point. (Each of the squares stands for 3 inches.)  My project is now 36 inches square.  So I have the orange points to add, and another something before I'm ready to make the back and binding.

In class we were given a block to enlarge on graph paper and then show at least six different ways to piece.  Then we had a diagram of the block in a plain setting for a quilt, 6 blocks by 6 blocks.  We had to use any shade of red for one feature in each block, and then use the same background in each block - but could change the colors.  That was pretty limiting.  We had to do 6 times.  Our homework for next week is to do (6 times) and new setting - this time we can change the background colors within a block and we can change the way the pieces are cut to add more of them. Still limiting but I bet people will come up with dazzling papers!  We are also supposed to bring real fabric to consider using in making the quilt. And that will be my downfall.  I can enlarge and do the math to determine the size, and I can even dream about colors or shades of colors to add interest.  But once I have to bring the fabric it's really, really hard as that brings the exercise back to reality.

I guess the other people in the class all know how to do the mechanical part of making a quilt, they really enjoy picking out colors and fabric and working with that part of the hobby to sew up the teacher's designs. And most of them actually end up with a finished quilt by the end of the class.

It seems a little like coloring by the numbers when we just make the teacher's quilt.

The fabric/color part isn't that much fun for me now.  Perhaps because I have so much fabric here so don't want to buy new.  I prefer scrappy looking quilts anyway. But don't have the color sense to end up with beautiful items...  Yet!  

But really, I'm feeling like I want to master the total part of making a quilt and to do it enough so I don't have to keep such detailed notes for myself.  So I need to master and practice to keep the skill!