Just adding this note to remind me about this video and the book:
https://www.youtube.com/watch?v=JJQaTBpZa9g&feature=youtu.be&t=12
This video shows with extra tips:
This is a variation:
Showing posts with label Technique. Show all posts
Showing posts with label Technique. Show all posts
Wednesday, November 4, 2015
Sunday, January 5, 2014
YouTube Beginning Quilting Tips
http://www.youtube.com/watch?v=5A4Pe60je58
SUPPLIES
- cutting mat - pick color you do not use very often in fabric
- rotary cutter
- rotary blade ruler - optima is brand she uses but in any case suggests using same brand all the time.
- invisible grip - to help ruler not slip
How to Make a Perfect Cut. Quilt with Aimee!
http://www.youtube.com/watch?v=E4Xz2CkKTUY
- 12.5 square ruler
- 6 x 12 or 24 inch ruler
- rotary cutter
Point trimming, JudyMartinBooks
http://www.youtube.com/watch?v=IDLCt2o3wkc
Almost a non-example of how to do a demonstration, but she has thought about points to trim...
http://www.youtube.com/watch?v=DSCBzwJ1lB4
Uses tools to buy and uses the fingers each time, seems like it would be tiring to do but still good ideas to consider. I think using an index card would work too! She puts tape in front of the needle.
Quilting Tutorials - The Perfect Seam Allowance, JudyMartinBooks
http://www.youtube.com/watch?v=JH9QdMHjnugAlmost a non-example of how to do a demonstration, Seam allowance test - she has tape only by the needle
http://www.youtube.com/watch?v=bdzIMEqAAbc
ilting Bar / Guide, Sewing Parts Online
Thursday, June 20, 2013
Technique: Easy Strip-Pieces Tumbling Blocks
http://www.youtube.com/watch?v=DWpSETMbws4
Easy way to make a complicated looking block!
This is the tool she uses to trim the pieces before sewing - seems like a great tool.
http://shop.online-quilting.com/shop/tools.html?page=shop.product_details&flypage=flypage.tpl&product_id=36&category_id=2
Technique: No-mark stitch and flip
Great idea - she uses a piece of cardboard to guide her stitching.
Blog post here:
http://www.quiltmaker.com/blogs/quiltypleasures/2012/02/qm-shorts-no-mark-stitch-flip/
Blog post here:
http://www.quiltmaker.com/blogs/quiltypleasures/2012/02/qm-shorts-no-mark-stitch-flip/
Friday, March 15, 2013
Ideas: How to Self-Bind a Quilt & How to Make Dragon Slippers
I found this link tonight while surfing the web! It's the clearest explanation how to do self-binding that I have seen.
http://www.made-by-rae.com/2010/10/rae-pretends-she-can-quilt-and-shares-a-quick-quilting-tutorial/
Very clear directions that will really help me finish up my charity quilts.
And also if you have any little kids in your life, I think making her dragon slippers for them will be the start of some fun times!
http://www.made-by-rae.com/2011/02/tutorial-by-rae-dragon-slippers/
Saturday, July 7, 2012
Red, White and Blue Blog Hop: July 7
Over 100 quilters are sharing their blocks and ideas! A few each day during the first part of July! The complete list can always be found by clicking the button on the side-bar of Jane's Fabrics! Please take a peek at all the inspiration posted by everyone!
4-Patch Blocks
I decided to share a fabulous technique for making 4-patch squares. This is such a versatile block, one that can be resized as you'd like, and can either be the main focus of the quilt, or a wonderful sashing or border.
I remember thinking how clever it was to sew two long strips of fabric together and then cutting them, rearranging and sewing to get a 4-patch. It seemed so much easier than cutting little squares - but if I wanted a more random look it always seemed that the little squares were the way to go. And little squares are just not appealing to me to work with on a grand scale.
Billie Lauder, has figured out a terrific way to make 4-patches, and she has shared videos for making two fabric 4-patches and super scrappy 4-patches. These are really fun to put together..... I used the Super Scrappy 4-Patch Method...
1: Pick your fabrics and end size. You will cut some squares one inch larger than what you want them to finish and then cut some strips that are half the width of the squares. |
| ||
2: Put the fabrics together. You can sew squares together, or two strips to a square. Pick either squares or strips to sew onto a square. Sew 1/4 inch seams - sew the strips with one seam, the square with two seams (to make a tube). |
| ||
3: See the seams for how you sew the parts together! Just two seams for each part for now. |
| ||
4: Without cutting the seams you have just sewn, cut the square in half. Press the seams. |
| ||
5: Trim the ends if needed, then arrange the pieces so they are all next to each other. In my case I just looked to get it so the same fabric was not next to each other in either direction. The photo shows two columns of the blocks, the column on the left will be sewn to the column on the right. |
| ||
6: Fold the first square in half, use that as your cutting line. After the first cut flip over the next seam and cut... |
| ||
7: If you use the ruler to measure your cuts, the unfinished block will be exactly the size you want. (I found it's easier to use the folding method.) |
| ||
8: In a really short time, you will have a lot of 4-patch blocks! Here are just a few examples of how you could arrange 4-patches so they are the highlight of your quilting project: |
|


 |
| Eight B |
 |
| Eight C |
 |
| Eight D |
 |
| Eight E |
I hope you will try this technique for making 4-patches - it's a lot of fun.
I added strips to make my 10.5 inch blocks. That way I'll have plenty of room to do the Leah Day Free Motion Quilt Along!
I'm releasing this post at midnight. Check back later to see my progress as I make these blocks into a baby quilt!
Thanks for visiting - now please go on and visit the other quilters who are sharing:
Today's Contributers are:
July 7th
QuiltQuest (That's me)
See the list of all the blogs participating, click on the button on the side-bar of Jane's Fabrics!
Wednesday, June 27, 2012
Idea: Tube Quilting
I'm taking a cooking class - the teacher is always showing us how to make dipping sauces. She tells us it's better to make it ourselves, than to have a lot of bottle of stuff that we buy and only use a few times. And doesn't that make sense?
Missouri Star Quilts shows how to make the tube quilting blocks with out needing a special ruler....
I don't make a lot of blocks, so appreciate knowing how to make these without forking out more money, and having yet another thing to store, misplace, and then have to waste time searching around to try and find when I need it!
For more inspiration on what to do with the blocks - or to get the real ruler go to
http://www.cozyquilt.com/Features/StripTubing.aspx
Wednesday, March 14, 2012
Idea: Pairie Point Flying Geese
SewCalGal's was giving away a copy of the "Prairie Point Pizzazz", by Karen Sievert (deadline has passed) - this is another way to flying geese!
Wednesday, February 15, 2012
Tips: Getting Parts Ready: 9-Patch
Method Video: Billie Lauder Basic Nine Patch - Two at a Time!
Having had success with Billie Lauder's method for 4-patches, I decided to do her method to make my 9-patches. With this method you make 2 blocks with the same cuts. By preparing several squares at the same time, the fabric could be swapped out so it's more scrappy looking....
 |
| 4-patch and 9-patch made with Billie Lauder method! |
- Cut two squares of fabric Color A and Color B - make it easy and pick a measurement easily divided by three. (For example 6 inches, 4.5 inches, 9 inches).
- Place them right sides together, and then sew up two opposite sides.
- Without cutting the seams you just sew, cut the fabric in to thirds.
- Sew the loose piece of fabric to a sewn side so you have one set with the color A, B, A and one with color B, A, B.
- Press toward the dark fabric.
- Place fabric right sides together - line up to match the seams and sew up two opposite sides of the block.
- Press toward the dark fabric.
- Cut into thirds, add the loose pieces.
- Press toward the dark fabric.
I made mine starting with blocks that were 4.5 inches square. I did in black and white so I wouldn't have to think about color.
I couldn't decide what colors to make the next set of 9-patches in so I cut some 4 inch white fabric and sewed my 2 inch strips (cut into 4 inches) on the sides. Cut that in half so the seams were not cut, then sewed short end to short end in a ring. Measured to cut one in half - then used that one as the cutting line for the rest of the 4-patches. This was a fun way to use those pieces of fabric and to end up with some randomly colored 4-patches. These were some of the fabric used in the spikes parts. The dark green looks out of place - but I really like the other colors - these will be great additions to a quilt. I even like the way in this quick layout there is extra white (or black) to make a random triangle.....
Both blocks (at least in theory) are the same size! They will finish in a quilt as 3-inches.
My husband is very curious to see what I come back with from the Marston/Moran workshop. He says he can't picture it at all....! (Neither can I! I'm wishing I knew someone in the class and that we could be collaborating during the workshop - that would add so much to the learning experience!)
I think I'll do more 9-patches after I get some sawtooth and wild geese prepared...
From Homework for the Marston/Moran workshop:
- Making “Parts” in advance. You will see in their book that they used, black and white Sawtooth, Wild Goose Chase, Four Patch and Nine Patch blocks for fillers, borders and sashing. They also used Strata in a number of quilts. You can make a bunch of these parts before you come to class if you want.
- Sawtooth: made with 2” squares or 3”squares cut diagonally
- Wild Goose Chase: made with 2 ½ x 4 ½ rectangles and 2 ½ squares
Four Patch: Strip pieced with 2” wide stripsNine Patch: Strip pieced with 1 ½ wide strips- Strata: Cut long strips of fabric between 1 ½ and 2 ½ wide and sew together to make new fabric which will be cut up in different ways. Make a new fabric 45” wide and about 25” long.
Monday, February 13, 2012
Tips: Getting Parts Ready: Spikes
I'm finally starting to get ready for my workshop with Gwen Marston and Freddy Moran.
I have had several of their books here (checked out from the library) - and have been exchanging emails with one of the ladies who is attending the workshop too. She received 100 pieces of fabric (scraps and fat quarters) in Freddy colors from one of her friends and started by washing and ironing. So I did that too - only I had to buy fabric but that was okay. I thought I was clever as I cut a 2 inch strip from each piece of fabric....
What I didn't remember was that I should have been cutting a variety of width strips....
I re-read the books and looked on line to see how to quickly do some of the parts - and what size people cut their strips and pieces.
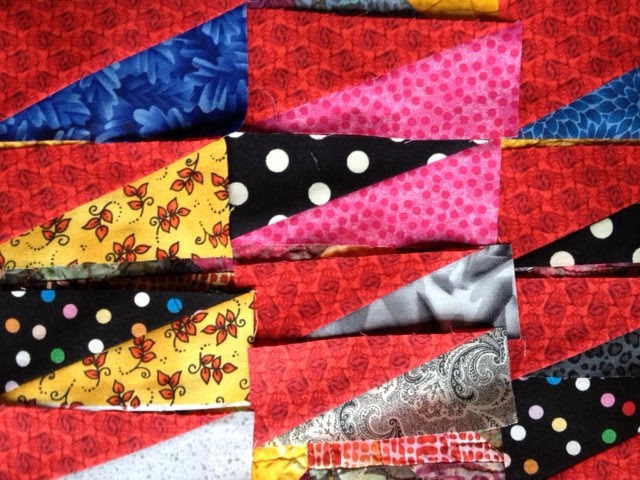
I decided the spike part was what I would start with as Gwen suggests starting with 2" x 6" pieces - I figured I could use the strips I already had made.
Then I had to decide what colors to use. I'm going to bring the log cabin blocks I won in the Block Lotto - they were to be made with blue, green, purple and then black & white or white & black or white and black. Rereading the directions and looking at the blocks I can also see grey - and sometimes orange or pink. The eye really goes to the different colors - unfortunately they aren't always the best looking fabrics - but at least a I had something to work on. My new friend made all her spikes with either a red or black and white on one side and then an assortment of colors on the other. I decided to make mine so they were blue, green or purple one side and black or white on the other. I hope there will be enough variety - some of my purple is sort of pinkish so it's really more than just the three colors. I suspect many of the attendees will be coming with red and I'd like my project to look a little different..... But oh the colors she picked look so rich - especially compared with my colors below.....
Now I spent a ton of time looking at the pattern. I didn't like the way it seemed so much fabric would be wasted. Why couldn't I just put the fabric together, draw a line and sew? Seemed then I would get two spikes. Maybe the second one would be oriented the other way so I could just save them for another project.
I found some scraps and tested my plan - it would not work. Doing that there are two wide pieces at the bottom and it sort of forms a V...
So I thought I'd cut the fabric, move the fabric and still sew both pieces up - still thinking I'd have to save one set for another project. But it turns out that it results with two spikes! I've relooking at Gwen's books and it doesn't not clearly say you will end up with two pieces - no wasted fabric. So I'm letting anyone reading this know it will result in two usable spikes!
The books does say to be sure to cut the fabric in the same orientation - it doesn't say to not put the fabrics good sides together as usual - but one has to be sure to cut the individual or the groups of fabric so it's all facing the same direction. I messed up on one piece (most of my fabric does not have a right or wrong side).
These pieces are ending up being very small... Looking at the examples I can understand why the spikes are put in as accents not as something that goes along the full quilt. I've done a bunch doing the pretty much 2" x 6" pieces - I'll have to cut these down so they are useable.... In one of the books Gwen says they will be 4.5" inches wide so that is what I will shoot for.
And I just relooked at the class list and spikes aren't even on the list of parts to premake.... Ugh!
I decided to pick some that are the nearer to being the same length already and to pair them up - so I have several done now.
I'm thinking I made a mistake and should have used less variety for the background parts. I was so pleased that I had so many pieces of black and white/ white and black. I think I should have only used black or black on white - the spikes are not showing up as much I thought they would.
Hmm I'll have to think of how to proceed...
My husband and son came back so I asked their advice. They both agree that there is too much variety. They thought I should try doing them with just two colors/fabrics. I thought that might be a good thing to try - but asked myself what I was going to do with the pieces. After cracking his 'jokes' - Aren't there quilting classes for blind people you could give them too? - Isn't it a tradition that they end the quilting class with a bonfire? - he did have the idea to put all the blues together, the purples together, the greens together - so I did that and actually it does make the points stand out....
My color confidence is gone though now - I have only a few days before I leave for the workshop. I need more parts done before the class meets to make best use of the time.
If I didn't have the log cabin blocks my colors would be yellow, orange, and black or brown - maybe some green and blue in the background a little. I don't think I have time to prepare parts in all these colors though.....
UPDATE 3-30-21: I found a really nice site with clear directions on how to make these kinds of blocks: https://seamslikeadream.com/the-half-rectangle-triangle-block/
I have had several of their books here (checked out from the library) - and have been exchanging emails with one of the ladies who is attending the workshop too. She received 100 pieces of fabric (scraps and fat quarters) in Freddy colors from one of her friends and started by washing and ironing. So I did that too - only I had to buy fabric but that was okay. I thought I was clever as I cut a 2 inch strip from each piece of fabric....
What I didn't remember was that I should have been cutting a variety of width strips....
I re-read the books and looked on line to see how to quickly do some of the parts - and what size people cut their strips and pieces.
I decided the spike part was what I would start with as Gwen suggests starting with 2" x 6" pieces - I figured I could use the strips I already had made.
 |
| Spikes made by other attendee. Notice she has same theme fabric or black and white in all. |
Now I spent a ton of time looking at the pattern. I didn't like the way it seemed so much fabric would be wasted. Why couldn't I just put the fabric together, draw a line and sew? Seemed then I would get two spikes. Maybe the second one would be oriented the other way so I could just save them for another project.
I found some scraps and tested my plan - it would not work. Doing that there are two wide pieces at the bottom and it sort of forms a V...
 |
| My Untrimmed spikes |
The books does say to be sure to cut the fabric in the same orientation - it doesn't say to not put the fabrics good sides together as usual - but one has to be sure to cut the individual or the groups of fabric so it's all facing the same direction. I messed up on one piece (most of my fabric does not have a right or wrong side).
These pieces are ending up being very small... Looking at the examples I can understand why the spikes are put in as accents not as something that goes along the full quilt. I've done a bunch doing the pretty much 2" x 6" pieces - I'll have to cut these down so they are useable.... In one of the books Gwen says they will be 4.5" inches wide so that is what I will shoot for.
And I just relooked at the class list and spikes aren't even on the list of parts to premake.... Ugh!
 |
| A non-example of using too many varieties..... |
I'm thinking I made a mistake and should have used less variety for the background parts. I was so pleased that I had so many pieces of black and white/ white and black. I think I should have only used black or black on white - the spikes are not showing up as much I thought they would.
Hmm I'll have to think of how to proceed...
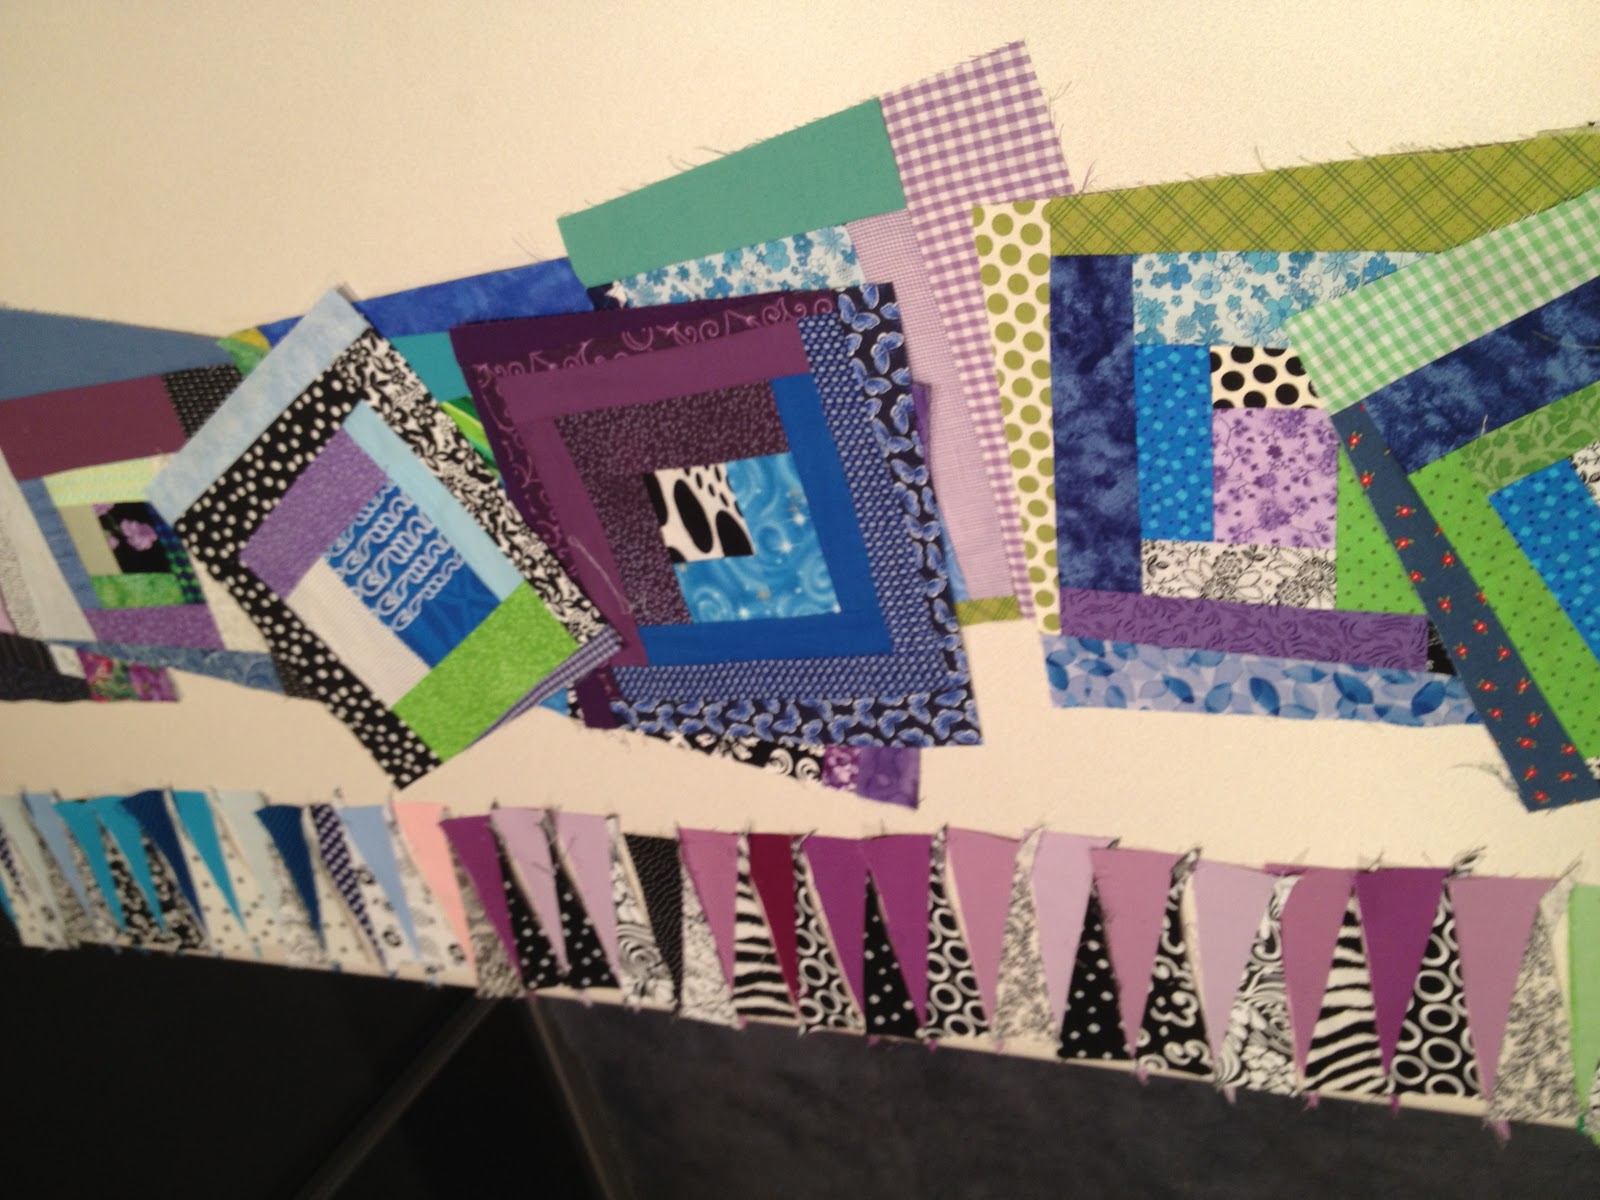 |
| Purple spikes |
 |
| Green spikes |
 |
| Blue spikes |
My color confidence is gone though now - I have only a few days before I leave for the workshop. I need more parts done before the class meets to make best use of the time.
If I didn't have the log cabin blocks my colors would be yellow, orange, and black or brown - maybe some green and blue in the background a little. I don't think I have time to prepare parts in all these colors though.....
UPDATE 3-30-21: I found a really nice site with clear directions on how to make these kinds of blocks: https://seamslikeadream.com/the-half-rectangle-triangle-block/
Idea: Iron Board Cover
Little Bluebell just shared a project she is working on:
The directions are over at Fresh Squeezed Fabric/I Have to Say
This is something I'd like to do - but later when I have my parts for the workshop ready!
Saturday, February 11, 2012
Idea: Lil Twister
I really like the way this pattern looks - and how fun to see how positioning the fabrics changes the way the project will look too.
http://conniekresin.blogspot.com/2011/11/northern-cardinal-twist.html
http://conniekresin.blogspot.com/2011/10/worldly-lil-twister-quilt-and-giiveaway.html
http://conniekresin.blogspot.com/2011/03/body-pillows-anyone.html
http://conniekresin.blogspot.com/2011/02/lil-twister-centerpiece.html
http://conniekresin.blogspot.com/2011/11/northern-cardinal-twist.html
http://conniekresin.blogspot.com/2011/10/worldly-lil-twister-quilt-and-giiveaway.html
http://conniekresin.blogspot.com/2011/03/body-pillows-anyone.html
http://conniekresin.blogspot.com/2011/02/lil-twister-centerpiece.html
Idea: Red String Runner
Red String Runner Tutorial
Still distracting myself by looking at blogs...
This lady has a clever way of cutting a string block into smaller blocks to make a table runner.
Still distracting myself by looking at blogs...
This lady has a clever way of cutting a string block into smaller blocks to make a table runner.
Tuesday, August 2, 2011
When Your Needle is Breaking (While FMQing)
Today I got a call from Leah Day! It was about something being out of stock that I ordered yesterday - but still it was fun to chat with her a bit. I told her how I was doing her beginning designs and how the needle was breaking. She asked me a few questions, then diagnosed it as operator error. When FMQing, of course I have control of the rate of the machine and the rate the fabric goes under the needle. When I am holding the fabric back then it's bending and breaking the needle. I said the last two breaks I was going straight - she said probably the timing was off and I should just take it in to be fixed. That one really bent needle can throw the timing off quickly.
So I loaded up the car and took the machine to the La Mesa Sew and Vac. The lady there (I think it was Monika) was very nice. She agreed with the diagnoses and started to write the ticket for repair up. Then she noticed I had the quilting foot on the machine - she asked if I had tested it with a regular pressure foot and I said no. I had broken all my needles so had just packed up and brought it to her. She said the test for timing was to sew a straight line and a zig zag line - so she found a pressure foot and put it on. (I had put on the dull needle that I was using to scoop the thread thru when bringing up the bobbin and had grabbed a spool of old thread and put it on the top of the machine.) She threaded the machine and did the test - both sides of the fabric looked perfect. She wound up the cords and told me I needed to practice coordinating the speed - she saved me either $45 or $75 (I can't remember how much a tune up is. They had a label on the machine so could tell I had last brought it in December 2010.)
Anyway, that's a pretty good test to know about. Hopefully I'll remember it the next time needles start to break - but also now maybe it's pounded in my head to be more careful about letting the fabric go when I'm Free Motion Quilting.
BTW Leah was so nice on the phone. Very generous with her time. She was so surprised that I was doing all her beginning designs...! To me it was just the natural thing to do once I found her wonderful blog.
Thursday, June 23, 2011
Wonky Squares
Clare (France, Aquitaine) - http://dordognequilter.blogspot.com/ and http://quilts4leukaemia.blogspot.com/ found an interesting tutorial on wonky squares.
I'm linking to it here so I can easily refer back to it.
http://piecefulkwilter.blogspot.com/2009/07/wonky-squares-tutorial.html
I'm linking to it here so I can easily refer back to it.
http://piecefulkwilter.blogspot.com/2009/07/wonky-squares-tutorial.html
Tuesday, June 21, 2011
Mug Rugs: To Practice Binding
I decided in May that I wanted to make a mug rug to go along with some tea and jam I had gotten my son's friend for her birthday. He saw her earlier than I expected so I wasn't able to do the mug rug until he was with her actually.
I auditioned some too cute to cut up apple fabric but then I decided to make my own top using fabric that would go with a mug his friend had made recently:
 (After doing this I did a side trip to explore how to work with curved seams.)
Click the photos to see the larger views....
Then I used a different striped material to make the binding. After I had it put together I realized that I needed to sew the initial seam so it wasn't as close to the edge. Or if I'm going to sew make the binding be so narrow on the top I need to start with narrower strip of fabric (I used 2 inch strip). The free motion quilting that I did made puffs appear toward the center, so I hope the mug will not topple over!


I waited a few days then decided to test the Missouri Star way of making HST, and I made another mug rug. This time I just did stitch in the ditch quilting and using 2 inch fabric I sewed the first seam 1/4 inch in so the back was the same size. I need help with learning what to do with the corners though - I had to reinforce with extra stitching on two of the corners. This mug rug will go to a friend who has a home office.....


I auditioned some too cute to cut up apple fabric but then I decided to make my own top using fabric that would go with a mug his friend had made recently:

Click the photos to see the larger views....
Then I used a different striped material to make the binding. After I had it put together I realized that I needed to sew the initial seam so it wasn't as close to the edge. Or if I'm going to sew make the binding be so narrow on the top I need to start with narrower strip of fabric (I used 2 inch strip). The free motion quilting that I did made puffs appear toward the center, so I hope the mug will not topple over!


I waited a few days then decided to test the Missouri Star way of making HST, and I made another mug rug. This time I just did stitch in the ditch quilting and using 2 inch fabric I sewed the first seam 1/4 inch in so the back was the same size. I need help with learning what to do with the corners though - I had to reinforce with extra stitching on two of the corners. This mug rug will go to a friend who has a home office.....


How Curved Seams Work


You can see how the lines shifted and disappeared - and how much smaller the square is after the three seams are sewn!
It was easier to do when I started the curve cut after a bit - so the first 1/4 inch or so is sort of straight.
Here are some links to nice tutorials on curves:
Sewing Easy Curves for Quilts
Added July 28 2011 or after:
Link Shared by Lib-Quilter Clare http://dordognequilter.blogspot.com/
http://threadbender.blogspot.com/2007/12/how-to-squiggle.html
Link Shared by Lib-Quilter Sylvia Arman
Link Shared by Lib-Quilter Clare http://dordognequilter.blogspot.com/
http://threadbender.blogspot.com/2007/12/how-to-squiggle.html
Link Shared by Lib-Quilter Sylvia Arman
Video on curved seams
http://www.roserushbrooke.com/video-alicia-merrett.html
Post by Lib-Quilter Michele Bilyeu
http://www.with-heart-and-hands.com/2011/04/my-color-and-design-class-with-jean.html
Post by Lib-Quilter Michele Bilyeu
http://www.with-heart-and-hands.com/2011/04/my-color-and-design-class-with-jean.html
Sunday, June 5, 2011
Tall Tales AKA Blue/Cranberry Quilt
What fun another technique video - Tall Tales AKA Blue/Cranberry Quilt
A nifty pattern where you cut a collection of fabrics into the same sized strips, sew them together, cut to make triangle shape then resew together to make strips. Add sashing, borders and quilt!
In the videos though she adds her thoughts on different decision points.
Joanne from Stashbusters shared the link.
Part 1
Part 2
Part 3
Part 4
Part 5
Part 6
Part 7
Part 8 - Almost Finished
Friday, June 3, 2011
Billie Lauder's Ultimate Scrappy 4-Patch Technique
Hold on to your hats!
Sue from CA has shared a new-to-me technique for making 4-patches. I found a link to a video here:
http://mypassionforquilting.blogspot.com/2011/03/quick-4-patch-video-by-billie-lauder.html
(Look at the side bar of mypassionforquilting.blogspot.com for links to more blogs with free patterns or tutorials.)
Now the question is how to size the pinwheel and the 4-patch so they end up being the same size.
The pinwheels lose 1 inch to seams so seems to me if you started with 6 7/8 fabric and do the 4-patch method described here the blocks would be the same as the pinwheels.
Have to think a bit to do the math so the pinwheels would end up the same as the 4-patches....
Subscribe to:
Posts (Atom)