Crumb Quilting Adventure - New Piecing Technique plus Digital Quilt | Ep. 5
Notes:
Procedure A:
Procedure B:
So now that I realize the size of things a little better, I have gone thru my pieces and sliced so my fabric is much smaller.
This means there are a lot of seams, so when I'm joining sometimes it has been helpful to put the two pieces to be joined on the cutting mat and to use the rotary cutter to slice bits off. When I'm doing that I am trying to end up with something at least an inch wide.
I press the seam open. I'm not trimming at this point except to place the template down to get the blocks cut. From this piece I got two blocks, and there are several pieces that will be inserted into other units.
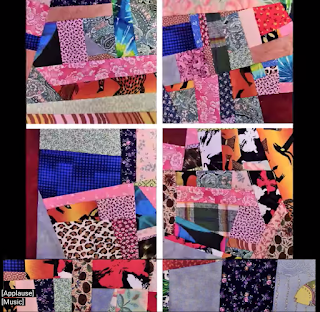
Here are my five blocks:
Here are Darlene's blocks and the digital quilt she made with them:
Her video gives the best explanation, so do click to see it to get the details!
Here she put them with sashing.
By inserting pink and or blue in almost all the blocks these blocks would look good together!
I used my photo of blocks and made a digital quilt with my five blocks too...!! So far, the green really stands out. I will try to get more of the other colors in too for the remaining blocks.
I am going on a little trip next week, so instead of leaving everything out, will be putting the pieces I have sewn for this project into a box. I hope it will be easy to pull things out again and continue. These two new procedures have made the project fun again for me.
Going to Minneapolis! My first time there. My husband is presenting at the university but I will be free to wander and see the sites. Suggestions welcome!
- She has a large shoe box where she puts all the pieces for this project. Some things are in baggies so they are divided up and easy to see and use.
- She has 4 or 5 blocks done, and has more ready to trim up.
- She used software to take the blocks she had done and place them in to digital quilts.
- Her pieces of fabric end up being 3/4 - 1 inch!
Procedure A:
- Find two longer strips each about 3/4 - 1 inch wide and about the same length. Sew them together and press.
- Find two shorter strips each about 3/4 - 1 inch wide and about the same length. Sew them together and press.
- Place the longer one on the sewing machine so only the two fabrics are under the pressure foot. Then place the other piece at right angle to that and sew only to connect the two pieces. Release the fabric, and trim so the top piece is now even with the one it was sewn on.
- Finger press. Move the fabric so only the new seam is showing, move the longer piece with the sewn piece on it so you can repeat with the next piece of fabric. The distance you move the longer piece will end up being how much of it shows in the new smaller units you are making.
- Finger press and continue.
- While placing the new fabric on top, you can change the direction of the fabric so different colors are against each other, you can also use different pieces of fabric (single or several sewn together).
- When the longer strip is full, then remove the piece. Press the seams so they are flat, then open them and cut apart.
Procedure B:
- Find three different strips of fabric about the same length.
- Press.
- Place one on the machine as usual, then place another at the side - but move the piece of fabric so it is a little crooked. Arrange the fabric so you sew along the edge of the top fabric (that will make it easier to see). Repeat with the next fabric. Use these strip sets using procedure A to get more variety.
So now that I realize the size of things a little better, I have gone thru my pieces and sliced so my fabric is much smaller.
This means there are a lot of seams, so when I'm joining sometimes it has been helpful to put the two pieces to be joined on the cutting mat and to use the rotary cutter to slice bits off. When I'm doing that I am trying to end up with something at least an inch wide.
I press the seam open. I'm not trimming at this point except to place the template down to get the blocks cut. From this piece I got two blocks, and there are several pieces that will be inserted into other units.
Here are my five blocks:
Her video gives the best explanation, so do click to see it to get the details!
Here she put them with sashing.
And she placed them without sashing.
By inserting pink and or blue in almost all the blocks these blocks would look good together!
I used my photo of blocks and made a digital quilt with my five blocks too...!! So far, the green really stands out. I will try to get more of the other colors in too for the remaining blocks.
I am going on a little trip next week, so instead of leaving everything out, will be putting the pieces I have sewn for this project into a box. I hope it will be easy to pull things out again and continue. These two new procedures have made the project fun again for me.
Going to Minneapolis! My first time there. My husband is presenting at the university but I will be free to wander and see the sites. Suggestions welcome!


No comments:
Post a Comment
Feedback is welcome!