Tuesday, July 27, 2010
WSF - FMQ Sampler - Basic Chevron (Beg)
http://freemotionquilting.blogspot.com/2009/09/day-46-basic-chevron.html
I had sort of used this design in my first FMQ quilt, but I had only one column of chevrons.
Before
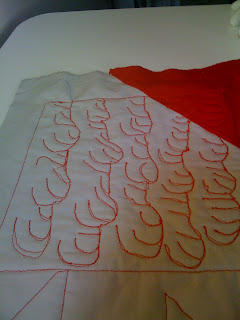
The video is clear. This design is good to do at the end or edge of a quilt as you have to flip the fabric to start the alternating columns of the design. I drew a portion of the design on paper before gong to the machine (one column then did the transition).
After
Man, I’m just not getting this design. I even used soap to draw a line so I would know where the tip was supposed to be. I just could not get a point to show in my sewing. During the second column I was sure the sides were supposed to go up against each other, but in the third I lost confidence and made them go more so they were in between. This pattern seems like it should be easy to do, but I’m having troubles.
I’m not sure how to correct this. Next time I will draw a complete block instead of just the first column and transition. Will be moving on to the next beginning design in the next section of the quilt.
To be clear, this does not look at all like Leah's Chevron. : (
I have now finished the first section of the WSF quilt (there were two shoo fly blocks that were both treated with SITD).
I had sort of used this design in my first FMQ quilt, but I had only one column of chevrons.
Before
The video is clear. This design is good to do at the end or edge of a quilt as you have to flip the fabric to start the alternating columns of the design. I drew a portion of the design on paper before gong to the machine (one column then did the transition).
| Front Basic Chevron |
After
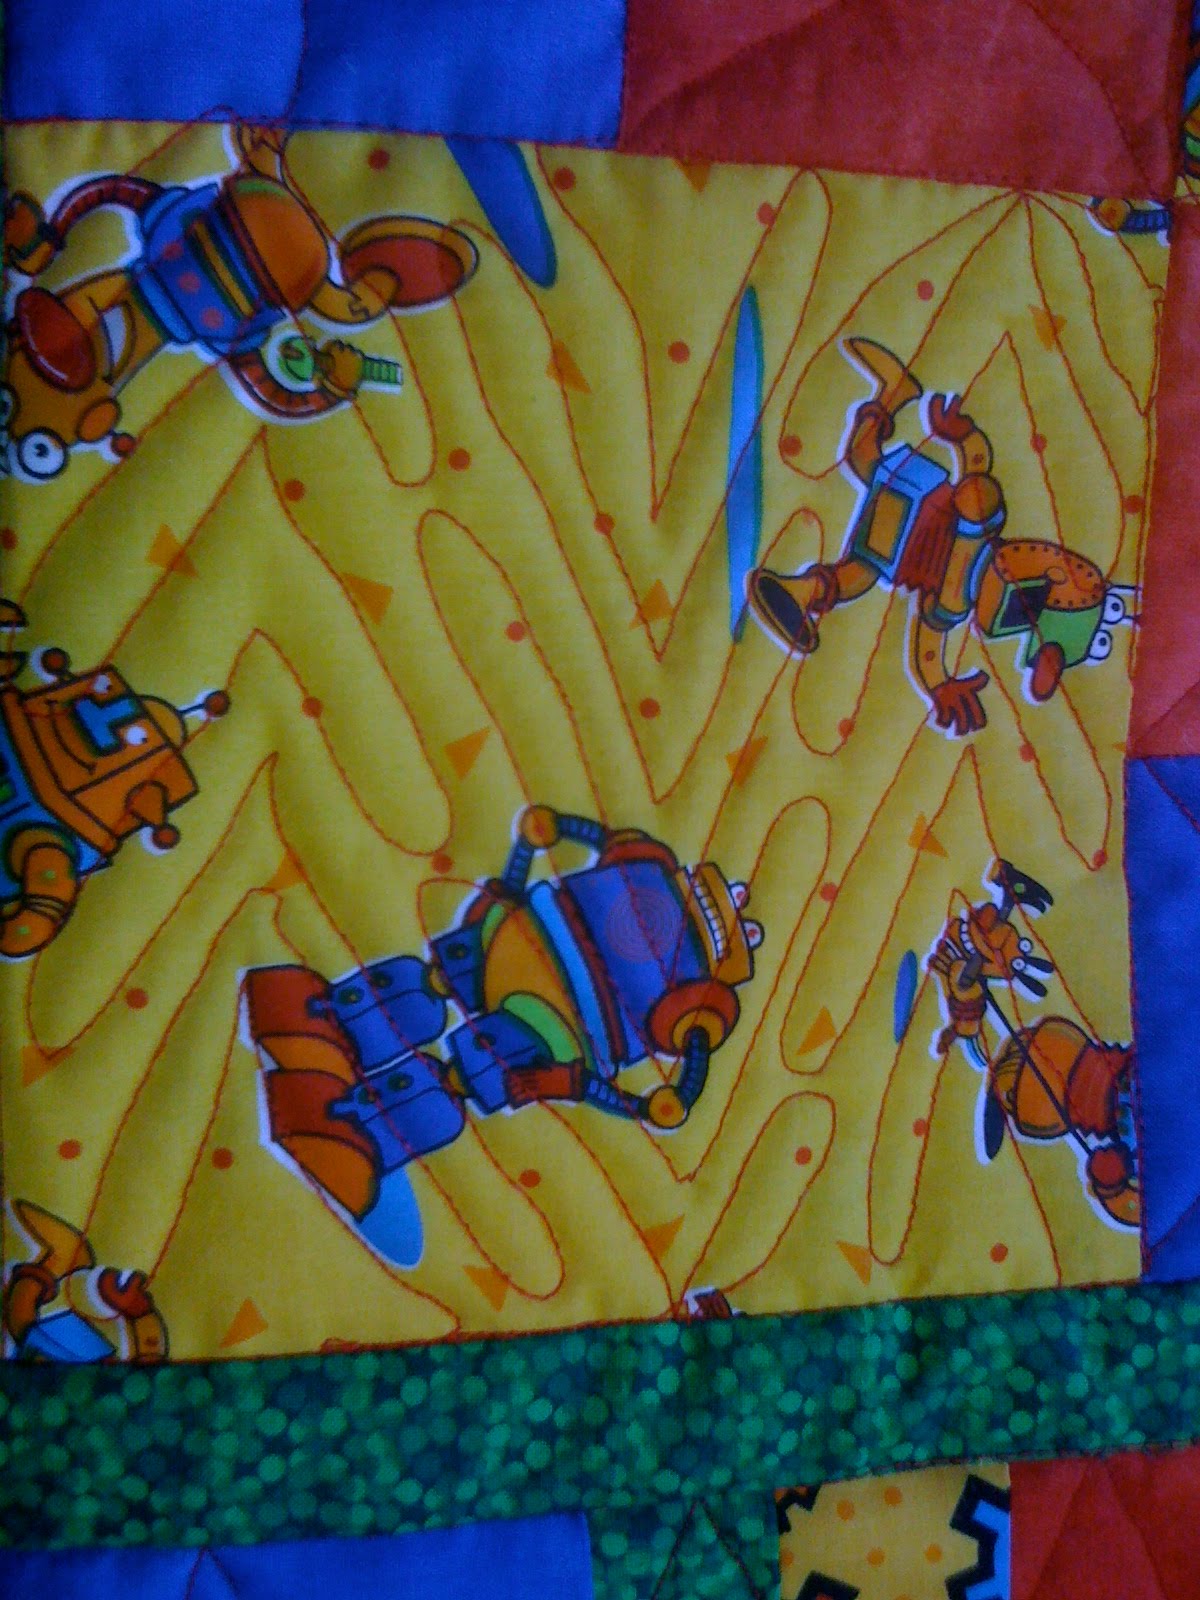
Man, I’m just not getting this design. I even used soap to draw a line so I would know where the tip was supposed to be. I just could not get a point to show in my sewing. During the second column I was sure the sides were supposed to go up against each other, but in the third I lost confidence and made them go more so they were in between. This pattern seems like it should be easy to do, but I’m having troubles.
I’m not sure how to correct this. Next time I will draw a complete block instead of just the first column and transition. Will be moving on to the next beginning design in the next section of the quilt.
| Back Basic Chevron |
I have now finished the first section of the WSF quilt (there were two shoo fly blocks that were both treated with SITD).
Monday, July 26, 2010
WSF- FMQ Sampler - Sea Oats
http://freemotionquilting.blogspot.com/2009/09/day-42-sea-oats.html
Before
This pattern is just like the previous one (Sea Algae) except there is a little loop at the end of each off shoot.
After
My loops are a little stiff looking. Also, I need to work on curving the off shoot. I was so concentrating on the loop and curving the end that I now see that the branches look really straight.
I had to change the bobbin during the last column of this design.
I only made four columns – think I should have done five. And changing the length of the offshoots would make it look more natural.
I also see now that in both this and the previous design I was supposed to have the offshoots all pointing in reverse direction from the question mark ending. Especially with this one I was really working to get the drops so they were all the same - so it's good to have photos to compare! Amazing that I missed this important part of the designs the first time I tried them!
Before
This pattern is just like the previous one (Sea Algae) except there is a little loop at the end of each off shoot.
 |
| Front Sea Oats |
After
My loops are a little stiff looking. Also, I need to work on curving the off shoot. I was so concentrating on the loop and curving the end that I now see that the branches look really straight.
I had to change the bobbin during the last column of this design.
I only made four columns – think I should have done five. And changing the length of the offshoots would make it look more natural.
I also see now that in both this and the previous design I was supposed to have the offshoots all pointing in reverse direction from the question mark ending. Especially with this one I was really working to get the drops so they were all the same - so it's good to have photos to compare! Amazing that I missed this important part of the designs the first time I tried them!
 |
| Back Sea Oats |
WSF Sampler - SITD Shoo Fly
I decided to try just doing stitch in the ditch (SITD)for this block, but it looks awfully plain. I'm hoping that I will appreciate having some blocks that have less quilting and so are softer in the finished product.

B was very confused about the location of my plain blocks and the patterned ones. I could tell from him comments that not having a standard setting might not be his cup of tea. But I’m hoping he will like it once it is done! If not then I’m making a blanket or something for someone else to keep…!


B was very confused about the location of my plain blocks and the patterned ones. I could tell from him comments that not having a standard setting might not be his cup of tea. But I’m hoping he will like it once it is done! If not then I’m making a blanket or something for someone else to keep…!

WSF Sampler - FMQ Sea Algae
http://freemotionquilting.blogspot.com/2009/09/day-41-sea-algae.html
Before Sewing
Watched the video. Since it has been a little while since I have done this, I’m anticipating the curves might be a problem, but maybe not!
The end picture shows the design upside down from how she did the sewing… There is no flipping of fabric so that will make it easier!
Starts with sort of straight line that curves back and forward to the right. Then you go back on that line to the start of the big curve. Go down from that point to make another upside down question mark shape. Once you reach the bottom travel up adding off shoots to the inside of each of the question mark shapes.

After Sewing
Making the upside down question marks were easier than I thought they would be. Traveling on the already stitched lines also didn’t seem as foreign as I thought it would be.
I am working with 8 inch squares so the amount of fabric covered is more than what Leah shows in her videos. I found myself sort of holding the needle while the machine was going and then readjusting where my hands were, so there are globs of thread on the back. I don’t think this is because of the needle or thread or bobbin tension, I think it’s because I’m sewing several stitches while moving my hands. So for the next design I’m going to try to stop the machine with the needle down – then readjust hands.
A bigger issue is that the lines on the bottom do not look the same as the lines on the top. The back has more sort of echoing that shows up as one stitch line on the front. This might be because I removed the pins so they would not catch on the side of the sewing table. So on the next design I will keep more pins in. Since this is a design that is done in a column that will be easy to do I think.
Added: I also see now that in both this and the next design I was supposed to have the offshoots all pointing in reverse direction from the question mark ending. Amazing that I missed this important part of the designs the first time I tried them!

WSF - Preparation
First I taped the back, then the batting then the top to the table... Then I pin basted.
 Then I used a walking foot to sew around each square..
 Then I was ready to start sewing the quilt designs!


Friday, June 18, 2010
FMQ Designs Used in First Quilt - Red - Long Beads
I intended to use a different design in each color - but at the end I saw the long strip of red and I just didn't know what to do. I didn't have control of the fabric at all so I couldn't fathom sewing columns of chevron's there. So instead I just did a long loopy stitch then came back fill it in - like beads...

I was really tired with this effort - pleased but tired. I determined to get new thread - I wanted red as it would stand out - for my second quilt. I also put the quilting aside until the things I ordered from Leah arrived. Having the bobbin glides and gloves really changed things. And I can't imagine sewing with the machine just being on the top of the table now - having it secure in the little desk really helps.

I was really tired with this effort - pleased but tired. I determined to get new thread - I wanted red as it would stand out - for my second quilt. I also put the quilting aside until the things I ordered from Leah arrived. Having the bobbin glides and gloves really changed things. And I can't imagine sewing with the machine just being on the top of the table now - having it secure in the little desk really helps.
FMQ Designs Used in First Quilt - Black and Blue - Stars
For this first quilt I put a different pattern on the different fabrics.
In reading about the fillers I was hearing that densely quilted fabric was sort of hard so for two of the fabrics I put stars.
I used black thread for the black material thinking the stars would poof up - but they didn't. They barely show at all. So when I went to the blue fabric I used beige thread knowing it would show up more.

For some of the stars I used beige in the bobbin - the back was looking pretty awful...

Here though you can see that each fabric had a different design...

This shows the different colors in the bobbin

FMQ Designs Used in First Quilt - Animal Print - Squiggles
Originally I thought I would pick one animal in each block to outline - then I was going to echo around that for the rest of the block. I thought that would make the one animal stand out and be sort of puffy. But when I didn't have any control of the fabric - so I ended up just making squiggles on the blocks. I was so disappointed, I packed up the machine and my stuff and left the workshop early...
I'm so glad I remembered Leah's site and had bookmarked it so I could get back to it easily!
Front - see how long the stitches are? I had no control at all - and really no plan.

Back of an animal square. This is about the fourth one I did - I didn't like the squiggles and was trying to get more control of the fabric. Without gloves this is very hard to do.

Thursday, June 17, 2010
FMQ Designs Used in First Quilt - Red - Basic Chevron
For the first quilt I picked a pattern from Leah's site to try to do. At this point I had not really read the posts about machine quilting - I had tried to do hardwood floors - now I tried the basic chevron design.
I put this in all the places where there was red fabric in the quilt. I was not very confident - was trying to do this without getting the gloves.
Red -
Basic Chevron
http://freemotionquilting.blogspot.com/2009/09/day-46-basic-chevron.html
My fabric was rather narrow so I expanded the design so one column would fit the piece of material.


This shows the back - notice the folded fabric - I didn't pin closely enough when I was basting...

FMQ Designs Used in First Quilt - Tan - Hardwood Floors
For the first quilt I picked a pattern from Leah's site to try to do. At this point I had not really read the posts about machine quilting - I just picked something I thought I could sew - hardwood floors.
I put this in all the places where there was tan fabric in the quilt.
I did my version of hardwood floors but it looks more like bamboo forest in some places...
http://freemotionquilting.blogspot.com/2009/10/day-59-hardwood-floors.html
http://freemotionquilting.blogspot.com/2009/10/day-71-bamboo-forest.html

This is the back of the same design but a different place on the quilt. I think I was afraid to have the 'boards' be so long so I changed the orientation so they could be shorter.

Beginning Free Motion Designs - Links to my Attempts!
Beginning Free Motion Designs
Active Links below go to my versions of the design in one of my projects - the post about my attempt contains a live link to the original, beautiful inspiration on Leah's site. Use the Back button to return to this screen. When there is a photo, double click to see enlarged view.
Leah's challenged herself to design 365 free motion quilting designs. My challenge is to do all the designs she has coded as beginner level.... Here is the list of beginner designs - when I have tried it there will be an active link to click on.... as she adds more beginner designs I will add them to this list too!
1) http://junedodge.blogspot.com/2010/05/day-1-shadow-waves-beg.html (QFK Sampler)
http://freemotionquilting.blogspot.com/2009/08/day-1-shadow-waves.html
2) http://junedodge.blogspot.com/2010/05/henna-floofy.html (QFK Sampler)
http://freemotionquilting.blogspot.com/2009/08/day-9-henna-fooffy.html
3) http://junedodge.blogspot.com/2010/05/free-motion-sampler-sashiko-shell-beg.html (QFK Sampler)
http://freemotionquilting.blogspot.com/2009/08/day-10-sashiko-shell.html
4) http://junedodge.blogspot.com/2010/05/free-motion-sampler-tree-roots-beg.html (QFK Sampler)
http://freemotionquilting.blogspot.com/2009/08/day-12-tree-roots.html
5) http://junedodge.blogspot.com/2010/05/free-motion-sampler-wandering-clover.html (QFK Sampler)
http://freemotionquilting.blogspot.com/2009/08/day-13-wandering-clover.html
6) http://junedodge.blogspot.com/2010/05/free-motion-sampler-flowing-glass-beg.html (QFK Sampler)
http://freemotionquilting.blogspot.com/2009/08/day-15-flowing-glass.html
7) http://junedodge.blogspot.com/2010/05/free-motion-sampler-brain-coral-beg.html (QFK Sampler)
http://freemotionquilting.blogspot.com/2009/08/day-16-brain-coral.html
8) http://junedodge.blogspot.com/2010/05/free-motion-sampler-matrix-beg-requires.html (QFK Sampler)
http://freemotionquilting.blogspot.com/2009/08/day-17-matrix.html
9) http://junedodge.blogspot.com/2010/05/free-motion-sampler-tree-bark-beg.html (QFK Sampler)
http://freemotionquilting.blogspot.com/2009/09/day-20-tree-bark.html
10) http://junedodge.blogspot.com/2010/05/freemotion-sampler-wave-chain-beg.html (QFK Sampler)
http://freemotionquilting.blogspot.com/2009/09/day-21-wave-chain.html
11) http://junedodge.blogspot.com/2010/05/freemotion-sampler-striated-earth-beg.html (QFK Sampler)
http://freemotionquilting.blogspot.com/2009/09/day-23-striated-earth.html
12) http://junedodge.blogspot.com/2010/05/freemotion-sampler-cat-hairball-filler.html (QFK Sampler)
http://freemotionquilting.blogspot.com/2009/09/day-29-cat-hairball-filler.html
13) http://junedodge.blogspot.com/2010/05/freemotion-sampler-trailing-tears-beg.html (QFK Sampler)
http://freemotionquilting.blogspot.com/2009/09/day-30-trailing-tears.html
14) http://junedodge.blogspot.com/2010/05/freemotion-sampler-cartoon-trees-beg.html (QFK Sampler)
http://freemotionquilting.blogspot.com/2009/09/day-31-cartoon-tree.html
15) http://junedodge.blogspot.com/2010/05/freemotion-sampler-mud-flatsbeg.html (QFK Sampler)
http://freemotionquilting.blogspot.com/2009/09/day-34-mud-flats.html
16. http://junedodge.blogspot.com/2010/07/wsf-sampler-fmq-sea-algae.html (WSF Sampler)
http://freemotionquilting.blogspot.com/2009/09/day-41-sea-algae.html
17. http://junedodge.blogspot.com/2010/07/wsf-fmq-sampler-sea-oats.html (WSF Sampler)
http://freemotionquilting.blogspot.com/2009/09/day-42-sea-oats.html
18. http://junedodge.blogspot.com/2010/06/fmq-designs-used-in-first-quilt-red.html (QFK First)
http://junedodge.blogspot.com/2010/07/wsf-fmq-sampler-basic-chevron-beg.html (WSF Sampler)
http://freemotionquilting.blogspot.com/2009/09/day-46-basic-chevron.html NEW
19. http://freemotionquilting.blogspot.com/2009/10/day-50-radio-static.html
20. http://freemotionquilting.blogspot.com/2009/10/day-57-curvy-key.html
21. http://freemotionquilting.blogspot.com/2009/10/day-58-flame-key.html NEW
22. http://junedodge.blogspot.com/2010/06/fmq-designs-used-in-first-quilt-tan.html (QFK Robot)
http://freemotionquilting.blogspot.com/2009/10/day-59-hardwood-floors.html
23. http://freemotionquilting.blogspot.com/2009/10/day-60-spiral-tree.html
24. http://freemotionquilting.blogspot.com/2009/10/day-65-flock-of-geese.html
25. http://freemotionquilting.blogspot.com/2009/10/day-66-dresden-daisies.html
26. http://freemotionquilting.blogspot.com/2009/10/day-71-bamboo-forest.html
27. http://freemotionquilting.blogspot.com/2009/10/day-72-little-hands-and-fingers.html
28. http://freemotionquilting.blogspot.com/2009/10/day-75-alien-fingers.html
29. http://freemotionquilting.blogspot.com/2009/11/day-85-concentric-circles.html
30. http://freemotionquilting.blogspot.com/2009/11/day-88-stomach-lining.html NEW
31. http://freemotionquilting.blogspot.com/2009/11/day-89-oil-slick.html NEW
32. http://freemotionquilting.blogspot.com/2009/11/day-92-leaf-veins.html
33. http://freemotionquilting.blogspot.com/2009/11/day-95-jagged-cosmos.html
34. http://freemotionquilting.blogspot.com/2009/11/day-97-wobbly-cosmos.html
35. http://freemotionquilting.blogspot.com/2009/11/day-98-super-spiral.html
36. http://freemotionquilting.blogspot.com/2009/12/101-heat-coil.html
37. http://freemotionquilting.blogspot.com/2009/12/103-bright-star.html
38. http://freemotionquilting.blogspot.com/2009/12/105-overlapping-arches.html
39. http://freemotionquilting.blogspot.com/2009/12/day-110-modern-art.html
40. http://freemotionquilting.blogspot.com/2010/01/day-112-rainforest-leaf.html
41. http://freemotionquilting.blogspot.com/2010/01/day-115-mesh-curtain.html
42. http://freemotionquilting.blogspot.com/2010/01/day-121-river-path.html
43. http://freemotionquilting.blogspot.com/2010/01/day-124-mario-vine.html
44. http://freemotionquilting.blogspot.com/2010/01/day-125-shoo-fly.html
45. http://freemotionquilting.blogspot.com/2010/02/day-127-lacy-lattice.html
46. http://freemotionquilting.blogspot.com/2010/02/day-128-spiky-vine.html
47. http://freemotionquilting.blogspot.com/2010/02/day-134-left-turn-right-turn.html
48. http://freemotionquilting.blogspot.com/2010/02/day-135-cityscape.html
49. http://freemotionquilting.blogspot.com/2010/03/day-136-curvy-turns.html
50. http://freemotionquilting.blogspot.com/2010/03/day-139-cornstalks.html
51. http://freemotionquilting.blogspot.com/2010/03/day-140-goldilocks.html
52. http://freemotionquilting.blogspot.com/2010/03/day-145-knit-stitch.html
53. http://freemotionquilting.blogspot.com/2010/03/day-152-trailing-spirals.html
54. http://freemotionquilting.blogspot.com/2010/04/day-154-spiral-tulip.html
55. http://freemotionquilting.blogspot.com/2010/04/day-161-loopy-hearts.html
56. http://freemotionquilting.blogspot.com/2010/05/day-171-matrix-rays.html
57. http://freemotionquilting.blogspot.com/2010/05/day-172-spiral-vine.html
58. http://freemotionquilting.blogspot.com/2010/05/day-173-loopy-paisley.html
59. http://freemotionquilting.blogspot.com/2010/05/day-175-loopy-flower.html
60. http://freemotionquilting.blogspot.com/2010/05/day-177-angle-turns.html
61. http://freemotionquilting.blogspot.com/2010/05/day-180-slate-tile.html
62. http://freemotionquilting.blogspot.com/2010/05/day-181-h2o.html
63. http://freemotionquilting.blogspot.com/2010/06/day-189-square-spiral.html
64. http://freemotionquilting.blogspot.com/2010/06/day-194-desert-sand.html
65. http://freemotionquilting.blogspot.com/2010/07/day-203-flowing-lines.html
66. http://freemotionquilting.blogspot.com/2010/07/day-204-spiral-illusion.html
67. missing a pattern?
Wednesday, May 19, 2010
Set Up of Sewing Space for Quilting Project
Inspired by:
http://freemotionquilting.blogspot.com/2009/09/quilting-tools-and-machine-setup.html
The machine is now on the little table I got from Leah. On the machine I have pin holder and cheater needle (also from Leah). On the right side I have a little cup to put the safety pins in - I'm putting them in opened most of the time as that is supposed to save time. Extra bobbins, seam rippers, machine needles, different pressure feet, little brush to catch lint and clean out the bobbin case, pin cushion with straight pins.
I use the straight pins to bring the threads up when starting a new quilting spot. I have the scissors on the bed (oh I'm sitting on the bed as I sew). I have the gloves on the bed or on my hands. I have larger table behind the little table - it has serger on it that I am using to hold the cone thread. There are also cutting mats and things on the table but they are not needed while quilting. There are testing pieces of batting wrapped in material to test machine.
The iron and ironing board are on the right - only used for pressing the binding before it was sewn.
Need to have a little container for the broken needles - I'm just hoping I caught all the points in the original needle container. Next project I want to have a chair, another little table to the left of the sewing machine table, a trash can, and little container for the broken needles. Also, perhaps put the pressure feet in a little container.
There is not as much getting up while quilting - if I can perfect the space then I'll be set!
Free Motion Sampler - Binding
This morning I put the binding on. I used the self-binding method as Quilts for Kids listed it as one of the options.
http://www.quiltmag.com/resources/quilt99-self-binding-your-quilt/
The backing was cut wider than the quilt so after quilting I sewed 1/4 inch from the edge. Then I cut the top and batting to that edge, leaving the backing so it was wider. Then I used ruler and cutting mat to cut that so it was just 1 inch all around. I pressed back to the cut line and at the sewing machine, turned the fabric over and sewed it down. What a difference!
I made up name labels and put them on the backs: June's 1st Quilt and June's Quilting Sampler!
I put both charity quilts in the washer and dryer - am so pleased with how soft they feel now and that the stitches stayed in! In Leah's blog she has mentioned how her show quilts are so filled with stitches that they are like cardboard - my stitching wasn't the same size so it worked out.
Bernie is already asking me what I'm going to do now for a project that stays here. He put a request in for thicker batting and has again said how he likes the blue, green, purple blocks that I won (but he hasn't been able to see the new wonky fly blocks as they are in envelopes still!) I'm sure he'll like them too! I'll pull them out for another design floor photo. My dilemma will be not just the setting but the quilting - but what fun!
I need to figure out a way to make the corners of the self-binding binding look better on my next quilts – but I’m very pleased with these two quilts now.
I know I’m behind with mailing them to quiltsforkids.org – But there is a Super Saturday class the last weekend in May so I'm thinking I'm going to wait to mail these in until after I can show them off in class!


Tuesday, May 18, 2010
Freemotion Sampler - Borders and Changes in Blocks


I decided to leave the 1 inch border without any quilting – and in the 3 inch outer border I put simple points – so it sort of looked like fringe – before I put the binding on that is!
I decided to remove all the cat fur ball quilting – and redid that block – and I added more points to the tree branch square so it looks better. Using the seam ripper really was a good decision - the change changed it from something I was just going to send off and hope it would be useful to something I'm proud of. So one ah ha moment is that it's better to go ahead and do a project as with each attempt one gets more comfortable with the process - but if it's not going well to undo and redo....
Freemotion Sampler - Alternating Blocks
I finished the larger blocks in the quilt – in the smaller boxes of the alternate blocks I decided to do stitch in the ditch and then to make a line from each of the the points – so it looks like a floating square. This way I hope the quilt will not be hard for the child.

 Now I thinking what I’m going to do in the borders – I’m leaning toward something that is not done densely as I want the quilts to be comfortable for the child in the hospital.


Saturday, May 15, 2010
Freemotion Sampler - Mud Flats(Beg)
http://freemotionquilting.blogspot.com/2009/09/day-34-mud-flats.html
The video did not show the flipping of the fabric – but it’s required so makes it harder to with a quilt – especially when you have the thread situation I do – cobbled together using a serger in the background. I did a better job of getting the points at the bottom than I did with Cartoon Trees.


The video did not show the flipping of the fabric – but it’s required so makes it harder to with a quilt – especially when you have the thread situation I do – cobbled together using a serger in the background. I did a better job of getting the points at the bottom than I did with Cartoon Trees.

Freemotion Sampler - Cartoon Trees (Beg)
http://freemotionquilting.blogspot.com/2009/09/day-31-cartoon-tree.html
Before Sewing:
Good contrast in the video and direction.
Involves flipping the fabric so that makes it harder for a beginner to do with an actual quilt!
After Sewing:
It was hard to get the points pointy on both the branches and the bottom.


Freemotion Sampler - Trailing Tears (Beg) requires flipping fabric
http://freemotionquilting.blogspot.com/2009/09/day-30-trailing-tears.html
Before Sewing:
This one looks easy to do – but it involves flipping the quilt around so that makes it a little harder.
After Sewing:
The pattern was pretty easy to do after all – I’m near the side of the quilt so I could flip it. That serger is grabbing the quilt so so need to rethink how I have things set up. It’s a nice looking pattern. I don’t quite understand how it could be used in 2.5 inch sashing though…. Would be nice to see a sample.


Freemotion Sampler - Cat Hairball Filler (Beg) Ugh
http://freemotionquilting.blogspot.com/2009/09/day-29-cat-hairball-filler.html
Before sewing:
The video is clear and there is contrast between the fabric and thread.
This pattern does not require flipping the quilt so that’s good. I’m going to watch the next pattern before going to the sewing room… maybe I can do two squares this morning!
After Sewing:
Ugh! It must have been me moving the fabric too quickly and perhaps the fabric was catching on the serger that I have the cone thread on - but my stitches were way too big – so I had to go back over the pattern with smaller stitches to try and save the project so it can still be used by QuiltsforKids.org. It really looks a mess – I don’t like doing this design.
Added later:
When I was doing the alternating blocks I went back and ripped out the stitching in this block - then I put it back in. The design is still not attractive - perhaps it's okay if your thread and fabric are the same color!
This is what was removed....

This is the final version...


Friday, May 14, 2010
Freemotion Sampler - Striated Earth (Beg) - perhaps should be beg/intermediate
http://freemotionquilting.blogspot.com/2009/09/day-23-striated-earth.html
Before sewing notes:
The video is easy to follow - nice contrast to the thread and fabric. Refers back to another pattern that was coded as beginner/intermediate so I skipped it "Etch and Sketch" in my journey thru the free motion patterns. It's a really nice looking pattern so want to try it soon. But first I will do Striated Earth - it's probably easier because there are points for the tips instead of rounded stitching.
Boy the fabric at the back of the sample block makes it really hard to see the stitching!
After sewing notes:
Okay, I did a variation of this filler - I got so involved that I forgot to make it so there were two points in each row. My version has more curved lines and they almost alternate lines instead of meeting in the middle. It's an okay result.
I think this one should also have been coded beginner immediate as it was hard to get the lines in rows….
I have four blocks left in the 5 inch squares in this quiltsforkids project. Then I need to figure what to put in the smaller squares and borders! I'm thinking for softness sake that I will do something that is not as close together as the ones I'm doing now…

